Group: Johnson & Johnson

Catalog excerpts

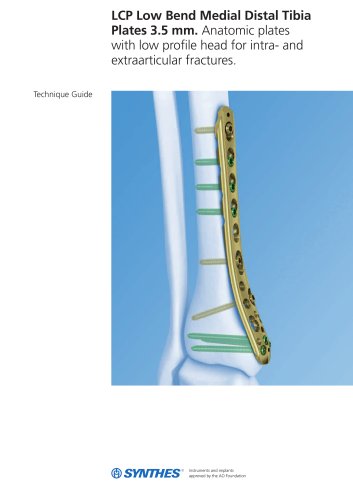
0x6.001.024_AA 13.10.09 10:05 Seite Cvr1 LCP Percutaneous Aiming System 3.5 for PHILOS. For less invasive surgery at the proximal humerus. Technique Guide
Open the catalog to page 1
0x6.001.024_AA 13.10.09 10:05 Seite 1 Table of Contents Product Information 2 4 Patient Positioning and Approach 5 Implantation Surgical Technique LCP Percutaneous Aiming System 3.5 for Philos AO Principles Introduction 6 Implants 22 Instruments 23 Sets 26 Bibliography 28 Image intensier control Warning This description alone does not provide sufficient background for direct use of the product. Instruction by a surgeon experienced in handling this product is highly recommended. Reprocessing, Care and Maintenance of Synthes Instruments For general guidelines, function control and dismantling...
Open the catalog to page 3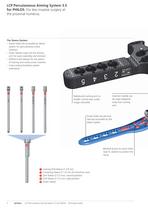
0x6.001.024_AA 13.10.09 10:05 Seite 2 LCP Percutaneous Aiming System 3.5 for PHILOS. For less invasive surgery at the proximal humerus. The Sleeve System – Screw holes are accessible by sleeve system for percutaneous screw insertion – Outer sleeves snap into the aiming arm for quick assembly and removal – Different drill sleeves for the option of locking and cortex screw insertion – Color-coding facilitates system orientation ᕡ ᕢ ᕣ ᕤ Insertion handle can be used independently from aiming arm Radiolucent aiming arm to enable control view under image intensifier Screw holes are percutaneously...
Open the catalog to page 4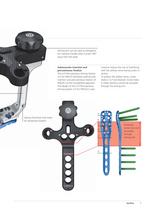
0x6.001.024_AA 13.10.09 10:05 Seite 3 Aiming arm can be used as elongation for insertion handle when turned 180° away from the plate Submuscular insertion and percutaneous fixation The LCP Percutaneous Aiming System 3.5 for PHILOS facilitates submuscular insertion and percutaneous fixation of PHILOS via the transdeltoid approach. The design of the LCP Percutaneous Aiming System 3.5 for PHILOS is opti- mized to reduce the risk of interfering with the axillary nerve during screw insertion. To protect the axillary nerve, screw levels C to F are blocked. Screw holes in these sections cannot be...
Open the catalog to page 5
0x6.001.024_AA 13.10.09 10:05 Seite 4 AO Principles In 1958, the AO formulated four basic principles, which have become the guidelines for internal fixation.1, 2 Those principles as applied to the LCP Percutaneous Aiming System 3.5 for PHILOS are: Anatomic reduction The precontoured plate facilitates restoration of the humeral head and the reduction of the metaphyseal segments to the diaphysis. Stable fixation Locking screws with optimized angles create a fixed-angle construct, providing angular stability. Preservation of blood supply The LCP Percutaneous Aiming System for PHILOS simplifies...
Open the catalog to page 6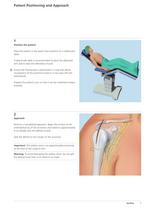
0x6.001.024_AA 13.10.09 10:05 Seite 5 Patient Positioning and Approach 1 Position the patient Place the patient in the beach chair position on a radiolucent table. A lateral side table is recommended to place the abducted arm and to relax the deltoideus muscle. Ensure the fluoroscope is positioned in a way that allows visualization of the proximal humerus in two axes (AP and lateral/axial). Prepare the patient’s arm so that it can be mobilized intraoperatively. 2 Approach Perform a transdeltoid approach. Begin the incision at the anterolateral tip of the acromion and extend it approximately...
Open the catalog to page 7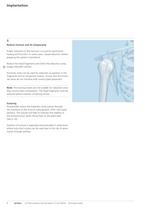
0x6.001.024_AA 13.10.09 10:05 Seite 6 Implantation 1 Reduce fracture and fix temporarily Proper reduction of the fracture is crucial for good bone healing and function. In some cases, closed reduction before prepping the patient is beneficial. Reduce the head fragments and check the reduction using image intensifier control. Kirschner wires can be used for reduction as joysticks in the fragments and for temporary fixation. Ensure that the Kirschner wires do not interfere with correct plate placement. Note: The locking screws are not suitable for reduction since they cannot exert...
Open the catalog to page 8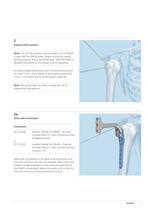
0x6.001.024_AA 13.10.09 10:05 Seite 7 2 Prepare plate position Note: The LCP Percutaneous Aiming System 3.5 for PHILOS is used with the PHILOS plate. Please consult the surgical technique guide “Philos and Philos long” (036.000.166) for detailed information on the implant and its indications. For optimal plate positioning, insert two positioning Kirschner wires 2 mm – 4 mm lateral to the bicipital groove and 5 mm – 7 mm below the tip of the greater tubercule. Note: Placing the plate too high increases the risk of subacromial impingement. 2a Alternative technique Instrument 03.122.006 or...
Open the catalog to page 9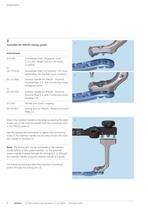
0x6.001.024_AA 13.10.09 10:05 Seite 8 Implantation 3 1 Assemble the PHILOS aiming system Instruments 314.550 or 03.113.019 03.122.006 or 03.122.035 Screwdriver Shaft, hexagonal, small, л 2.5 mm, length 165 mm, for Quick Coupling Screwdriver Shaft 3.5 Stardrive, T15, long, self-holding, for AO/ASIF Quick Coupling 2 Insertion Handle for PHILOS – Proximal Humeral Plate 3.5, with Connecting Screw, hexagonal socket Insertion Handle for PHILOS – Proximal Humeral Plate 3.5, with Connecting Screw, Stardrive T15 311.431 Handle with Quick Coupling 03.122.007 Aiming Arm for PHILOS – Proximal Humeral...
Open the catalog to page 10
0x6.001.024_AA 13.10.09 10:05 Seite 9 4 Insert plate Slide the plate into the subdeltoid space and along the bone. Always keep the plate in contact with bone. Warning: Do not injure the axillary nerve. The axillary nerve can be palpated at the lower margin of the incision. Note: Do not use the insertion handle and the plate for soft tissue retraction or for release or dissection of the deltoid insertion. Synthes 9
Open the catalog to page 11
0x6.001.024_AA 13.10.09 10:05 Seite 10 Implantation 5 Position and align plate Instruments 03.113.009 Outer Sleeve for percutaneous LCP Aiming Instruments 3.5 03.113.022 Centering Sleeve, percutaneous, for Kirschner Wire л 1.6 mm 02.113.001 Kirschner Wire л 1.6 mm, with drill tip, length 200 mm, Stainless Steel Position the plate between the positioning Kirschner wires described in step 2. Ensure the plate shaft is aligned with the bone. The plate can be provisionally fixed to the bone using the Kirschner wire holes in the aiming device (or a centering sleeve). Insert the Kirschner wires...
Open the catalog to page 12All Depuy Synthes catalogs and technical brochures
-
 ZERO-P NATURAL™PLATE
5 Pages
-
 2.0 mm LCP® Distal Ulna Plate
20 Pages
-
 SYNFLATE SYSTEM
3 Pages
-
 2.4 mm VA LCP™
4 Pages
-
 Building on Success
16 Pages
-
 HEALIX ADVANCE
4 Pages
-
 RADIUS OF CURVATURE
3 Pages
-
 Introducing The Variable Angle
12 Pages
-
 HEALIX Anchor™ 3.4 mm
2 Pages
-
 Small Battery Drive II
4 Pages
-
 HEALIX ADVANCE
4 Pages
-
 3.5 mm LCP™ Medial
15 Pages
-
 Titanium Sternal Fixation System
34 Pages
-
 MatrixRIB®FixationSystem
86 Pages
-
 Mandible Trauma Solutions
2 Pages
-
 Power line II
4 Pages
-
 Concorde
28 Pages
-
 LCP Intercarpal
31 Pages
-
 LCS® COMPLETE™
2 Pages
-
 Synthes TPLO.
8 Pages
-
 SynFix-LR System
56 Pages
-
 ATB Anterior Tension Band Plate
32 Pages
-
 CONDUIT™
15 Pages
-
 Brochure_FINAL
2 Pages
-
 DePuy Synthes
81 Pages
-
 Anspach
3 Pages
-
 Orthopedic Foot Instruments
32 Pages
-
 PINNACLE® Hip Solutions
12 Pages
-
 Corail
24 Pages
-
 S-ROM® NOILES™
68 Pages
-
 TRI-LOCK® Product Rationale
12 Pages
-
 Reclaim Surgical Technique
44 Pages
-
 Speed
Speed2 Pages
-
 attune
80 Pages
-
 HAMMERLOCK® 2
2 Pages
-
 DePuy Glenoid Solutions
2 Pages
-
 Trauma Solutions. Elbow
4 Pages
-
 Polar
Polar4 Pages
-
 Alveolar Distractor.
4 Pages
-
 Piezoelectric System
4 Pages
-
 Air Power Line II
6 Pages
-
 LCP Clavicle Hook Plate
4 Pages
-
 TruMatch Pin Guides
16 Pages
-
 P F N A
8 Pages
-
 SKILL, DEDICATION,
16 Pages
-
 Orthopaedics. Overview
20 Pages
-
 DURALOC
16 Pages
-
 Marathon Cemented Cup
20 Pages
-
 REEF Surgical Technique
16 Pages
-
 MatrixNEURO
8 Pages
-
 Anspach XMax
4 Pages
-
 Anspach eMax 2 Plus
4 Pages
-
 Small Electric Drive
4 Pages
-
 Air Pen Drive
4 Pages
-
 Colibri II
4 Pages
-
 Spine
Spine25 Pages
-
 Expert Hindfoot Arthrodesis Nail
48 Pages
-
 LCP Distal Fibula Plates
32 Pages
-
 TomoFix
60 Pages
-
 Expert Tibial Nail PROtect
16 Pages
-
 Expert Tibia Nail
84 Pages
-
 Sacral Bars
16 Pages
-
 Pelvic C-Clamp
20 Pages
-
 Low Profile Pelvic System
16 Pages
-
 Proximal Femoral (Hook) Plate
24 Pages
-
 LCP
LCP24 Pages
-
 PFNA
PFNA112 Pages
-
 HCS 1.5, 2.4, 3.0
36 Pages
-
 LCP Wrist Fusion
32 Pages
-
 LCP Compact Hand
28 Pages
-
 VA-LCP Elbow
48 Pages
-
 Distal Radius
44 Pages
-
 Olecranon
30 Pages
-
 LCP Hook Plate
28 Pages
-
 DHP & Olecranon
4 Pages
-
 LCP S-A
4 Pages
-
 Epoca
Epoca4 Pages
-
 MultiLoc
68 Pages