
Catalog excerpts

CALCANEUS SCREW emergency team for broken bones®
Open the catalog to page 1
• aterial of screws: TiAL6V4 ELI M • asier removal of implant after fracture has healed E • mproved fatigue strength of implant I • educed risk of inflammation and allergy R • uter diameter 7.3 mm O • engths: L 50 - 90 mm in 5 mm steps • Ø 3.2 mm Guide Wire applicable • elfcutting & seldfdrilling S CALCANEUS SCREW emergency team for broken bones® Indications • omplex fractures of the C calcaneus selfcutting & seldfdrilling Contraindications • ll serious general diseases A • oft-tissue situation at risk from S infection • iological age > 70 B • eripheral occlusive disease P •...
Open the catalog to page 2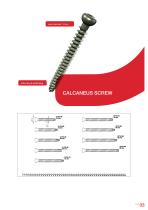
selfcutting & seldfdrilling CALCANEUS SCREW
Open the catalog to page 3
CALCANEUS SCREW emergency team for broken bones® Calcaneus Distractor & Heel Press Calcaneus Distractor & Heel Press Through small incisions, transversally from the lateral, Ø 3.2 mm Kirschner wires are inserted into the neck of the talus and the tubelar part of the calcaneus. One of the distracters is inserted on the lateral end of the wires. It should be 20 millimetres far from the epidermis. The threaded bar of the distractor points towards the proximal on the lateral side of the foot, and the driving disc of the distractor is placed similarly on the medial, but the threaded rod is on...
Open the catalog to page 4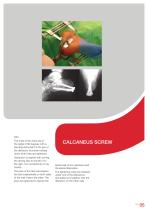
side. The ends of the wires are at the angle of 90 degrees with a bending instrument at the jaw of the distractor to prevent sliding down when they are tightened. Distraction is started with turning the driving disc to the left or to the right. It is monitored by X-ray screen. The jaws of the heel compressor are laid longitudinally on both sides of the heel, below the ankle. The jaws are tightened to repone the CALCANEUS SCREW lateral wall of the calcaneus and the lateral dislocation. The tightening wires are sheared under one of the distractors and pulled out together with the distractor...
Open the catalog to page 5
Time of operation Immediately after injury or 3 to 5 days afterwards at the latest at best. Position during operation Anaesthetic and side position so that the injured foot can lie flat at the top of the foot and the uninjured leg can be bent at the knee. The injured leg is positioned in such a way that it can be moved. This ensures that both a lateral and a broden projection can be carried out using the image converter. CALCANEUS SCREW emergency team for broken bones® After washing and covering, a 3 mm drill wire is inserted into the tuber calcanei and talus using the image converter. A...
Open the catalog to page 6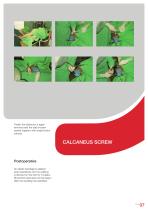
Finally, the distractor is again removed and the stab incision sewed together with single button sutures. CALCANEUS SCREW Postoperative An elastic bandage is applied post-operatively, and no walking is allowed on the foot for 8 weeks. Movement exercises can be begun after the swelling has subsided.
Open the catalog to page 7
Calcaneus Screw CALCANEUS SCREW emergency team for broken bones® Cancellous Screw, Cannulated, D=7.3mm, L=50mm, Full Thread Cancellous Screw, Cannulated, D=7.3mm, L=55mm, Full Thread Cancellous Screw, Cannulated, D=7.3mm, L=60mm, Full Thread Cancellous Screw, Cannulated, D=7.3mm, L=65mm, Full Thread Cancellous Screw, Cannulated, D=7.3mm, L=70mm, Full Thread Cancellous Screw, Cannulated, D=7.3mm, L=75mm, Full Thread Cancellous Screw, Cannulated, D=7.3mm, L=80mm, Full Thread Cancellous Screw, Cannulated, D=7.3mm, L=85mm, Full Thread Cancellous Screw, Cannulated, D=7.3mm, L=90mm, Full Thread...
Open the catalog to page 8
Calcaneus Distractor & Heel Press CALCANEUS SCREW Calcaneus Distractor Heel Press Guide Wire, Steel, D=3.2mm, L=228mm Bending Device Sterilization Tray, Distractor, Heel Press
Open the catalog to page 9
Chemical process - anodization in a strong alkaline solution * Type III anodization Dotize Type II anodization Different colors Film become an interstitial part of the titanium Implant surface remains sensitive to: Chipping Peeling Discoloration No visible cosmetical effect Anodization Type II leads to following benefits * • • • • • • • • Oxygen and silicon absorbing conversion layer Decrease in protein adsorption Closing of micro pores and micro cracks Reduced risk of inflammation and allergy Hardened titanium surface Reduced tendency of cold welding of titanium implants Increased fatigue...
Open the catalog to page 10
Sterilization Guidelines The following remarks should serve as a guideline in the sterilization of medical products. IMPORTANT INDICATIONS FOR DOCTORS AND OPERATING THEATRE PERSONNEL This instruction leaflet refers to all supplied nonsterile implants and all reusable instruments from I.T.S. GmbH. Detailed information for the identification of the product (such as system classification, cat. no.) can be found in the product identification code and/ or on the package label. Make sure that you are familiar with the possibilities of application, combinability and correct handling of the...
Open the catalog to page 12
Sterilization Guidelines Disinfection Equipment: Commercially available disinfectants authorized for use with medical products e.g.. MEDICLEAN FORTE) can be used (but only according to the instructions of the disinfectant producer). In the case of automatic cleaning, a final rinse cycle at 90 °C for 5 minutes can be finally carried out to provide thermal disinfection. Drying Drying as part of the cleaning/ disinfection cycle should not exceed 110 °C. Checking, Maintenance and Inspection • Each instrument or implant is to be inspected carefully to make sure that all visible dirt has been...
Open the catalog to page 13
I.T.S. GmbH part of the MED-HOLD GROUP Autal 28, 8301 Lassnitzhöhe Austria © I.T.S. GmbH Graz/Austria 2011. Subject to technical alterations, errors and misprints excepted.
Open the catalog to page 16All I.T.S. catalogs and technical brochures
-
 ufs
ufs1 Pages
-
 DHL
DHL2 Pages
-
 ITS
ITS2 Pages
-
 PHL
PHL24 Pages
-
 ACLS
ACLS20 Pages
-
 CFN
CFN32 Pages
-
 OLS
OLS24 Pages
-
 PHLs
PHLs20 Pages
-
 CTN - Cannulated Tibia Nail
28 Pages
-
 SR Sacral Rods
20 Pages
-
 HCS
HCS24 Pages
-
 TOS Twist-Off Screw
20 Pages
-
 TLS
TLS20 Pages
-
 PRS-RX
32 Pages
-
 HLS
HLS20 Pages
-
 ES
ES20 Pages
-
 SR
SR20 Pages
-
 FL
FL24 Pages
-
 PL - Pilon Locking Plate small
12 Pages
-
 OL - Olecranon Locking Plate
24 Pages
-
 CAS
CAS40 Pages
-
 FCN
FCN20 Pages
-
 HOL
HOL24 Pages
-
 FLS
FLS24 Pages
-
 PFL
PFL20 Pages
-
 DTL
DTL24 Pages
-
 HTO
HTO24 Pages
-
 PTL
PTL32 Pages
-
 DFL
DFL32 Pages
-
 SCL
SCL32 Pages
-
 SLS
SLS24 Pages
-
 CAL
CAL20 Pages
-
 DUL
DUL24 Pages
-
 CLS
CLS28 Pages


