Catalog excerpts

MEDICAL FITNESS Lojer Pulleys Operating and maintenance manual Käyttö-ja huoltoohje Bruks- och underhållsanvisning Bedienungs-und wartungsanleitung
Open the catalog to page 1
Laitteen malli/Model of the device ___________________________________________ Sarjanumero(Serial number of the device ______________________________________ Your local dealer__________________________________________________________
Open the catalog to page 2
Lojer Pulley ja Vertical pull Operating and maintenance manual
Open the catalog to page 3
Read the instructions fully before using the device.
Open the catalog to page 4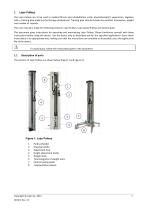
Lojer Pulleys The Lojer Pulleys are to be used in medical fitness and rehabilitation under physiotherapist’s supervision, together with a training plan made by the therapy professional. Training plan should include the method, accessories, weight and number of repeats. This user manual is made for following products: Lojer Pulleys, Lojer Speed Pulleys and vertical pulls. This document gives instructions for operating and maintaining Lojer Pulleys. Please familiarise yourself with these instructions before using the device. Use the device only as described and for the specified applications....
Open the catalog to page 5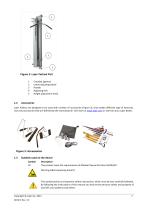
Crossbar (gantry) Lower adjusting wheel Handle Adjusting fork Height adjustment knob Lojer Pulleys are designed to be used with number of accessories (Figure 3), that enable different type of exercises. Use only accessories that are defined by the manufacturer. See more at www.lojer.com or ask from your Lojer dealer. Symbols used on the device Symbol CE Description This product meet the requirements of Medical Device Directive 93/42/EEC Warning label (squeezing hazard) This symbol points out important safety instructions, which must be very carefully followed. By following the instructions...
Open the catalog to page 6
Introduction Inspection upon delivery Before the device is taken into use, check that the packaging is intact and that it has not been damaged during transportation. Please notify the transport company and the supplier of any transit damage within two (2) days of receiving the delivery. Ensure that the delivery contains all the parts detailed in the delivery note. If there is anything missing from the delivery consignment, please contact the supplier immediately. The device can be stored at a temperature of -10...+60 °C. The permitted humidity is 30...75 %. Before use Remove all the bands...
Open the catalog to page 7
Installing the Mobile Pulley Assemble the mobile section to the Speed Pulley (Figure 4) with supports and screws exactly to vertically position in case the delivery occurs separately. Lift the pulley to the mobile stand Screw M8X20 (4) both sides Screw the back bracket on M6X20 with washers (4). Make sure the pulley is in straight line. Figure 4: Installing the mobile pulley Installing the Vertical Pull Fix the Vertical Pull against a solid wall that can stand the utilization of the device. The Vertical Pull must be installed exactly vertically (when looked at both from the side and from...
Open the catalog to page 8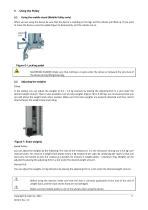
Using the mobile stand (Mobile Pulley only) When you are using the device be sure that the device is standing on the legs and the wheels are lifted up. If you want to move the device, press the pedal (Figure 6) downwards, and the wheels are on. Figure 6: Locking pedal SQUEEZING HAZARD! Make sure that nothing is or gets under the device or between the structure of the device during lifting/lowering. Pulley: In the pulleys you can adjust the weights at 0,5 – 1,0 kg intervals by placing the adjusting fork in a slot under the desired weight amount. There is also available a set of extra weights...
Open the catalog to page 9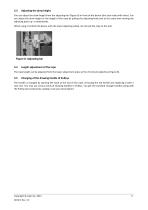
Adjusting the draw height You can adjust the draw height from the adjusting bar (Figure 8) in front of the device (the clear tube with holes). You can adjust the draw height or the length of the rope by pulling the adjusting knob and at the same time moving the adjusting parts up- or downwards. When using a Vertical Pull device with the lower adjusting wheel, do not pull the rope to the side. Length adjustment of the rope The rope length can be adjusted from the lower adjustment piece at the chromium plated bar (Figure 8). Changing of the drawing handle of Pulleys The handle is changed by...
Open the catalog to page 10
Before cleaning remove all accessories. Clean stains as soon as possible. In order to keep the surfaces in good condition do the cleaning regularly. Do cleaning/disinfectant always between patients. Do more thorough cleaning once a month. Follow the cleaning/disinfecting instructions given by the respective facility. Metal and plastic surfaces Clean the metal and plastic surfaces and with a damp cloth and weak alkaline cleaning fluid. Use small brush for corners and other difficult spots. Rinse with clean water and dry carefully after cleaning. Do not use excessive fluids. Use disinfectant...
Open the catalog to page 11
Maintenance Only trained person may carry out service and repair. Maintenance carried out by an authorized person may cause injury or damage to the device which the manufacturer is not responsible for. All service and repair operations must be documented. Daily measures Inspect all ropes, straps and their connections. Do not use if the component is found worn or damaged. Biannual and annual measures Lubricate the slide bars (25 mm barrels, in encased models inside the case) of the weight stack approximately every six months. For example, use WD-40 spray lubricant. Check also the condition...
Open the catalog to page 12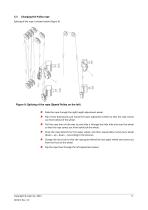
Changing the Pulley rope Splicing of the rope is shown below (Figure 9). Figure 9: Splicing of the rope (Speed Pulley on the left) Slide the rope through the right height adjustment wheel. Slip it then downwards and round the lower adjustment wheel so that the rope comes out from behind of the wheel. Pull the rope then all the way up and slide it through the little hole and over the wheel so that the rope comes out from behind of the wheel. Draw the rope behind the first upper wheel, and then sequentially round every wheel (down – up – down …) according to the pictures. Change the last...
Open the catalog to page 13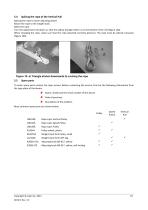
Splicing the rope of the Vertical Pull Splicing the rope to lower adjusting wheel: Attach the rope to the weight stack. Splice the rope. Turn the adjustment roll down so, that the yellow triangle sticker is on the bottom of the roll (Figure 10a). When changing the rope, make sure that the rope attached correctly (picture). The rope must be spliced crosswise (Figure 10b). Figure 10: a) Triangle sticker downwards b) Locking the rope Spare parts To order spare parts contact the Lojer service. Before contacting the service, find out the following information from the type plate of the device....
Open the catalog to page 14All Lojer catalogs and technical brochures
-
 Capre E2 Examination table
2 Pages
-
 Lojer Medical Wellness Catalogue
48 Pages
-
 Operating table accessories
48 Pages
-
 Showering Furniture
2 Pages
-
 Capre FX
2 Pages
-
 Delta Treatment Tables
2 Pages
-
 Bobath Mat Table
2 Pages
-
 NOVA Bed Side Locker
2 Pages
-
 Capre Medical Chair
2 Pages
-
 Afia 4060-4062
2 Pages
-
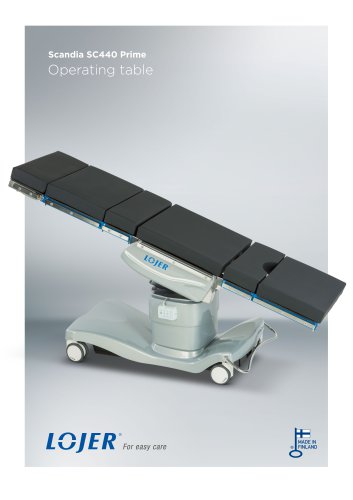 Scandia SC440 Prime
20 Pages
-
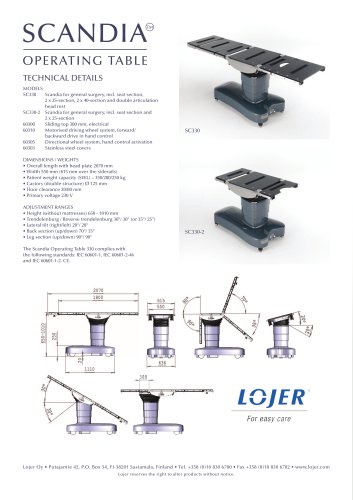
 Scandia SC330
12 Pages
-
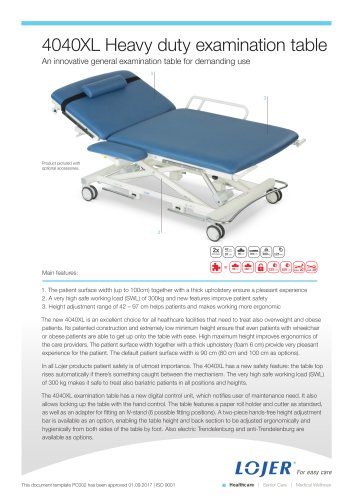 4040XL
2 Pages
-
 ScanAfia X ICU W
2 Pages
-
 ScanAfia XS/XTK
2 Pages


Archived catalogs
-
 Scandia SC330 Brochure
12 Pages
-
 Capre MC Medical Chair
2 Pages
-
 Scandia SC330
12 Pages
-
 Scandia operating table
12 Pages
-
 BedSide Lockers
2 Pages
-
 Lojer Scandia 310H
2 Pages
-
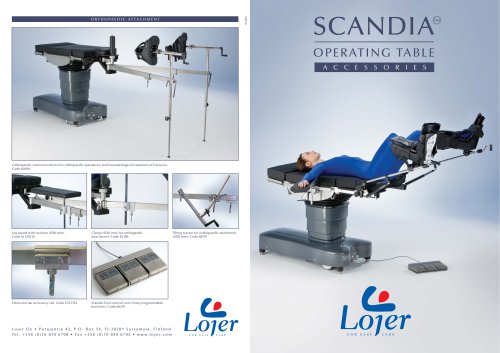 Scandia_accessories
4 Pages
-
 Capre MCRC
2 Pages
-
 Scandia330
6 Pages