
Catalog excerpts

HD camera recorder Book
Open the catalog to page 1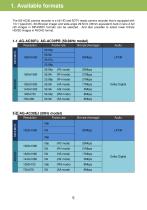
The AG-AC30 camera recorder is a full HD and SDTV ready camera recorder that is equipped with 1/3.1 type(inch), 60.3M pixel imager and wide-angle 29.5mm (35mm equivalent) built-in lens A full HD images in MP4/MOV formats can be selected. And also possible to select lower bitrate HD/SD images in AVCHD format.
Open the catalog to page 5
2. Preparation before Shooting
Open the catalog to page 6
2. Preparation before shooting 2-1. Major IN/OUT connectors Image resolution of HDMI and VIDEO OUT signals vary depend on the system settings. See P.43 for the details. Battery charge indicator 12V DC IN (Capable of battery charge) Headphones out (Ø3.5mm stereo mini jack) Wired remote terminals Analog audio & video out USB2.0 DEVICE terminal (Type micro-B connector) For connection between a computer USB2.0 HOST terminal (Type-A connector) For external storage device connection. HDMI output (Type-A connector)
Open the catalog to page 7
2. Preparation before shooting 2-2. Record mode settings Set the resolution and frame-rate, etc. with MENU > “SYSTEM MODE” where the following menu items are available. MENU > SYSTEM MODE - REC MODE : MOV, MP4 or AVCHD - REC FORMAT: Choose a combination of the number of pixels and bitrate (see P.4) 2-3. Audio input settings The AG-AC30 can handle up to 2 channels of audio and record them. 1. Set CH SELECT switches (A) for audio source selection (built-in MIC / external) 2. When external input is chosen, set attenuation type (LINE, MIC) and phantom powering option with INPUT1/2 switches (B)....
Open the catalog to page 8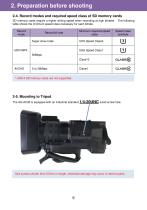
2-4. Record modes and required speed class of SD memory cards SD memory cards require a higher writing speed when recording at high bitrates. The following table shows the minimum speed class necessary for each bitrate. Record mode * UHS-II SD memory cards are not supported. Use screws shorter than 5.5mm in length, otherwise damage may occur to internal parts.
Open the catalog to page 9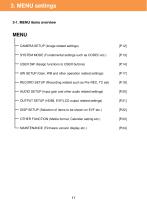
3-1. MENU items overview MENU CAMERA SETUP (Image related settings) SYSTEM MODE (Fundamental settings such as CODEC etc.) USER SW (Assign functions to USER buttons) SW SETUP (Gain, WB and other operation related settings) RECORD SETUP (Recording related such as Pre-REC, TC set) AUDIO SETUP (Input gain and other audio related settings) OUTPUT SETUP (HDMI, EVF/LCD output related settings) DISP SETUP (Selection of items to be shown on EVF etc.) OTHER FUNCTION (Media format, Calendar setting etc.) MAINTENANCE (Firmware version display etc.)
Open the catalog to page 11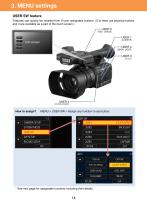
3. MENU settings USER SW feature Features can quickly be recalled from 9 user assignable buttons. (5 of them are physical buttons and 4 are available as a part of the touch screen.) USER 5 (REC CHECK) USER 2 (BACK LIGHT) USER 4 (FOCUS ASSIST) MENU > USER SW > Assign any function to any button. * See next page for assignable functions including their details.
Open the catalog to page 14
USER SW The following table shows all functions that can
Open the catalog to page 15
USER SW <continued> The following table shows all functions that can be assigned to the USER buttons.
Open the catalog to page 16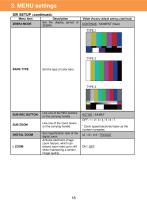
3. MENU settings SW SETUP Menu item ZEBRA MODE Description Set the display period of ZEBRA. Value (Factory default setting underlined) CONTINUE / MOMENT (5sec) TYPE 1 BARS TYPE Set the type of color bars. Use one of the REC buttons on the carrying handle. Use one of the zoom levers on the carrying handle. DIGITAL ZOOM Set magnification ratio of the digital zoom. Activate electronic image zoom feature, which can extend zoom ratio up to x40 while maintaining a certain image quality. * Zoom speed becomes faster as the number increases. x2 / x5 / x10 / TOGGLE
Open the catalog to page 18
4. Understanding advanced features
Open the catalog to page 25
4. Understanding advanced features 4-1. Understanding Focus assist features How to use 1. Set the FOCUS mode to MANUAL. 2. Press the FOCUS ASSIST button located at the left side of the unit or assign the FOCUS ASSIST function to any assignable USER buttons. (MENU > USER SW > any USER button number : FOCUS ASSIST1 or FOCUS ASSIST2) FOCUS ASSIST button 3. Choose assist type to be recalled with the USER button. (MENU > SW SETUP > FOCUS ASSIST1 or 2: EXPAND / PEAKING / BOTH) Part of image can be magnified from 3 to 10 times. The position to be magnified can be specified by tapping the touch...
Open the catalog to page 26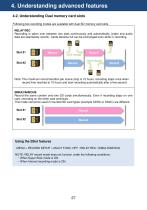
4. Understanding advanced features 4-2. Understanding Dual memory card slots Following two recording modes are available with dual SD memory card slots. RELAY REC Recording is taken over between two slots continuously and automatically (video and audio data are seamlessly record). Cards became full can be exchanged even while in recording. Card change Card change Note: The maximum record duration per scene (clip) is 10 hours, recording stops once when record time reached at 10 hours and start recording automatically after a few second. SIMULTANEOUS Record the same content onto two SD cards...
Open the catalog to page 27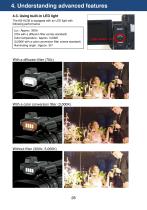
4. Understanding advanced features 4-3. Using built-in LED light The AG-AC30 is equipped with an LED light with following performance Lux : Approx. 300lx (70lx with a diffusion filter comes standard) Color temperature : Approx. 5,000K (3,000K with a color conversion filter comes standard) Illuminating angle : Approx. 30° With a diffusion filter (70lx) With a color conversion filter (3,000K) Light switch
Open the catalog to page 28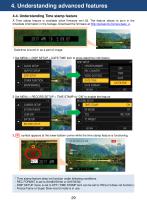
4. Understanding advanced features 4-4. Understanding Time stamp feature A Time stamp feature is available since firmware ver1.03. The feature allows to burn in the time/date information in the footage. Download the firmware at http://panasonic.biz/sav/pass_e. Date/time is burnt-in as a part of image. 1. Set MENU > DISP SETUP > DATE/TIME item to show date/time information. 2. Set MENU > RECORD SETUP > TIME STAMP to “ON” to enable the feature. 3. R symbol appears at the lower-bottom corner while the time stamp feature is functioning. * Time stamp feature does not function under following...
Open the catalog to page 29
5. Understanding CAMERA SETUP operations
Open the catalog to page 30
5. Understanding CAMERA SETUP operations 5-1. Expressing the texture of objects (detail enhancement) When expressing the outline or surface texture of an object, faint reflection of light may be intensified or, to the contrary, the picture may look blurred. This is a phenomenon caused by the strength / weakness of Detail signal to intensify the video signal for the object’s outline. Adjustment of Detail signal can make the object’s luster or texture look more natural. SHARPNESS +5
Open the catalog to page 31All I-Pro catalogs and technical brochures
-
 The 4K 4MOS solution
2 Pages
-
 AG-MDR25 and AG-MDC20
6 Pages
-
 Industrial Medical Vision
12 Pages
-
 4K Micro Camera Brochure
4 Pages
-
 4K OEM Brochure GP-UH532
2 Pages
-
 POVCAM Brochure IMV
3 Pages
-
 Lineup
76 Pages
-
 AG-AC30
4 Pages
-
 EVA1 book
92 Pages
-
 EVA1
EVA120 Pages
-
 VariCam lineup
20 Pages
-
 VariCam LT
8 Pages


Archived catalogs
-
 GP-MH310
2 Pages
-
 MODULE CAMERA LINE UP
4 Pages