Group: Stryker

Catalog excerpts

Operative Technique
Open the catalog to page 1
Gamma3 System Gamma3 Contributing Surgeons: Prof. Kwok Sui Leung, M. D. Dr.med.Bernhard Karich Chairman of Department of Orthopaedics and Traumatology The Chinese University of Hong Kong Prince of Wales Hospital Hong Kong Head of the Trauma Department Heinrich-Braun-Hospital, Zwickau Germany Dr. Gilbert Taglang All surgeons, who supported the idea of the U-Blade Lag Screw for the treatment of proximal femur fractures. Head of the Trauma Department Center for Traumatology, Strasbourg France Prof. Dr. med. Volker Bühren Chief of Surgical Services Medical Director of Murnau Trauma Center,...
Open the catalog to page 2
Fig. 1a: Gamma3 RC Lag Screw Set assembled and spreaded Gamma3 RC Lag Screw Set features a combination of a standard Gamma Lag Screw and a spreading U-Clip. They are designed for use with the Gamma3 Trochanteric (Fig. 2) and Gamma3 Long Nails. The insertion procedure of the Gamma3 RC Lag Screw is similar to the standard Gamma3 Lag Screw. Insertion of the Gamma3 RC U-Clip into the Gamma3 RC Lag Screw is done by sliding the U-Clip into the two grooves of the lag screw and inserted fully without any hammering. Fig. 2: Gamma3 RC Lag Screw Set in the Gamma3 Trochanteric Nail 180
Open the catalog to page 4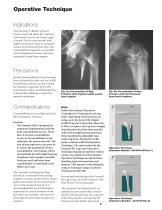
Operative Technique Indications The Gamma3 U-Blade Lag Screw may be used with either the Gamma3 Trochanteric Nail or the Long Length Gamma3 Nail to treat patients with highly osteoporotic bone or metastatic disease in the femoral head, short femoral head/neck fragments, or unstable intertrochanteric fractures with missing medial-caudal bone support. Contraindications are medial neck and sub-trochanteric fractures. Caution: The Gamma Nail is designed for temporary implantation until the bone consolidation occurs. Therefore, if no bone consolidation occurs or if consolidation is not...
Open the catalog to page 5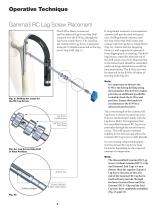
Operative Technique Gamma3 RC Lag Screw Placement The K-Wire Sleeve is removed and the adjusted Lag Screw Step Drill is passed over the K-Wire, through the Lag Screw Guide Sleeve. The canal for the Gamma3 RC Lag Screw is prepared using the T-Handle connected to the Lag Screw Step Drill (Fig. 3). If exceptional resistance is encountered, a power drill may be used with great care. Drilling should continue until the stop of the Step Drill comes into contact with the Lag Screw Guide Sleeve (Fig. 3a). Ensure that the Targeting Device is well supported to prevent it from slipping back or...
Open the catalog to page 6
Operative Technique Separate the selected Gamma3 RC Lag Screw Set from the End Cap and the Gamma3 RC U-Clip and attach the Gamma3 RC Lag Screw to the Gamma3 RC Lag Screwdriver (Fig. 4b) by turning the end thumbwheel clockwise (Fig. 4). Make sure that the pins of the RC Screwdriver are in the slot of the Gamma3 RC Lag Screw (Fig. 4b). Tighten the thumbwheel. Make sure that the compression wheel of the Lag Screwdriver (Fig. 4a) is positioned closest to the handle. Fig. 4: Assembly of Gamma3 RC Lag Screw and Gamma3 RC Lag Screwdriver The Gamma3 RC Lag Screw CAN NOT be connected to the regular...
Open the catalog to page 7
Operative Technique Gamma3 RC Lag Screw Insertion The RC Lag Screw assembly is now passed over the K-Wire, through the Lag Screw Guide Sleeve, and threaded up to the end of the predrilled hole of the femur head. Check the end position of the RC Lag Screw on the image intensifier. A double check of the end position is also possible with the indicator ring on the RC Lag Screwdriver when it reached the end of the Lag Screw Guide Sleeve. Compression / Apposition If compression or apposition of the fracture gap is required, this can be achieved by gently turning the thumbwheel of the Lag...
Open the catalog to page 8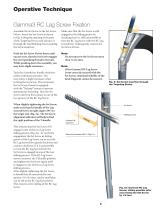
Operative Technique Gamma3 RC Lag Screw Fixation Assemble the Set Screw to the Set Screw Driver. Insert the Set Screw as shown in Fig. 6 along the opening of the post of the Targeting Device and advance it through the Nail Holding Screw pushing the Set Screwdriver. Make sure that the Set Screw is still engaged in the sliding groove by checking that it is still not possible to turn the RC Lag Screw with the RC Lag Screwdriver. Subsequently remove the Set Screw Driver. Push the Set Screw Driver down until you are sure, that the Set Screw engages the corresponding thread in the nail. While...
Open the catalog to page 9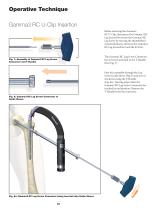
Operative Technique Gamma3 RC U-Clip Insertion Before inserting the Gamma3 RC U-Clip, disconnect the Gamma3 RC Lag Screwdriver from the Gamma3 RC Lag Screw by turning the thumbwheel counterclockwise. Remove the Gamma3 RC Lag Screwdriver and the K-Wire. Fig. 7: Assembly of Gamma3 RC Lag Screw Connector and T-Handle The Gamma3 RC Lag Screw Connector has to be pre-attached to the T-Handle first (Fig. 7). Pass this assembly through the Lag Screw Guide Sleeve (Fig. 8) and turn it clockwise using the T-Handle (Fig. 8a). Turning stops when the Gamma3 RC Lag Screw Connector has reached its end...
Open the catalog to page 10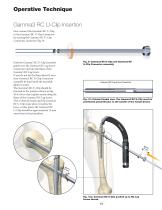
Operative Technique Gamma3 RC U-Clip Insertion Now connect the Gamma3 RC U-Clip to the Gamma3 RC U-Clip Connector by turning the Gamma3 RC U-Clip Connector clockwise (Fig. 9). Fig. 9: Gamma3 RC U-Clip and Gamma3 RC U-Clip Connector assembly Push the Gamma3 RC U-Clip assembly gently over the Gamma3 RC Lag Screw Connector and into the flutes of the Gamma3 RC Lag Screw. If you do not hit the flutes directly turn your Gamma3 RC U-Clip Connector assembly by hand until the assembly glides in easily. The Gamma3 RC U-Clip should be inserted in the position shown in Fig. 10 & 10a so that it glides...
Open the catalog to page 11
Operative Technique Gamma3 RC U-Clip Insertion The Gamma3 RC U-Clip Inserter is required to move the Gamma3 RC U-Clip into its final position. The Gamma3 RC U-Clip will now start to spread to the anterior and posterior side. This procedure requires greater force and cannot be done by hand. Note: Never use a hammer! The Gamma3 RC U-Clip Inserter is designed to provide the force that will bring the Gamma3 RC U-Clip in its final position, by spreading the U-Clip. Fig. 11: RC U-Clip Inserter adapted to RC Lag Screw Connector Position the Gamma3 RC U-Clip Inserter over the Gamma3 RC Lag Screw...
Open the catalog to page 12All Stryker catalogs and technical brochures
-
 VariAx® DistalFibula
20 Pages
-
 ACCOLADE® II
20 Pages
-
 VariAx® 2
20 Pages
-
 TruRize® Clinical Chair
2 Pages
-
 TruRize™ Clinical Chair
4 Pages
-
 Prime TC®
4 Pages
-
 ENT navigation system
7 Pages
-
 Smart Equipment Management
3 Pages
-
 OrthoMap®
4 Pages
-
 AxSOS 3® Titanium
36 Pages
-
 Luxor
Luxor4 Pages
-
 Humeral Nailing System
44 Pages
-
 AVS Anchor® -C
2 Pages
-
 Aviator™
2 Pages
-
 Aero® -C
6 Pages
-
 Stryker Biologics
46 Pages
-
 Escalate®
16 Pages
-
 Dynatran
13 Pages
-
 Reflex®
24 Pages
-
 OASYS®
44 Pages
-
 SurgiCount
4 Pages
-
 Reusable Cuff
2 Pages
-
 Disposable Cuff
2 Pages
-
 SmartPump
2 Pages
-
 Patient Education
2 Pages
-
 Revolution
6 Pages
-
 Cast Vac
2 Pages
-
 Cast Cutter
2 Pages
-
 Stryker NAV3i
4 Pages
-
 S3 MedSurg Bed
8 Pages
-
 Asnis ® Micro Xpress
2 Pages
-
 EasyClip
2 Pages
-
 Universal Neuro III
10 Pages
-
 Right Angled Screwdriver
8 Pages
-
 Neptune E-SEP
2 Pages
-
 Neptune 2
2 Pages
-
 InterPulse - Orthopaedics
4 Pages
-
 Mixevac III
2 Pages
-
 System 7 Family
7 Pages
-
 SDC 3
SDC 32 Pages
-
 SmartTip ™
3 Pages
-
 Label Changes
2 Pages
-
 Gamma3 T
6 Pages
-
 the Mill
2 Pages
-
 CBC II
2 Pages
-
 Scorpio ®Knee TS
6 Pages
-
 GMRS
GMRS13 Pages
-
 trident
12 Pages
-
 Gamma3 Fragment Control Clip
6 Pages
-
 Gamma3 Long Nail R2.0
48 Pages
-
 Gamma3 Trochanteric Nail 180
48 Pages
-
 CD4 & SABO2 Family
5 Pages
-
 System 7 Sterilization Case
2 Pages
-
 System 7 Battery
2 Pages
-
 System 7 Precision
2 Pages
-
 System 7
7 Pages
-
 ACL Instrumentation Brochure
6 Pages
-
 C-Arm T racking System
2 Pages
-
 company overview
12 Pages


