
カタログの抜粋

USER GUIDE PLATINUM SERIES™ Sound Processor
カタログの1ページ目を開く
User Guide for the Platinum Series™ Sound Processor PLATINUM SERIES
カタログの2ページ目を開く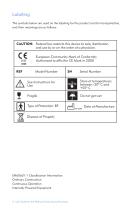
Labeling The symbols below are used on the labeling for the product and for transportation, and their meanings are as follows: CAUTION: ederal law restricts this device to sale, distribution F and use by or on the order of a physician. European Community Mark of Conformity Authorized to affix the CE Mark in 2000 REF Model Number Serial Number Store at temperatures between -20° C and +55° C Type of Protection: BF Dispose of Properly EN60601-1 Classification Information: Ordinary Construction Continuous Operation Internally Powered Equipment 2 User Guide for the Platinum Series Sound Processor
カタログの3ページ目を開く
Table of Contents Platinum Series Sound Processor . . . . . . . . . . . . . . . . . . . . . . . . . . . 5 Program Control . . . . . . . . . . . . . . . . . . . . . . . . . . . . . . . . . . . . . 5 Volume Control . . . . . . . . . . . . . . . . . . . . . . . . . . . . . . . . . . . . . 5 Sensitivity Control . . . . . . . . . . . . . . . . . . . . . . . . . . . . . . . . . . . . 6 Headpiece Jack . . . . . . . . . . . . . . . . . . . . . . . . . . . . . . . . . . . . . 6 Dual Color LED Indicator . . . . . . . . . . . . . . . . . . . . . . . . . . . . . . . . 6 Audible Alarm . . . . . . . . ....
カタログの4ページ目を開く
Table of Figures Figure 1: Platinum Series Sound Processor . . . . . . . . . . . . . . . . . . . . . 5 Headpiece Color Cap Removal Tool. . . . . . . . . . . . . . . . . . . . 10 Removing the Headpiece Color Cap. . . . . . . . . . . . . . . . . . . . 10 Headpiece with Headpiece Clip. . . . . . . . . . . . . . . . . . . . . . 11 Fitting the Headpiece Color Cap. . . . . . . . . . . . . . . . . . . . . . 11 Headpiece with Cable. . . . . . . . . . . . . . . . . . . . . . . . . . . . 13 Battery Release Lever. . . . . . . . . . . . . . . . . . . . . . . . . . . . . 14 Connecting the Power Supply...
カタログの5ページ目を開く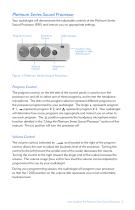
Platinum Series Sound Processor Your audiologist will demonstrate the adjustable controls of the Platinum Series Sound Processor (PSP) and instruct you on appropriate settings. Figure 1: Platinum Series Sound Processor. Program Control The program control, on the left side of the control panel, is used to turn the processor on and off, to select one of three programs, and to test the headpiece microphone. The dots on the program selector represent different programs on the processor programmed by your audiologist. The single • represents program # 1, represents program # 2, and represents...
カタログの6ページ目を開く
Sensitivity Control The sensitivity control indicated by and located to the right of the volume control, determines the quietest level of sound that will be picked up from the environment by the microphone. The sensitivity control is typically set at 12:00 for daily device use. Turning the control to the left decreases the sensitivity so that softer sounds are not picked up by the microphone. This may help eliminate background noise. Turning the control to the right increases the sensitivity so that softer or more distant sounds can be picked up by the microphone. Headpiece Jack The...
カタログの7ページ目を開く
Microphone/System Status When the battery and lock sequences are complete, microphone and system status can be verified. The green LED indicator will flicker in response to loud sounds presented near the microphone verifying that the microphone is receiving sound, that data is being transmitted to the implant, and that the processor is receiving information back from the implant. Increasing the sensitivity will cause the green LED to flash in response to softer sounds, while decreasing the sensitivity will require more intense sounds for the LED to react. The green light is not expected to...
カタログの8ページ目を開く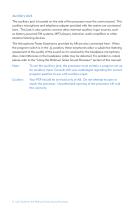
Auxiliary Jack The auxiliary jack is located on the side of the processor near the control panel. The auxiliary microphone and telephone adapter provided with the system are connected here. This jack is also used to connect other external auditory input sources, such as battery-powered FM systems, MP3 players, television audio amplifiers or other assistive listening devices. The Microphone Tester Earphones provided by AB are also connected here. When the program switch is in the position, these earphones allow a subjective listening assessment of the quality of the sound as it is received...
カタログの9ページ目を開く
Headpiece & Cable Single-Unit Headpiece The single-unit headpiece integrates the system’s microphone and transmitter in an attractive headpiece, which is easily worn directly over the implant. Two different headpieces are available for use with the processor depending on your implant type. A “flat bottom” style headpiece is used with the Clarion 1.0, 1.2 and CII Bionic Ear cochlear implants because these have a flat surface ceramic casing. A “curved bottom” style headpiece is used with the HiRes 90K® implant. The curved headpiece is designed to conform more comfortably to the shape of this...
カタログの10ページ目を開く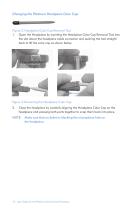
Changing the Platinum Headpiece Color Cap: Figure 2: Headpiece Color Cap Removal Tool. Open the Headpiece by inserting the Headpiece Color Cap Removal Tool into 1. the slot above the headpiece cable connector and pushing the tool straight back to lift the color cap as shown below. Figure 3: Removing the Headpiece Color Cap. Close the headpiece by carefully aligning the Headpiece Color Cap on the 2. headpiece and pressing both parts together to snap them back into place. Make sure that no debris is blocking the microphone hole on NOTE: the headpiece. 10 User Guide for the Platinum Series...
カタログの11ページ目を開く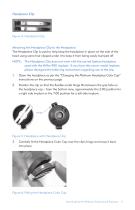
Headpiece Clip Figure 4: Headpiece Clip. Attaching the Headpiece Clip to the Headpiece: The Headpiece Clip is used to help keep the headpiece in place on the side of the head using some hair clipped under it to keep it from being easily bumped off. NOTE : The Headpiece Clip does not work with the curved bottom headpiece used with the HiRes 90K implant. If you have this newer model implant, please disregard the following instructions regarding use of the clip. Open the headpiece as per the “Changing the Platinum Headpiece Color Cap” 1. instructions on the previous page. Position the clip so...
カタログの12ページ目を開くカタログアーカイブ
-
 Naída CI Q30
386 ページ
-
 Naída CI Q90
392 ページ
-
 Naída CI Q70
67 ページ
-
 Naida CI Q70
18 ページ
-
 Advanced Bionics
12 ページ
-
 hear your world
44 ページ
-
 hear your best
20 ページ
-
 USER GUIDE HARMONY®
54 ページ
-
 SOUND SOLUTIONS
6 ページ
-
 NEPTUNE User Guide
54 ページ
-
 Products & Accessories
42 ページ
-
 AquaCase
12 ページ
-
 Neptune_Wearing
16 ページ
-
 Hear Your Best brochure
32 ページ
-
 HiRes 90K Implant Family
40 ページ
-
 Neptune Brochure
6 ページ
-
 Product Catalog
32 ページ


