
カタログの抜粋
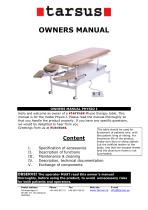
OWNERS MANUAL OWNERS MANUAL PHYSIO I Hello and welcome as owner of a Physio therapy table. This manual is for the model Physio I. Please read the manual thoroughly so that you handle the product properly. If you have any specific questions, we would be delighted to hear from you. Greetings from us at . The table should be used for treatment of patients only, with the patient lying or sitting. For maximum life of the product, make sure that no sharp objects cut the artificial leather of the pads, and that the wooden sheets and the aluminum frame is not overloaded. Specification of accessories Description of functions Maintenance & cleaning Description, technical documentation Exchange of components OBSERVE! The operator MUST read this owner’s manual thoroughly, before using the product, to avoid unnecessary risks for both patients and operators. Postal address Myrängsvägen 8 SE-891 50 Örnsköldsvik SWEDEN
カタログの1ページ目を開く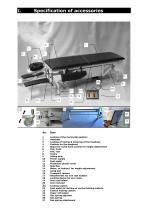
Locking of the horizontal position Headrest Locking of raising & lowering of the headrest Cushion for the headrest Space for extra hand control for height adjustment Pad, front Pad, rear Frame Lifting bow Power supply Feet pedal Protective plastic cover Side flap Motor, or hydraul, for height adjustment Lying pad Transport castors Attachments for arm rest holders Locking device for arm rests Arm rest holder Arm rest pad Locking castors Foot pedal for locking of central locking castors Central locking castors Paper roll holder Gas spring adjuster Gas spring Gas spring attachment
カタログの2ページ目を開く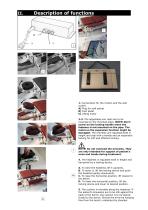
1. Connections for the motors and the wall socket. A) Plug for wall socket B) Foot pedal C) Lifting motor 2-3. The adjustable arm rests are to be mounted on the chromed pipes. NOTE! Don’t screw on the locking handle when the fastener is not mounted on the pipe. The metal on the expansion function might be damaged. The armrests are regulated both in height and side with a handle and an expansion locking for soft and efficient locking. NOTE! Do not overload the armrests. They are only intended for support of patient’s arms and hands during treatment. 4. The headrest is regulated both in...
カタログの3ページ目を開く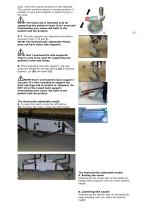
joint, move the cushion forward on the headrest. The cushion could be placed in reverse position, if needed, to give extra support to patient lying on the back. NOTE! The head rest is intended only for supporting the patient’s head. Don’t overload! Overloading may cause risk both to the patient and the product. 6-7. The side supports are adjusted according to pictures 6 and 7, (A and B). NOTE! The hydraulically adjustable Physio does not have these side supports. NOTE! Don’t overload the side supports! They’re only to be used for supporting the patient’s arms and hands. 8. When adjusting...
カタログの4ページ目を開く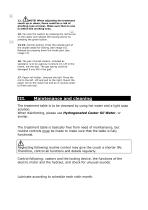
11 NOTE! When adjusting the treatment 12. couch up or down, there could be a risk of pinching (see arrows). Make sure that no one is within the working area. 13. You lock the castors by pressing the red button on the castor and release the locking device by pressing the green button. 14-15. Central-locking. Press the outside part of the double pedal for locking (see image 16). Release by pressing down the inside part (see image 17). 16. The pair of small castors, included as standard, is to be used as in picture 16. Lift in the frame, not the pad. The gas spring could be damaged if you lift...
カタログの5ページ目を開く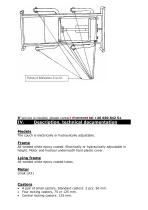
If service is needed, please contact Description, technical documentation The couch is electrically or hydraulically adjustable. All-welded white epoxy coated. Electrically or hydraulically adjustable in height. Motor and hydraul underneath hard plastic cover. Lying frame All-welded white epoxy coated tubes. A pair of small castors. Standard castors: 2 pcs. 50 mm. Four locking castors, 75 or 125 mm. Central locking castors: 125
カタログの6ページ目を開く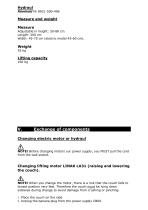
Measure and weight Measure Adjustable in height: 50-88 cm. Length: 200 cm Width: 45-70 cm (electric model 45-60 cm). Changing electric motor or hydraul NOTE! Before changing motors our power supply, you MUST pull the cord from the wall socket. Changing lifting motor LINAK LA31 (raising and lowering the couch). NOTE! When you change the motor, there is a risk that the couch falls to lowest position very fast. Therefore the couch must be lying down sidewise during change to avoid damage from crushing or pinching. 1. Place the couch on the side. 2. Unplug the banana plug from the power supply...
カタログの7ページ目を開く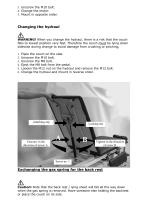
3. Unscrew the M10 bolt. 4. Change the motor. 5. Mount in opposite order. WARNING! When you change the hydraul, there is a risk that the couch falls to lowest position very fast. Therefore the couch must be lying down sidewise during change to avoid damage from crushing or pinching. 1. 2. 3. 4. 5. 6. Place the couch on the side. Unscrew the M10 bolt. Unscrew the M8 bolt. Eject the M8 bolt from the pedal. Loosen the M12 nut on the hydraul and remove the M12 bolt. Change the hydraul and mount in reverse order. Unscrew in the direction of arrow A. Tighten in the direction of arrow B....
カタログの8ページ目を開く
A) Loosen and remove screw no. 1 B) Loosen the locking nut and twist the gas spring (the black part) leftwise and remove it from the tube. C) Mount the new gas spring into the attaching cap. Note that the gas spring must be fully tightened and locked with the locking nut for the handle to be able to maneuver the gas spring. D) Screw on screw no. 1. E) DONE!
カタログの9ページ目を開くTarsusのすべてのカタログと技術パンフレット
-
Ultrasound table
1 ページ
-
Physiotherapy tables
1 ページ
-
Chassis
14 ページ
-
Portable tables
12 ページ
-
Accessories - Physio
1 ページ
-
IV Stands
1 ページ
-
Chassis
1 ページ
-
Steering handle
1 ページ
-
Violetta
2 ページ
-
Combi-Gynaecology
1 ページ
-
Chiropody chair
1 ページ
-
X-ray Table
1 ページ
-
Examination Table
4 ページ
-
Blood Sample Chairs
1 ページ
カタログアーカイブ
-
Chassis
1 ページ


