- Catalogs
- Ackermann Instrumente
- USER MANUAL 16-2017PAL / NTSC
USER MANUAL 16-2017PAL / NTSC
1 /19Pages

USER MANUAL 16-2017PAL / NTSC
1 /19Pages
Catalog excerpts

USER MANUAL 16-2017PAL / NTSC CCD MONO CAMERA
Open the catalog to page 1
USER MANUAL 16-2017PAL / NTSC Rev. 03/2017 These operating instructions contain information that is subject to copyright. All rights are reserved. This manual should not be photo-copied, duplicated on microfilm or otherwise copied or distributed, completely or in part, without the approval of the manufacturer. The manufacturer will appreciate any errors or anything unclear in this operating manual being pointed out to us by users of our products. Due to the continuing progress and development of our products, we reserve all rights for technical alterations. Rev. 03/2017 SERVICE ADDRESS: Ackermann...
Open the catalog to page 2
USER MANUAL 16-2017PAL / NTSC Rev. 03/2017 7. OPERATION IN AUTOMATIC MODE 8. OPERATION IN MANUAL MODE 9. DESCRIPTION OF THE FRONT AND BACK PANEL 10 PROCEDURE FOR DISINFECTING THE SENSOR
Open the catalog to page 3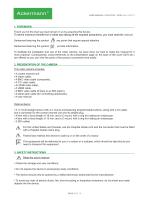
USER MANUAL 16-2017PAL / NTSC Rev. 03/2017 1. FOREWORD Thank you for the trust you have shown in us by acquiring this device. To derive maximum benefit from it whilst also taking all the requisite precautions, you must read this manual. Sentences featuring the symbol are points that require special attention. Sentences featuring the symbol provide information. To facilitate the installation and use of the video camera, we have done our best to make the manual for it more practical. Consequently, cross-references to the presentation page on the back of the cover ([D1] etc.) are offered so you...
Open the catalog to page 4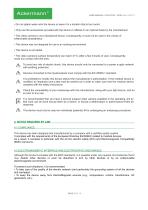
USER MANUAL 16-2017PAL / NTSC Rev. 03/2017 • Do not splash water onto the device or leave it in a location that is too humid; • Only use the accessories provided with the device or offered on an optional basis by the manufacturer; • This video camera is not a flameproof device. Consequently, it must not be used in the vicinity of inflammable anaesthetics. • This device was not designed for use in an ionising environment. • This device is not sterile. • The video camera’s surface temperature can reach 41°C (after a few minutes of use). Consequently, avoid any contact with this area. To avoid any...
Open the catalog to page 5
USER MANUAL 16-2017PAL / NTSC Rev. 03/2017 4.3 MATERIO-VIGILANCE Like any medical system, this device is subject to the provisions pertaining to a materio vigilance; any serious disfunction must therefore be promptly notified to the competent authorities and the manufacturer with the greatest possible precision. Address of the manufacturer: see on the second page Caution: Federal law restricts this device to sale by or on the order of a Physician This camera is intended to be used by qualified physicians in general and plastic surgery to provide access, illumination and allow observation or manipulation...
Open the catalog to page 6
USER MANUAL 16-2017PAL / NTSC Rev. 03/2017 It is prohibited to carry out a surgical operation with the USB2 output; a video output must be connected to the monitor. Only the EMPIA2820 driver should be installed for the video camera’s USB2 output. (The driver is available with the CD delivered.) Then it will be possible to check that the video camera is operating properly and in particular to make sure that the monitor’s settings are completely satisfactory: when you disconnect the sensor, a bar test pattern will appear (except on the USB outlet [C5]). Before fitting an endoscope (or a fibrescope)...
Open the catalog to page 7
USER MANUAL 16-2017PAL / NTSC Rev. 03/2017 You should carry out the following steps: • Once the video camera is connected to the endoscope, the ambient light is reduced to a minimum, and the light source is active, film a white surface. • Activate the white balance; the message “Balance In Progress” will appear on the OLED screen of the control channel unit, or 4 white squares will appear on-screen. • Continue to film the white surface until the “Balance In Progress” message on the OLED screen of the control channel unit disappears, or until the 4 white squares disappear. • At the end of the...
Open the catalog to page 8
USER MANUAL 16-2017PAL / NTSC Rev. 03/2017 • Semi-Rigid • Flexible • User’s choice 8.2 WHITE BALANCING There are two ways of initiating the white balance. 1. From the control channel unit, by pressing the wheel when the AWB white balance icon is selected. 2. From the wheel [S3] on the pendular sensor of the button [S7] from the straight sensor. You should carry out the following steps: • Once the video camera is connected to the endoscope, the ambient light is reduced to a minimum, and the light source is active, film a white surface. • Activate the white balance; the message “Balance In Progress”...
Open the catalog to page 9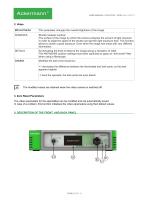
USER MANUAL 16-2017PAL / NTSC Rev. 03/2017 This parameter changes the overall brightness of the image. Shutter analysis window: The surface of the image by which the camera analyzes the amount of light received, in order to adapt the speed of the shutter and get the right exposure time. This function allows to obtain a good exposure. Even when the image has areas with very different illumination. Accentuating the level of detail of the image giving a sensation of relief. The ANTIMOIRE position settings have been optimized to apply an "anti-moiré" filter when using a fibroscope. Modifies the dark...
Open the catalog to page 10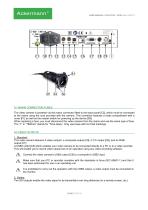
USER MANUAL 16-2017PAL / NTSC Rev. 03/2017 9.1 MAINS CONNECTOR/ FUSES The video camera is powered via the mains connector fitted to the back panel [C2], which must be connected to the mains using the cord provided with the camera. This connector features a fuses compartment with a cover [F1] as well as the master switch for powering up the device [S9]. When replacing a fuse, you must disconnect the video camera from the mains and use the same type of fuse. The “T” in “T800mA” stands for “Time-delay”. Only use fuses with UL/CSA markings. 9.2 VIDEO OUTPUTS 1. Standard: This video camera features...
Open the catalog to page 11
USER MANUAL 16-2017PAL / NTSC Rev. 03/2017 9.3 PERIPHERAL OUTPUT A peripheral output [C6] enables print-outs, screen shots, etc. via a 3.5 mm stereo jack cable, using the control wheel on the sensor. A "p" will be displayed on the screen when this function is activated from the head of the video camera. First of all, you have to configure the activation of this output via the Tool menu (cf. section 8.3). Devices connected to the "VIDEO OUT" and "PERIPHERAL" sockets must comply with the IEC 60950 standard. 9.4 INDICATIONS AND SYMBOLS ON THE BACK PANEL The indications and symbols on the back panel...
Open the catalog to page 12All Ackermann Instrumente catalogs and technical brochures
 USER MANUAL 16-2018PAL / NTSC
15 Pages
 Ackermann ©
52 Pages
 ACKERMANN EUROPCLIP
2 Pages

- Hosley medical trolley
- Hospital trolley
- Surgery forceps
- Grasping forceps
- Trolley with tray
- Surgery electrode
- Stainless steel forceps
- Electrosurgical electrode
- Surgical system
- Straight forceps
- Medical endoscope
- Reusable forceps
- Equipment trolley
- Cutting electrosurgical system
- Coagulation electrosurgical unit
- Endoscopy forceps
- Monopolar electrode
- Interbody fusion cage
- CMOS camera
- Camera with USB port