- Catalogs
- Ackermann Instrumente
- USER MANUAL 16-2018PAL / NTSC
USER MANUAL 16-2018PAL / NTSC
1 /15Pages

USER MANUAL 16-2018PAL / NTSC
1 /15Pages
Catalog excerpts

USER MANUAL 16-2018PAL / NTSC FULL HD CAMERA
Open the catalog to page 1
USER MANUAL 16-2018PAL / NTSC Rev. 07/2016 These operating instructions contain information that is subject to copyright. All rights are reserved. This manual should not be photo-copied, duplicated on microfilm or otherwise copied or distributed, completely or in part, without the approval of the manufacturer. The manufacturer will appreciate any errors or anything unclear in this operating manual being pointed out to us by users of our products. Due to the continuing progress and development of our products, we reserve all rights for technical alterations. Rev. 07/2016 SERVICE ADDRESS: Ackermann...
Open the catalog to page 2
USER MANUAL 16-2018PAL / NTSC Rev. 07/2016 4. REGULATORY RECOMMENDATION 4.1 CONFORMITY 4.2.ELECTROMAGNETIC INTERFERENCE & ELECTROSTATIC DISCHARGES 4.3 MATERIO-VIGILANCE 4.4 END OF LIFE 5. INSTALLATION 5.1 CONNECTION OF THE FRONT PANEL 5.2 50 / 60 HZ 5.3 STARTING 6. USER ADJUSTMENT 6.1 WHITE BALANCE / AWB [S2] 6.2 FOCUS 6.3 FUNCTIONING OF THE MENUS 6.4 APPLICATION FIELD MENU [S3] 6.5 VIDEO PARAMETERS MENU [S4] 6.6 OPTION MENU [S5] 6.7 TEXT GENERATOR [S9] 7. DESCRIPTION OF THE FRONT AND BACK PANEL 7.1 MAINS PLUG 7.2 VIDEO OUTPUTS 7.3 PS2-KEYBOARD 7.4 PERIPHERAL OUTPUTS 7.5 IDENTIFICATION AND SYMBOLS...
Open the catalog to page 3
USER MANUAL 16-2018PAL / NTSC Rev. 07/2016 1. INTRODUCTION Thank you for your confidence in us proven by the purchase of this device. To take full advantage and comply with all necessary precautions, you should carefully read this manual and be well acquainted with its contents. To facilitate the installation and the use of the camera we wanted to make his handbook more practical. Thus references in the page of presentation in the back of the cover (in the form of [D1] for example) are proposed for you to visualize easily the parts of the product concerned. 2. PRESENTATION OF THE CAMERA This...
Open the catalog to page 4
USER MANUAL 16-2018PAL / NTSC Rev. 07/2016 • Do not expose this device to LASER rays • This camera is not a sterile device. • Before any use, you should check for any rough surfaces, sharp edges, protrusions that could cause a safety hazard. 4. REGULATORY RECOMMENDATION 4.1 CONFORMITY This device has been designed and manufactured by a company with a certified quality system. It complies with the requirements of the European Directive 93/42/EEC related to medical devices. As a result, it complies in particular with the ad hoc electric safety (IEC) and Electromagnetic Compatibility (EMC) standards....
Open the catalog to page 5
USER MANUAL 16-2018PAL / NTSC Rev. 07/2016 Disposal must be carried out in accordance with local environmental regulations for waste disposal. For more detailed information about treatment, recovery and recycling of this product, please contact your local city office your household waste disposal service or the dealer to whom you purchased the product from. 5. INSTALLATION (for explanation of the abbreviations [C1] etc. refer to chapter 7. DESCRIPTION OF THE FRONT AND BACK PANEL) 5.1 CONNECTION OF THE BACK PANEL Connect the power supply cable to the mains plug of the camera [C2] and a video cable...
Open the catalog to page 6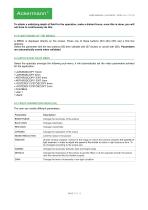
USER MANUAL 16-2018PAL / NTSC Rev. 07/2016 To obtain a satisfying depth of field for the operation, make a distant focus; once this is done, you will not have to continuously do this. 6.3 FUNCTIONING OF THE MENUS A MENU is displayed directly on the screen. Press one of these buttons (S3) (S4) (S5) and a first line appears. Select the parameter with the two buttons (S6) then validate with (S7) button or cancel with (S8). Parameters are automatically saved when validated 6.4 APPLICATION FIELD MENU Select the specialty amongst the following sub-menu; it will automatically set the video parameters...
Open the catalog to page 7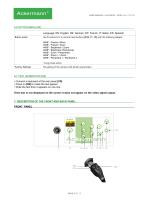
USER MANUAL 16-2018PAL / NTSC Rev. 07/2016 6.6 OPTION MENU [S5] Language: EN: English, DE: German, FR: French, IT: Italian, ES: Spanish Button action Set Functions for 3 camera head buttons [S10, 11, 12] with the following setups: AWB* / Freeze / Mirror AWB* / Freeze / Zoom AWB* / Brightness / Zoom AWB* / Brightness /Peripherals AWB* / Zoom / Peripherals AWB* / Zoom + / Zoom AWB* / Peripheral 1 / Peripheral 2 *Long press action Factory Settings Re-setting of the camera with factory parameters 6.7 TEXT GENERATOR [S9] • Connect a keyboard at the rear panel [C8] • Press on [S9] to make the text...
Open the catalog to page 8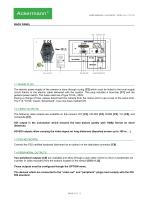
USER MANUAL 16-2018PAL / NTSC Rev. 07/2016 BACK PANEL 7.1 MAINS PLUG The electric power supply of the camera is done through a plug [C2] which must be linked to the local supply circuit thanks to the electric cable delivered with the system. This plug includes a fuse-trap [F1] and the general power switch. The fuses used are of type T2.5A - 250V. During a change of fuse, please disconnect the camera from the mains and to use a fuse of the same kind. The T of “T2.5A” means “temporised”. Use only fuses marked UR. 7.2 VIDEO OUTPUTS The following video outputs are available on this camera: DVI [C3],...
Open the catalog to page 9
USER MANUAL 16-2018PAL / NTSC Rev. 07/2016 7.5 IDENTIFICATION AND SYMBOLS ON THE BACK PANEL The indications and symbols mentioned on the back panel allow identifying the camera in conformity with the International standards IEC 60601-1, IEC 60601-2-18, IEC 60417 and ISO 980 (See Annex 1). 8. RECOMMENDED CLEANING PROCEDURE Whatever the procedure followed for the decontamination is, the use of a sterile sleeve is compulsory during the surgical operation. The sensor and the objective of the camera are designed for a cold disinfection by immersion in glutaraldehyde type (Lab. Anios). All other methods...
Open the catalog to page 10
USER MANUAL 16-2018PAL / NTSC Rev. 07/2016 The information provided in this chapter is only given as advice. While it is validated by us, the responsibility regarding decontamination remains linked with the methods and / or tools implemented by the people in charge or overseaing the process. 9. CLEANING THE OPTICAL SURFACE Observation can be hindered by a dirty lens surface. There should not be any fingerprints or marks on the surface of the lens. To avoid scratching the lens surface, never use an abrasive cloth or sponge to clean it. To remove dust, dirt and other impurities which do not come...
Open the catalog to page 11All Ackermann Instrumente catalogs and technical brochures
 USER MANUAL 16-2017PAL / NTSC
19 Pages
 Ackermann ©
52 Pages
 ACKERMANN EUROPCLIP
2 Pages

- Hosley medical trolley
- Hospital trolley
- Surgery forceps
- Grasping forceps
- Trolley with tray
- Surgery electrode
- Stainless steel forceps
- Electrosurgical electrode
- Surgical system
- Straight forceps
- Medical endoscope
- Reusable forceps
- Equipment trolley
- Cutting electrosurgical system
- Coagulation electrosurgical unit
- Endoscopy forceps
- Monopolar electrode
- Interbody fusion cage
- CMOS camera
- Camera with USB port