- Catalogs
- Advanced Bionics
- USER GUIDE HARMONY®
USER GUIDE HARMONY®

USER GUIDE HARMONY®
- Ensure adequate airflow for power supplies and chargers.
- Do not force PowerCel connections to avoid damage.
- Regularly clean charger contacts to prevent malfunction.
- Use only the provided charger for PowerCels.
- Monitor LED indicators for battery and connection status.
- Avoid immersion in water and exposure to extreme temperatures.
- Clean with a damp lint-free cloth and keep contacts free from dirt and moisture.
- Carry a Patient Identification Card at all times.
- Avoid electrostatic discharge by touching objects or people before handling the processor.
- Be cautious around metal detectors and X-ray machines at airports.
- Audio Mixing: Allows the processor microphone to pick up external sounds when connected to an audio device.
- Earhooks: Includes Standard Earhook, T-Mic Microphone, and Direct Connect Earhook for various audio connections.
- Instructions for using Direct Connect Cable and Audio Interface Cable with external devices.
- Adapters may be needed for different audio outputs.
- Personal FM Systems: Improve listening in noisy environments with specific connection instructions.
- Infrared Systems: Another type of assistive listening device for difficult listening environments.
Catalog excerpts

USER GUIDE HARMONY* HiResolution" Bionic Ear System
Open the catalog to page 1
User Guide for the Auria® Harmony® Sound Processor HARMONY9 HiResolution* Bionic Ear System
Open the catalog to page 2
Labeling The symbols below are used on the labeling for the product and for transportation, and their meanings are as follows: CAUTION: Federal law restricts this device to sale, distribution and use by or on the order of a physician. European Community Mark of Conformity Authorized to afx the CE Mark in 2006 REF Model Number Serial Number Store at temperatures between -20° C and +55° C Type of Protection: BF Dispose of Properly EN60601-1 Classication Information: Ordinary Construction Continuous Operation Internally Powered Equipment 2 User Guide for the Auria Harmony Sound Processor
Open the catalog to page 3
Table of Contents Part I: Assembling Your Auria Harmony Sound Processor . . . . . . . . . . . . . . .7 Overview . . . . . . . . . . . . . . . . . . . . . . . . . . . . . . . . . . . . . . . . . 7 Connecting Auria Accent Color Covers and Headpiece Caps . . . . . . . . . . 8 Attaching the Accent Color Headpiece Cap . . . . . . . . . . . . . . . . . 8 Removing the Accent Color Headpiece Cap . . . . . . . . . . . . . . . . . 8 Attaching the Accent Color Cover. . . . . . . . . . . . . . . . . . . . . . . . 9 Removing the Accent Color Cover . . . . . . . . . . . . . . . . . . . . . . . 9 Connecting...
Open the catalog to page 4
Cleaning and Caring for Your Harmony Processor . . . . . . . . . . . . . . . 23 Warnings and Precautions . . . . . . . . . . . . . . . . . . . . . . . . . . . . . . 24 Electrostatic Discharge (ESD) . . . . . . . . . . . . . . . . . . . . . . . . . 24 Airport Security Metal Detectors . . . . . . . . . . . . . . . . . . . . . . . 25 X-ray Machines . . . . . . . . . . . . . . . . . . . . . . . . . . . . . . . . . 25 Part 4: Hearing with Your Harmony Processor. . . . . . . . . . . . . . . . . . . . . 26 Audio Mixing . . . . . . . . . . . . . . . . . . . . . . . . . . . . . . . . . . . . . 26 Earhooks...
Open the catalog to page 5
Using Direct Audio Input . . . . . . . . . . . . . . . . . . . . . . . . . . . . 42 Using a Speaker Phone . . . . . . . . . . . . . . . . . . . . . . . . . . . . . 43 Cell Phones . . . . . . . . . . . . . . . . . . . . . . . . . . . . . . . . . . . . 43 Phone Tips . . . . . . . . . . . . . . . . . . . . . . . . . . . . . . . . . . . . 43 Part 5: Other Accessories. . . . . . . . . . . . . . . . . . . . . . . . . . . . . . . . . 44 Auria Carrying Case . . . . . . . . . . . . . . . . . . . . . . . . . . . . . . . . . 44 Dri-Aid Function . . . . . . . . . . . . . . . . . . . . . . . . . . . . . ....
Open the catalog to page 6
Table of Figures Figure 1. Figure 2. Figure 3. Figure 4. Figure 5. Figure 6. Figure 7. Figure 8. Figure 9. Figure 10. Figure 11. Figure 12. Figure 13. Figure 14. Figure 15. Figure 16. Figure 17. Figure 18. Figure 19. Figure 20. Figure 21. Figure 22. Figure 23. Figure 24. Figure 25. Figure 26. Figure 27. Figure 28. Figure 29. Figure 30. Figure 31. Figure 32. Figure 33. Figure 34. Figure 35. Figure 36. Harmony Processor With Other External Components. . . . Removing the Accent Color Headpiece Cap. . . . . . . . . . Attaching the Accent Color Cover. . . . . . . . . . . . . . . . Removing Your Accent...
Open the catalog to page 7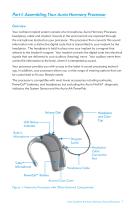
Part I: Assembling YourAuria Harmony Processor Your cochlear implant system consists of a microphone, Auria Harmony Processor, headpiece, cable and implant. Sounds in the environment are captured through the microphone located on your processor. The processor then converts this sound information into a distinctive digital code that is transmitted to your implant by the headpiece. The headpiece is held in place over your implant by a magnet that attracts to the implant's magnet. Your implant converts the digital code into electrical signals that are delivered to your auditory (hearing) nerve....
Open the catalog to page 8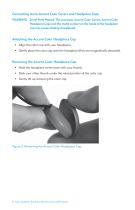
Connecting Auria Accent Color Covers and Headpiece Caps WARNING: Small Parts Hazard: The processor, Accent Color Covers, Accent Color Headpiece Caps and the metal contact on the inside of the headpiece cap may cause choking if swallowed. Attaching the Accent Color Headpiece Cap • Align the color cap with your headpiece. • Gently place the color cap onto the headpiece (they are magnetically attracted). Removing the Accent Color Headpiece Cap • Hold the headpiece at the base with your thumb. • Slide your other thumb under the raised portion of the color cap. • Gently lift up removing the color...
Open the catalog to page 9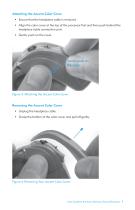
Attaching the Accent Color Cover • Ensure that the headpiece cable is removed. • Align the color cover at the top of the processor rst and then push behind the headpiece cable connection port. • Gently push on the cover. Figure 3: Attaching the Accent Color Cover. Removing the Accent Color Cover • Unplug the headpiece cable. • Grasp the bottom of the color cover and pull off gently. Figure 4: Removing Your Accent Color Cover. User Guide for the Auria Harmony Sound Processor 9
Open the catalog to page 10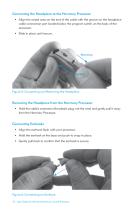
Connecting the Headpiece to the Harmony Processor • Align the raised area on the end of the cable with the groove on the headpiece cable connection port located below the program switch on the body of the processor. • Slide in place until secure. Figure 5: Connecting and Removing the Headpiece. Removing the Headpiece from the Harmony Processor • Hold the cable’s connector (the plastic plug, not the wire) and gently pull it away from the Harmony Processor. Connecting Earhooks • Align the earhook ush with your processor. • Hold the earhook at the base and push to snap in place. • Gently pull back...
Open the catalog to page 11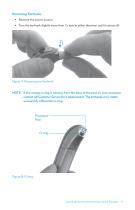
Removing Earhooks • Remove the power source. • Turn the earhook slightly more than 1/4 turn in either direction until it comes off. Figure 7: Removing an Earhook. NOTE: If the orange o-ring is missing from the base of the post on your processor, contact AB Customer Service for a replacement. The earhooks may rotate excessively without the o-ring. User Guide for the Auria Harmony Sound Processor 11
Open the catalog to page 12
Part 2: Powering Your Harmony Processor WARNING: Power supplies and battery chargers should be operated in an open area to ensure adequate airow. While no injury cases have resulted, components may become hot during normal use or a fault condition. If the device’s temperature results in discomfort or pain when touched, disconnect the power source and contact your local AB representative. The Auria PowerCel Battery Option The PowerCel is used to power your processor. If you select this option, the entire unit will sit behind your ear. Connecting the PowerCel Battery The tracks located along the...
Open the catalog to page 13Archived catalogs
 Hear Your Best brochure
32 Pages
 SOUND SOLUTIONS
6 Pages
 Off-the-Ear Power Options
2 Pages
 USER GUIDE PLATINUM SERIES?
40 Pages
 HiRes 90K Implant Family
40 Pages
 Advanced Bionics
12 Pages
 hear your best
20 Pages
 Products & Accessories
42 Pages
 NEPTUNE User Guide
54 Pages
 Naida CI Q70
18 Pages
 hear your world
44 Pages
 hear more of your world
8 Pages
 Bring on the Water brochure
16 Pages
 Bring on the Performance (Q70)
24 Pages
 Neptune_Wearing
16 Pages
 Bring on the Performance (Q90)
24 Pages
 Bring on the Performance (Q30)
20 Pages
 HiFocus™ Mid-Scala Electrode
8 Pages
 Naída CI Q70
67 Pages
 AquaCase
12 Pages
 Naída CI Q90
392 Pages
 Naída CI Q30
386 Pages
 Neptune Brochure
6 Pages
 Product Catalog
32 Pages