
- Catalogs
- Advanced Brain Monitoring
- Apnea Guard

Apnea Guard

Apnea Guard
The Apnea Guard Theragnostic Protocol is designed to enhance the fitting and effectiveness of custom oral appliances for sleep apnea treatment. It features quick fabrication, adjustable settings, and identifies optimal protrusion settings for over 80% of patients, leading to improved outcomes and reduced chair time.
Developed with a $1.15 million grant, the protocol shows significant improvements over conventional methods, with more patients achieving an AHI < 10 and better outcomes based on specific vertical dimensions of occlusion (VDO) by gender.
- Initial Fitting: Select the appropriate tray and determine settings using the Apnea Guard Worktable.
- Bite Registration: Use a digital scanner or dental lab for custom appliance fabrication.
- 3-Night Treatment Efficacy Study: Assess treatment efficacy using baseline, oral appliance, and positional therapy.
- Apnea Guard Titration: Evaluate treatment benefit and instruct on advancing the Apnea Guard.
- Delivery of Custom Appliance: Adjust protrusion settings and conduct a post-treatment sleep study.
Addresses benefits of the protocol, importance of VDO selection, evidence for target protrusion, TMJ risks, and atypical protrusive ranges.
Instructions for digital and non-digital methods to ensure accurate transfer of settings to the custom appliance.
Steps for conducting a study using Night Shift and WristOx devices, with data synchronization and report generation recommendations.
Guidance for a three-night study to assess effectiveness, with device usage and feedback collection instructions.
Instructions for advancing the Apnea Guard, including a video tutorial.
Addresses common issues like improper fitting and retention material disengagement with causes and solutions.
Outlines procedures for adjusting the Apnea Guard device, including fitting settings and retention material adjustments.
- Device Falling Out: Solutions include refitting trays and managing pain.
- Nocturnal Drooling: Solutions include prescribing Atropine and trimming excess material.
- Sore Teeth: Solutions include replacing retention material and advising against prone sleeping.
Lists studies and papers on the efficacy and outcomes of oral appliances and positional therapy for obstructive sleep apnea.
Advanced Brain Monitoring, Inc., 2237 Faraday Avenue, Suite 100, Carlsbad, CA, USA 92008. Phone: (760) 720-0099 x6029.
Catalog excerpts

Theragnostic Protocol © 2020-2022 Advanced Brain Monitoring, Inc. All Rights Reserved
Open the catalog to page 1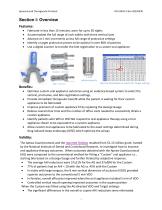
Apnea Guard Theragnostic Protocol Section I: Overview Features: • • • • • Fabricate in less than 15 minutes, worn for up to 30 nights Accommodate the full range of arch widths with three vertical sizes Advance at 1 mm increments across full range of protrusive settings Identify a target protrusion proven to be optimal in over 80% of patients Use a digital scanner to transfer the bite registration to a custom oral appliance 1 mm advancements Use the Worktable to select the Target setting Optimize custom oral appliance outcomes using an evidence-based system to select the vertical, protrusive,...
Open the catalog to page 2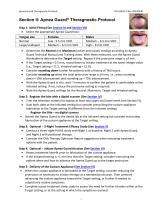
Apnea Guard Theragnostic Protocol Section II: Apnea Guard® Theragnostic Protocol Step 1: Initial Fitting (See Section III and Section VII) • Select the appropriate Apnea Guard tray: Tongue size Normal Large/scalloped • • • • • • Males Medium – 6.5 mm VDO High – 8 mm VDO Determine the Neutral and Maximum (active protrusion) settings according to Apnea Guard Technical Manual and Training video. With these measures, use the Apnea Guard Worktable to determine the Target setting. Repeat if the protrusive range is <4 mm. If the Target setting = 0.5 mm, round down to initiate treatment at the lower...
Open the catalog to page 3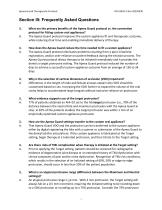
Apnea Guard Theragnostic Protocol Section III: Frequently Asked Questions Q. A. What are the primary benefits of the Apnea Guard protocol vs. the convention protocol for fitting custom oral appliances? The Apnea Guard protocol improves the custom appliance fit and therapeutic outcome, while reducing chair time and enabling immediate delivery of therapy. How does the Apnea Guard reduce the time needed to fit a custom appliance? The Apnea Guard protocol eliminates problems resulting from a poor initial bite registration, and/or over-reliance on patient feedback during the titration process. The...
Open the catalog to page 4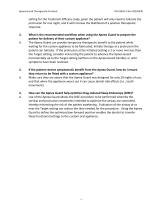
Apnea Guard Theragnostic Protocol setting for the Treatment Efficacy study, given the patient will only need to tolerate the protrusion for one night, and it will increase the likelihood of a positive therapeutic response. Q. A. What is the recommended workflow when using the Apnea Guard to prepare the patient for delivery of their custom appliance? The Apnea Guard can provide temporary therapeutic benefit to the patient while waiting for the custom appliance to be fabricated. Initiate therapy at a protrusion the patient can tolerate. If the protrusion at the Initiated setting is 2 or more mm...
Open the catalog to page 5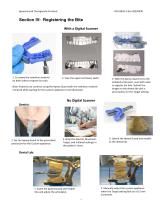
Apnea Guard Theragnostic Protocol Section IV: Registering the Bite With a Digital Scanner 1. Cut away the retention material on both sides to expose the teeth. 2. Scan the upper and lower teeth. Note: Patients can continue using the Apnea Guard with the retention material removed while waiting for the Custom appliance to be fabricated. 3. With the Apnea Guard set to the Initiated protrusion, scan both sides to register the bite. Submit the images to the dental lab with a prescription for the Target setting. No Digital Scanner Dentist: 1. Set the Apnea Guard to the prescribed protrusion for the...
Open the catalog to page 6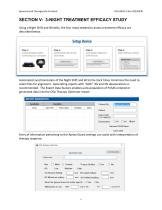
Apnea Guard Theragnostic Protocol SECTION V: 3-NIGHT TREATMENT EFFICACY STUDY Using a Night Shift and WristOx, the four steps needed to assess treatment efficacy are described below. Automated synchronization of the Night Shift and Wrist Ox clock times minimizes the need to select files for alignment. Generating reports with “both” 4% and 3% desaturations is recommended. The Export Data feature enables auto-population of PoSAS entered or generated data into the OSA Therapy Optimizer report. Entry of information pertaining to the Apnea Guard settings can assist with interpretation of therapy response....
Open the catalog to page 7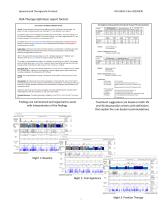
Apnea Guard Theragnostic Protocol OSA Therapy Optimizer report format: Findings are summarized and organized to assist with interpretation of the findings. Treatment suggestions are based on both 3% and 4% desaturation criteria with definitions that explain the rule-based recommendations. Night 2: Oral Appliance Night 3: Position Therapy
Open the catalog to page 8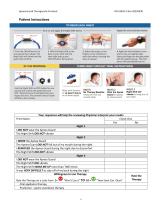
Apnea Guard Theragnostic Protocol Patient Instructions Wear both devices for at least 3 hours on all three nights. NIGHT1 No Therapy Baseline measures how you usually sleep NIGHT 2 Wear the Apnea Guard to assess its improvement NIGHT 3 Night Shift will vibrate to keep you off your back Your responses will help the reviewing Physician interpret your results Check One Yes No Night 1 I DID NOT wear the Apnea Guard The Night Shift DID NOT vibrate Night 2 I WORE the Apnea Guard The Apnea Guard DID NOT fall out of my mouth during the night I REMOVED the Apnea Guard during the night due to discomfort...
Open the catalog to page 9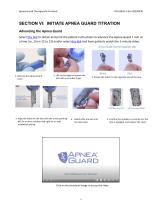
Apnea Guard Theragnostic Protocol SECTION VI: INITIATE APNEA GUARD TITRATION Advancing the Apnea Guard Select this link to obtain and print the patient instructions to advance the Apnea Guard 1 mm at a time (i.e., from 12 to 13) and/or select this link and have patients watch the 2-minute video. 1. Remove the Apnea Guard cover. 2. Lift up the edge to remove the lock with your index finger 3. Align the holes for the lock with the arrow pointing left for an even number and right for an odd numbered setting. 3. Rotate the tether to the opposite end of the lock. 4. Gently affix the lock into the...
Open the catalog to page 10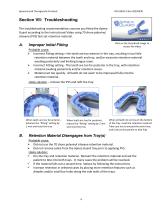
Apnea Guard Theragnostic Protocol Section VII: Troubleshooting The troubleshooting recommendations assume you fitted the Apnea Guard according to the Instructional Video using 70 shore polyvinyl siloxane (PVS) fast-set retention material. Click on the thumbnail image to access the video Improper Initial Fitting Probable cause: ➢ Incorrect Fitting setting = the teeth are too anterior in the tray, resulting in too little retention material between the teeth and tray, and/or excessive retention material exuding posteriorly and limiting tongue room. ➢ Incorrect Fitting setting - The teeth are too...
Open the catalog to page 11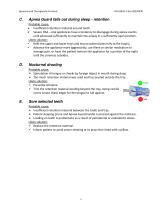
Apnea Guard Theragnostic Protocol Apnea Guard falls out during sleep - retention Probable cause: ➢ Insufficient retention material around teeth. ➢ Severe OSA – oral appliances have a tendency to disengage during apnea events until advanced sufficiently to maintain the airway in a sufficiently open position. Likely solution: ✓ Refit the upper and lower trays and ensure patient bites fully to the tray(s). ✓ Advance the appliance more aggressively, use Aleve or similar medication to manage pain, or have the patient remove the appliance for a portion of the night until the soreness subsides. Nocturnal...
Open the catalog to page 12All Advanced Brain Monitoring catalogs and technical brochures
 Sleep Profiler
2 Pages
 Night Shift
2 Pages
Archived catalogs
 Apnea Guard
2 Pages
- Analysis software
- Visualization software
- Tablet computer software
- Tablet PC software
- Monitoring software
- Automated software
- Recording software
- EEG system
- EEG software
- Sleep monitor
- EEG system with mapping
- Mouthguard
- EMG software
- Portable EEG system
- Video recording software
- Snoring mouthguard
- Body-worn EEG system
- EEG system with electromyography
- EEG system with electrooculograph
- 24-channel EEG system