- Company
- Products
- Catalogs
- News & Trends
- Exhibitions
Aesculap® Targon® RF
1 /28Pages

Aesculap® Targon® RF
1 /28Pages
Catalog excerpts

Aesculap® Targon® RF Retrograde Femoral Nail Aesculap Orthopaedics
Open the catalog to page 1
Hans-Werner Stedtfeld, MD Formerly: Centre for Trauma Surgery, Nuremberg, Germany University Hospital of Rostock, Germany ‘The implantation of interlocking nails from an antegrade access has become the gold standard for most fractures of the femoral shaft. In the interests of optimally expanding the indications for the antegrade procedure, the distal interlocking holes have been moved a great distance toward distal and tripled in number in the Targon® Femoral System. Nevertheless, there are still a number of very good or relative indications for the retrograde nailing procedure. Today supracondylar...
Open the catalog to page 2
Metaphyseal Femoral
Open the catalog to page 3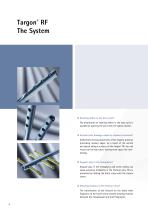
z Reaming debris in the knee joint? The distribution of reaming debris in the knee joint is avoided by opening the joint with the hollow reamer. z Internal knee damage caused by implant protrusion? Sufficiently recessed placement of the implant prevents protruding implant edges. As a result of the ventral and dorsal oblique surfaces of the Targon® RF, the nail recess can be kept small, leaving more space for interlocking. z Angular play in the metaphysis? Angular play in the metaphysis and screw sliding can cause excessive instability in the fracture area. This is prevented by locking the distal...
Open the catalog to page 4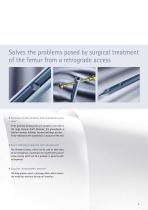
Solves the problems posed by surgical treatment of the femur from a retrograde access z Deviation of nail curvature from anatomical curvature? If the proximal locking holes are located to one side of the large femoral shaft diameter, the groundwork is laid for incorrect drillings. Incorrect drillings are distinctly reduced by the anatomical curvature of the nail. z Screw loosening in patients with osteoporosis? The threaded sleeves, which can be used on both sides of the metaphysis, counteract the insufficiently secure screw seating which can be a problem in patients with osteoporosis. z Excessive...
Open the catalog to page 5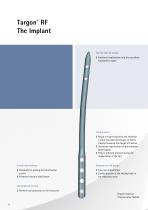
Targon® RF The Implant Special nail tip design z Facilitates implantation into the cancellous trochanteric region Long grooves z Result in higher elasticity and therefore a more favorable distribution of forces, thereby lessening the danger of fracture z Accelerate regeneration of the endosteal blood supply z Help to alleviate pressure during the implantation of the nail 4-way interlocking Anatomical nail design z Possibility for placing the transfixation screws z Enhanced fracture stabilization z Easy nail implantation z Central position of the locking holes in the medullary canal Ventrodorsal...
Open the catalog to page 6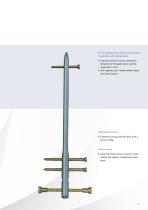
The threaded sleeve allows screw fixation in patients with osteoporosis z Internal thread for secure connection between the threaded sleeve and the screw (dia. 6 mm) z Self-tapping outer thread enables largearea bone contact Interlocking screws z Extremely strong titanium alloy with a proven design Closure screw z Locks the distal screw to prevent screw sliding and angular metaphyseal movement
Open the catalog to page 7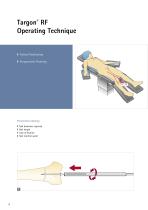
Targon® RF Operating Technique z Patient Positioning z Preoperative Planning Preoperative planning z Nail diameters required z Nail length z Type of fixation z Nail insertion point
Open the catalog to page 8
Access and preparation of the nail bed [1] Access z Hollow reamer (Ø 12.5 mm) KH392R z Guide pin KH393R z Universal handle KH319R Cutaneous incision and tissue splitting. Insert the guide pin with the universal handle or a motor-driven instrument; monitor the position with an image intensifier. Open the entry hole with the hollow reamer. Nail insertion [2] Attaching the nail to the targeting device z Targeting device KH210 z Nail adapter KH396R z Nail adapter screw KH397R z Tightening sleeve KH321R Connect the nail adapter to the targeting device. Insert the nail adapter screw until above the...
Open the catalog to page 9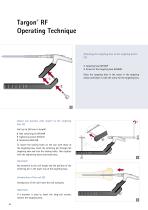
Targon® RF Operating Technique Attaching the targeting bow to the targeting device [3] z Targeting bow KH395P z Screw for the targeting bow KH409R Place the targeting bow in the recess in the targeting device and fasten it with the screw for the targeting bow. Adjust nail position with respect to the targeting bow [4] (nail up to 240 mm in length) m To match the locking holes on the nail with those of the targeting bow, insert the centering pin through the targeting bow and into the locking holes. Then tighten with the tightening sleeve and socket key. z Nail centering pin KH394R z Tightening...
Open the catalog to page 10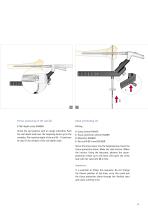
Precise positioning of the nail [6] z Nail depth scale KH406R Check the nail position with an image intensifier. Push the nail depth scale over the targeting device up to the condyles. The insertion depth of the nail (0 - 10 mm) can be read in the window of the nail depth scale. z Screw sleeve KH410P z Tissue-protection sleeve KH429R z Obturator KH383R z Twist drill (Ø 5 mm) KH385R Screw the screw sleeve into the targeting bow. Insert the tissue-protection sleeve. Make the stab incision. Widen the incision. Using the obturator, advance the tissueprotection sleeve up to the bone. Drill open the...
Open the catalog to page 11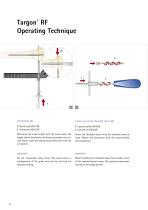
Targon® RF Operating Technique Interlocking [8] z Screw scale KH274R z Screwdriver KH322R Determine the screw length with the screw scale. The length shown determines the distance between the cortical layers. Insert the selected screw (Ø 6 mm) with the screwdriver. Screw the threaded sleeve onto the selected screw by hand. Tighten the connection with the counterhandle and screwdriver. Do not manipulate using force! This could result in misalignment of the guide wire and the nail hole for proximal locking. Lateral use of the threaded sleeve [9] Before inserting the threaded sleeve from medial,...
Open the catalog to page 12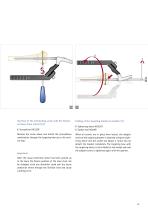
Insertion of the interlocking screw with the threaded sleeve from lateral [10] z Screwdriver KH322R Remove the screw sleeve and attach the screw/sleeve combination through the targeting bow up to the cortical stop. Folding of the targeting bracket to medial [11] z Tightening sleeve KH321R z Socket key KH324R When all screws are in place from lateral, the adapter screw at the targeting bracket is loosened using the tightening sleeve and the socket key (about 3 turns). Do not detach the bracket completely. The targeting bow with the targeting device is then folded to the medial side and the adapter...
Open the catalog to page 13All Aesculap® catalogs and technical brochures
 proGAV ® 2.0
36 Pages
 Targon® FN
36 Pages
 AESCULAP® NEUROENDOSCOPY
128 Pages
 AESCULAP® Metha®
28 Pages
 AESCULAP® BULLDOG CLIPS
8 Pages
 Quintex®
8 Pages
 MONOMAX®
16 Pages
 Premilene® Mesh Plug
8 Pages
 AESCULAP® Excia® 12/14
18 Pages
 Aesculap®
16 Pages
 VascuFlex®
12 Pages
 Aesculap Aeos®
16 Pages
 LC – LINEAR CUTTER STAPLER
6 Pages
 M.blue®
44 Pages
 Nelson® deluxe
8 Pages
 CARDIOLOGY
44 Pages
 Aesculap® OrthoPilot®
52 Pages
 TrendHip®
16 Pages
 proSA®
30 Pages
 activ L®
44 Pages
 AESCULAP® SINGLE USE PRODUCTS
88 Pages
 AESCULAP® CoreHip® SYSTEM
36 Pages
 AdTec® bipolar
8 Pages
 Aesculap Surgical Instruments
64 Pages
 EV3.0 CAMERA CONTROL UNIT
12 Pages


- Bone plate
- Logistics trolley
- Compression plate
- AMBISEA catheter
- Metallic compression plate
- Locking compression plate
- Surgery forceps
- Medical device trolley
- Grasping forceps
- Syringe
- Surgery electrode
- Human scissors
- Cannula
- Electrosurgical electrode
- Surgical system
- AMBISEA retractor
- Medical endoscope
- Surgical scissors
- AMBISEA balloon catheter
- Container