Group: Abbott

Catalog excerpts

Alere"Tl Strep A Package Insert
Open the catalog to page 1
Alere'Tl Strep A Package Insert For use with the Alere™ i Instrument For use with throat swab specimens For in vitro use only IJOnly CLIA COMPLEXITY: WAIVED A Certificate of Waiver is required to perform this test in a CLIA Waived setting. To obtain CLIA waiver information and a Certificate of Waiver, please contact your state health department. Additional CLIA waiver information is available at the Centers for Medicare and Medicaid website at www.cms.hhs.gov/CLIA. Failure to follow the instructions or modification to the test system instructions will result in the test no longer meeting...
Open the catalog to page 3
Alere™ i Strep A is a rapid, instrument-based isothermal test for the qualitative detection of Group A Strep directly from throat swab specimens with results in eight (8) minutes or less. The Alere™ i Instrument has a small footprint and easy to use graphical user interface for convenience. The Alere™ i Strep A kit contains all components required to carry out an assay for Group A Strep on the Alere™ i Instrument. PRINCIPLES OF THE PROCEDURE Alere™ i Strep A utilizes isothermal nucleic acid amplification technology for the qualitative detection of Group A Strep bacterial nucleic acids. It...
Open the catalog to page 4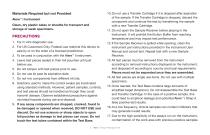
Materials Required but not Provided 10. Do not use a Transfer Cartridge if it is dropped after aspiration of the sample. If the Transfer Cartridge is dropped, discard the component and continue the test by transferring the sample with a new Transfer Cartridge. Alere™ i Instrument Clean, dry plastic tubes or sheaths for transport and storage of swab specimens. 11. Do not open the Sample Receiver before placing in the instrument. It will prohibit the Elution Buffer from reaching temperature and may impact test performance. PRECAUTIONS 1. For in vitro diagnostic use. 2. For US Customers Only:...
Open the catalog to page 5
may cause false positive results. Handle samples according to standard laboratory practices. Clean instruments and surrounding surfaces according to instructions provided in the cleaning section of the instrument User Manual. Refer to Section 1.6, Maintenance & Cleaning, for further information. 18. Do not touch the heads of the Control Swabs. Cross contamination with the Positive Control Swabs may occur due to their high target level and the sensitivity of the assays run on the instrument. 19. Test results should be interpreted in conjunction with other laboratory and clinical data. 20....
Open the catalog to page 6
Procedural Control Valid displayed on the instrument screen indicates that the assay reagents maintained their functional integrity and the sample did not significantly inhibit assay performance. External Positive and Negative Controls: Good laboratory practice suggests the use of positive and negative controls to ensure that test reagents are working and that the test is correctly performed. Alere™ i Strep A kits contain Positive and Negative Control Swabs. These swabs may be used to demonstrate the ability to generate appropriate positive and negative results by following the assay...
Open the catalog to page 7
The following transport media have been tested and are also acceptable: • ESwab™ Collection Kit, Liquid Amies • BBL™ CultureSwab™ Liquid Amies* • BBL™ CultureSwab™ Liquid Stuart* *These transport media systems preserve the sample on the swab tip via contact with a media-moistened sponge. If immediate testing is not possible, the throat swab can be held in transport media at room temperature (approximately 20°C) or refrigerated at 2-8°C for up to twenty-four (24) hours from the time of sample collection prior to testing. Note: If testing a swab transported in media, the collection swab is to...
Open the catalog to page 8
Alere Loading Application Enter User ID or Scan Step 1_ Turn on the Alere™ i Instrument -press the power button ® on the side of the instrument. Note: If the unit is unattended for one hour, the instrument will go to a black screen power save mode. Touch the screen to return the unit to active display operation. Enter User ID Press V’ after entry. Touch ‘Strep A’ This starts a Strep A test. Enter Patient ID using on screen keyboard or barcode scanner Touch V’. Verify that the ID was entered correctly, then touch V’ to confirm entry. Run Test Influenza A & B Strep A Touch ‘Run Test’ This...
Open the catalog to page 9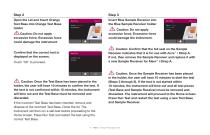
Step 2 Open the Lid and Insert Orange Test Base into Orange Test Base holder Insert test base into device. Caution: Do not apply excessive force. Excessive force could damage the instrument. Caution: Do not apply excessive force. Excessive force could damage the instrument. Confirm that the correct test is displayed on the screen. Touch ‘OK’ to proceed. Insert Blue Sample Receiver into the Blue Sample Receiver holder Place sample receiver in holder. Caution: Confirm that the foil seal on the Sample Receiver indicates that it is for use with Alere™ i Strep A. If not, then remove the Sample...
Open the catalog to page 10
Step 4 Wait for the Sample Receiver to Warm Up. Caution: DO NOT REMOVE THE FOIL SEAL UNTIL PROMPTED BY THE INSTRUMENT. DO NOT close the lid or insert the swab sample until prompted by the instrument. When prompted, remove the foil seal and place the patient swab to be tested into the Sample Receiver. Remove seal. Mix swab for 10 seconds and discard the swab. (6:37) Vigorously mix the swab in the liquid for 10 seconds. Press the swab head against the side of the Sample Receiver as you mix it. This helps remove the sample from the swab. Once the swab is removed, touch ‘OK’ to proceed. Remove...
Open the catalog to page 11
Step 5a Press the White Transfer Cartridge into the Blue Sample Receiver Listen for a click. Press transfer cartridge into receiver (click). Attach cartridge to test base (orange indicator descends) Lift and then connect the Transfer Cartridge to the Test Base Run Test Press transfer cartridge into receiver (click). Attach cartridge to test base (orange indicator descends) When the Transfer Cartridge is properly attached to the Sample Receiver, the orange indicator on the Transfer Cartridge will rise. If the orange indicator does not rise, continue pushing onto the Sample Receiver until it...
Open the catalog to page 12All Abbott catalogs and technical brochures
-
 HIV-1/2 Ag/Ab COMBO
2 Pages
-
 HIV-1/2 TEST
6 Pages
-
 Alere hCG Easy
6 Pages
-
 SoToxa™
12 Pages
-
 Alere AfinionTM CRP
2 Pages
-
 Alere™ q HIV-1/2 Detect
2 Pages
-
 Alere Determine HB sAg
6 Pages
-
 Binax NOW G6PD
4 Pages
-
 Alere™ DDS® 2
2 Pages
-
 Alere Afinion Lipid Panel
2 Pages
-
 Alere i Influenza A & B
2 Pages
-
 Alere hCG Portfolio Brochure
6 Pages
-
 Alere Actim Partus
6 Pages
-
 Alere Actim PROM Brochure
6 Pages
-
 Alere ICU Product Brochure
6 Pages
-
 epoc
epoc2 Pages
-
 Alere Triage System
4 Pages
-
 Alere? TestPack hCG
4 Pages
-
 Alere Pima CD4 Analyser
20 Pages
-
 Alere Cardio Combo
4 Pages
-
 Alere hCG Portfolio
2 Pages
-
 Alere Cholestech LDX System
2 Pages
-
 Alere HemoPoint® H2 Meter
2 Pages
-
 Alere Cholestech LDX® System
2 Pages
-
 AIMS®
AIMS®4 Pages
-
 Alere INRatio®/INRatio®2
2 Pages
-
 Alere™
2 Pages


Archived catalogs
-
 epoc® Blood Analysis System
2 Pages
-
 epoc®
epoc®2 Pages