- Catalogs
- Amplitude Surgical
- COMETE® / ECLIPSE ® AND ECLIPSE ® BCP SCREW
COMETE® / ECLIPSE ® AND ECLIPSE ® BCP SCREW
1 /15Pages
COMETE® / ECLIPSE ® AND ECLIPSE ® BCP SCREW
1 /15Pages
Catalog excerpts

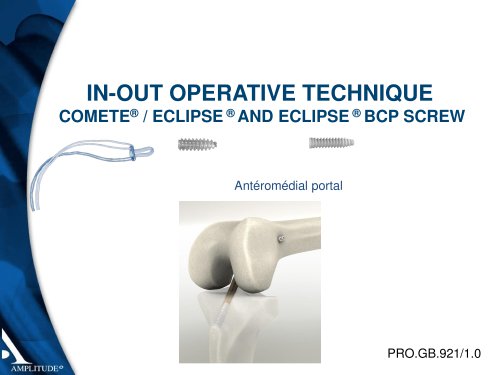
IN-OUT OPERATIVE TECHNIQUE COMETE® / ECLIPSE ® AND ECLIPSE ® BCP SCREW Antéromédial portal
Open the catalog to page 1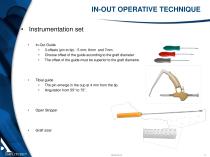
IN-OUT OPERATIVE TECHNIQUE • Instrumentation set • In-Out Guide • 3 offsets (pin to tip) : 5 mm; 6mm and 7mm. • Choose offset of the guide according to the graft diameter. • The offset of the guide must be superior to the graft diametre. Tibial guide • The pin emerge in the cup at 4 mm from the tip. • Angulation from 55° to 75°. Open Stripper
Open the catalog to page 2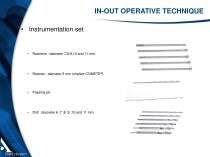
IN-OUT OPERATIVE TECHNIQUE • Instrumentation set Reamer : diameter 5 mm (implant COMETE®).
Open the catalog to page 3
IN-OUT OPERATIVE TECHNIQUE Instrumentation set : Eclipse® Screwdriver Nitinol screw pin guide diameter 1.1 mm
Open the catalog to page 4
IN-OUT OPERATIVE TECHNIQUE Harvest the graft (semitendinosous and the Gracilis tendons ) Harvest with the open stripper the semitendinosous and the Gracilis tendons Prepare the graft, associate both tendons and double them. Evaluate the graft diameter with the graft s
Open the catalog to page 5
IN-OUT OPERATIVE TECHNIQUE Tibial guide placement : • • Position the tip of the tibial guide between the tibial spin. Push the sleeve in contact with bone in the graft harvest incision and insert a 2,4 mm pin . • Guide caracteristic: the drill emerge 4 mm before the tip ( in the cup) • Use a canulate reamer with the same diameter as the
Open the catalog to page 6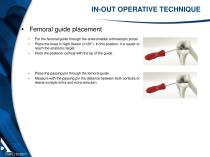
IN-OUT OPERATIVE TECHNIQUE Femoral guide placement • • • Put the femoral guide through the anteromedial arthroscopic portal. Place the knee in higth flexion (≈120°). In this position, it is easier to reach the anatomic target. Hook the posterior cortical with the tip of the guide. Place the passing pin through the femoral guide . Measure with the passing pin the distance between both corticals of lateral condyle (intra and extra
Open the catalog to page 7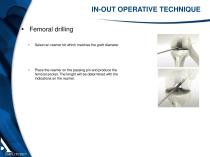
IN-OUT OPERATIVE TECHNIQUE Femoral drilling • Select an reamer bit which matches the graft diameter Place the reamer on the passing pin and produce the femoral socket. The lenght will be determined with the indications on the ream
Open the catalog to page 8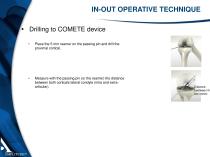
IN-OUT OPERATIVE TECHNIQUE Drilling to COMETE device • Place the 5 mm reamer on the passing pin and drill the proximal cortical. Measure with the passing pin (or the reamer) the distance between both corticals lateral condyle (intra and extraarticular).
Open the catalog to page 9
IN-OUT OPERATIVE TECHNIQUE Graft préparation on COMETE® implant COMETE® loop COMETE® Implant • • COMETE® loop length 15, 20, 25, 30,35 et 40 mm Pull wire are connected together and strengthenned to ease movement throught the passing pin. Choose the COMETE ® implant COMETE® Implant length = length just above : by the difference distance between both corticals less femoral tunnel length + 5 mm Example : COMETE® implant 25 mm : - distance between both corticals 42 mm - femoral tunnel length 25 mm 42-25+5 = 22 mm COMETE® implant length : 25 mm Fullwire connected together and strengthenned Titanium...
Open the catalog to page 10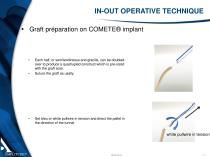
IN-OUT OPERATIVE TECHNIQUE Graft préparation on COMETE® implant Each half, or semitendinosus and gracilis, can be doubledover to produce a quadrupled construct which is pre-sized with the graft sizer. Suture the graft as usally. Set bleu or white pullwire in tension and direct the pallet in the direction of the tunnel. white pullwire in tension
Open the catalog to page 11
IN-OUT OPERATIVE TECHNIQUE • Place a wire with a loop in the passing pin. • The passing pin is used for pullwire passage. • Set the passing pin in tension. The traction suture is routed through the femoral tunnel • Use a grasper to recover the wire loop in the intra-articular tibial tunnel • Put the COMETE® pullwire in the wire loop over the tibial tunnel. . • Dissociate white and blue pullwire, to ease their movement inside the tunnel. • Pull the pullwire on the femur, the COMETE ® pullwire will emerge on the
Open the catalog to page 12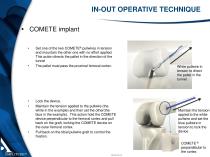
IN-OUT OPERATIVE TECHNIQUE COMETE implant • Set one of the two COMETE® pullwires in tension and mountain the other one with no effort applied. This action directs the pallet in the direction of the tunnel The pallet must pass the proximal femoral cortex. Lock the device, Maintain the tension applied to the pullwire (the white in the example) and then set the other(the blue in the example). This action hold the COMETE device perpendicular to the femoral cortex and pull back on the graft, locking the COMETE device on the outer femoral cortex. Pull back on the tibial pullwire graft to control...
Open the catalog to page 13
IN-OUT OPERATIVE TECHNIQUE Tibial Fixation Pull back on the tibial pullwire graft to control the fixation tension on the graft. Place the screw guide pin in the tibial tunnel. Put the interference screw on the dedicated screwdriver. : • Eclipse® (yellow screwdriver) • Eclipse®BCP (blue screwdriver). Screw on the screw gide pin. Eclipse®BCP Screwdriver Graft tensioning Eclipse® Screwdriver Graft tensioning
Open the catalog to page 14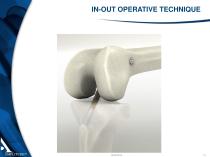
IN-OUT OPERATIVE TECHNIQUE
Open the catalog to page 15All Amplitude Surgical catalogs and technical brochures
 SCORE® II
4 Pages
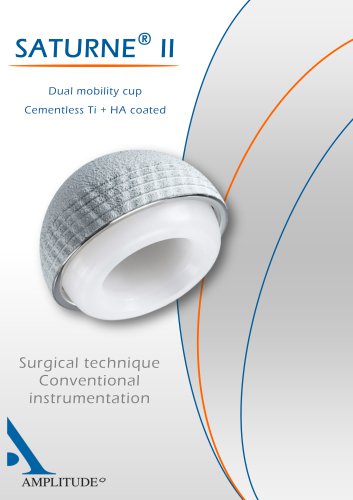 SATURNE® II
28 Pages
 ECLIPSE® BCP
4 Pages
 ACL Reconstruction
32 Pages

- Femoral stem
- Knee prosthesis
- Acetabular prosthesis
- Cementless femoral stem
- Cementless acetabular prosthesis
- Suture button
- Cruciate ligament interference screw
- Cemented femoral stem
- Femoral head prosthesis
- Bone cement
- Orthopedic surgery bone cement
- Fixed-bearing knee prosthesis
- Revision femoral stem
- Orthopedic extension device
- Surgical navigation system
- Revision knee prosthesis
- ACL reconstruction suture button
- Optical surgical navigation system
- Mobile-bearing knee prosthesis