- Catalogs
- Arthrosurface
- Hip HemiCAP®
Hip HemiCAP®

Hip HemiCAP®
Catalog excerpts

Hip Resurfacing System The Arthrosurface® HemiCAP® Hip Hemiarthroplasty System restores the articular surface geometry of the femoral head and preserves functional structures using an innovative 3 dimensional mapping system and a contoured articular resurfacing implant.
Open the catalog to page 1
Description Contraindications Absolute contraindications include: The HemiCAP® Contoured Articular Prosthetic incorporates an articular resurfacing component and a cancellous fixation taper post component that mate together via a taper interlock to provide stable and immobile fixation of the implant and stress bearing contact at the bone/ prosthetic interface. The device is a single use implant intended to be used with bone cement. Materials: Articular Resurfacing Component: Cobalt-Chromium Alloy (Co-Cr-Mo) Surface Coating: Titanium (CP Ti) Taper Post: Titanium Alloy (Ti-6Al-4V) Indications Relief...
Open the catalog to page 3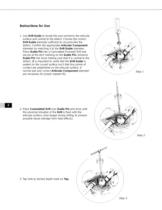
Instructions for Use 1. Use Drill Guide to locate the axis normal to the articular surface and central to the defect. Choose the correct Drill Guide diameter sufficient to circumscribe the defect. Confirm the appropriate Articular Component diameter by matching it to the Drill Guide diameter. Place Guide Pin into a Cannulated Powered Drill and secure at the etch marking on the Guide Pin. Advance Guide Pin into bone making sure that it is central to the defect. (It is important to verify that the Drill Guide is seated on the curved surface such that four points of contact are established on the...
Open the catalog to page 4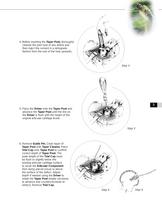
4. Before inserting the Taper Post, thoroughly cleanse the pilot hole of any debris and then inject the cement in a retrograde fashion from the end of the hole upwards. Step 4 5 5. Place the Driver onto the Taper Post and advance the Taper Post until the line on the Driver is flush with the height of the original articular cartilage levels. Step 5 6. Remove Guide Pin. Clean taper of Taper Post with Taper Cleaner. Place Trial Cap onto Taper Post to confirm correct depth of Taper Post. The peak height of the Trial Cap must be flush or slightly below the existing articular cartilage surface to avoid...
Open the catalog to page 5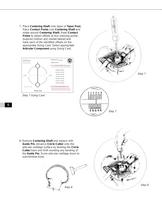
7. Place Centering Shaft onto taper of Taper Post. Place Contact Probe over Centering Shaft and rotate around Centering Shaft. Read Contact Probe to obtain offsets at four indexing points (superior / inferior and medial / lateral) and mark each of the identified offsets on the appropriate Sizing Card. Select appropriate Articular Component using Sizing Card. Step 7 Step 7 Sizing Card 6 Step 7 8. Remove Centering Shaft and replace with Guide Pin. Advance Circle Cutter onto the articular cartilage surface by twisting the Circle Cutter back and forth avoiding any bending of the Guide Pin. Score...
Open the catalog to page 6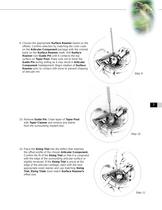
9. Choose the appropriate Surface Reamer based on the offsets. Confirm selection by matching the color code on the Articular Component package with the colored band on the Surface Reamer shaft. Drill Surface Reamer over Guide Pin until it contacts the top surface on Taper Post. Make sure not to bend the Guide Pin during drilling as it may result in Articular Component malalignment. Begin rotation of Surface Reamer prior to contact with bone to prevent chipping of articular rim. Step 9 7 10. Remove Guide Pin. Clean taper of Taper Post with Taper Cleaner and remove any debris from the surrounding...
Open the catalog to page 7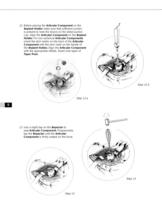
12. Before placing the Articular Component on the Implant Holder make sure that sufficient suction is present to hold the device on the distal suction cup. Align the Articular Component on the Implant Holder. For non-spherical Articular Components orient the etch marks on the back of the Articular Component with the etch mark on the handle of the Implant Holder. Align the Articular Component with the appropriate offsets. Insert onto taper of Taper Post. Step 12 b Step 12 a 8 13. Use a slight tap on the Impactor to seat Articular Component. Progressively tap the Impactor until the Articular Component...
Open the catalog to page 8
Warnings Precautions Improper selection, placement, positioning, alignment, and fixation of the implant components may reduce the service life of the prosthetic components. Inadequate preparation and cleaning of the implant components mating surfaces may result in improper fixation of the device. Improper handling of the implants can produce scratches, nicks or dents that may have adverse clinical effects on mating joint surfaces. Do not modify implants. The surgeon shall be thoroughly familiar with the implants, instruments, and surgical technique prior to performing surgery. HemiCAP® implants...
Open the catalog to page 9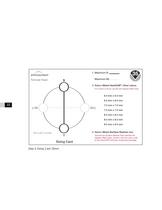
10 Step 6 Sizing Card 35mm
Open the catalog to page 10
Manufactured by: ® Arthrosurface, Inc., 28 Forge Parkway, Franklin, MA 02038 tel +1 508 520 3003 • fax +1 508 528 4604 Catalog Number H000-3500 8007-1205 Description Kit, Instrument, 35mm, Hip 2.5mm Guide Pin (5 pk) Hip Articular Component 35mm H352-0060 6.0mm x 6.0mm Offset H352-0065 H352-0070 H352-0075 H352-0080 H352-0085 H352-0090 6.5mm 7.0mm 7.5mm 8.0mm 8.5mm 9.0mm x x x x x x 6.5mm 7.0mm 7.5mm 8.0mm 8.5mm 9.0mm Offset Offset Offset Offset Offset Offset Taper Post H156-0032 Taper Post, 15.6mm X 32mm Arthrosurface’s HemiCAP® resurfacing system is also available for the following joints: Shoulder...
Open the catalog to page 12All Arthrosurface catalogs and technical brochures
 Restore Your Active Lifestyle
16 Pages
 Kahuna
2 Pages
 NanoFx
2 Pages
 KISSloc™
2 Pages
 hip hemicap
2 Pages
 When it’s your last move
2 Pages
 Product Portfolio
15 Pages
 Great toe HemiCAP®
7 Pages
 Shoulder HemiCAP®
1 Page
 UniCAP
2 Pages
- Bone plate
- Arthrodesis plate
- Knee prosthesis
- Metallic arthrodesis plate
- Foot arthrodesis plate
- Arthrodesis screw
- Cemented knee prosthesis
- Metallic arthrodesis screw
- Foot arthrodesis screw
- Headless arthrodesis screw
- Digit joint implant
- Unicondylar knee prosthesis
- Non-locking arthrodesis plate
- Metatarsophalangeal joint implant
- Foot phalange arthrodesis plate
- Humeral head prosthesis
- Patello-femoral prosthesis