- Catalogs
- B&B DENTAL
- Prosthetic Procedures
Prosthetic Procedures

Prosthetic Procedures
B&B Dental, an Italian company, specializes in dental implants and bone regeneration materials, focusing on high-quality, affordable prosthetic implant technologies. They prioritize innovation and customer satisfaction and offer training courses for dental professionals to enhance implant-prosthetic techniques.
The catalog is intended for dental technicians and clinicians with basic surgical training. It details the DURAVIT system's prosthetic components, emphasizing implant planning, surgical, and prosthetic procedures.
The Conexa system features a unique prosthetic connection compatible with various implant lines. Key features include platform switching to reduce bone loss, an internal hexagon for torsional load resistance, and a conical connection to eliminate micro-movements.
The kit includes manual drivers, torque ratchets, and extractor screws. The unlocking system uses a Morse taper created by friction between conical surfaces, requiring an extractor screw for disassembly.
Options include cement-retained, screw-retained, and attachment-retained restorations, each with specific advantages and disadvantages, such as esthetic improvements or ease of disassembly.
Healing screws are used to rehabilitate soft tissue before final prosthetic abutment insertion, available for anterior and posterior areas.
Various transfer techniques are detailed, including pull-off, facility, and pick-up transfers, each with specific procedures for impression taking and master cast fabrication.
PEEK temporary abutments are intended for immediate loading and esthetic cases, with a usage limit of 180 days. They are customizable and available in straight and angled versions.
Non-rotating abutments are designed for screw- or cement-retained temporary crowns and cement-retained temporary bridges, while rotating abutments are used for screw-retained temporary bridges.
- Narrow diameter suitable for narrow interdental spaces.
- Applicable in both anterior and posterior regions.
- Made from titanium for precise fit and high stability.
- Features Conexa connection.
- Do not use for more than 180 days.
- Place temporary restorations out of occlusion.
- Temporary abutments can be shortened vertically by up to 6 mm.
- Devices are non-sterile and for single use only.
- Abutments can be steam sterilized at 134°C for 5 minutes.
Surgical Procedures: Shorten the temporary abutment, check heights with a silicone key, temporarily seal the screw channel, mount the temporary abutment, place the temporary restoration, and tighten the screw to 25 Ncm.
Laboratory Procedures: Sandblast, coat with opaque, fill the silicone key with acrylic resin, polish and clean the temporary restoration, reopen the screw channel, and remove excess acrylic.
Color-coded and well-marked for easy identification, used to check gingival height and axial alignment of potential restorations, made from sterilizable polymer material.
Titanium Abutments: Available in diameters Ø5 and Ø6 for anterior and posterior areas, offered in three heights to mimic natural teeth preparations.
Zirconium Abutments: Consist of a titanium base and zirconium abutment, designed for esthetic zones with ceramic cemented-retained crowns.
Used for cement-retained bridges via mesostructure, not recommended for Duravit implant system due to fitting challenges, use only in cases of extreme disparallelism and not for single crowns.
Used for screw-retained and some cemented-retained restorations, allows for patient-customized abutment fabrication using adhesive materials.
Suitable for prosthesis, hybrid prosthesis, bridges, and bar-retained overdentures, available in straight and angled versions to achieve parallelism for non-parallel implants.
Ensure precise fit of metal crowns on customized abutments, use appropriate torque settings for tightening screws, follow manufacturer’s instructions for investment materials and procedures.
Ensure the wax layer on the abutment is at least 0.7 mm thick. The wax framework of the bridge must be tension-free before investing, using standard bridge techniques. Verify the wax-up with a silicone key.
For optimal aesthetics, model a full anatomical wax-up and create a silicone key to define the shape of the customized titanium abutment. Invest the bridge framework without wetting agents and divest the abutment gently. Ensure a tension-free fit on the master cast. If necessary, cut and resplint the bridge. Sandblast, coat, and veneer the superstructure. Perform a try-on in the patient’s mouth and tighten occlusal screws to 25 Ncm.
Includes various retentive caps with different strengths and a complete set of accessories for installation. Select the height of the Equator abutment, ensuring the top margin is 1 mm above the mucosa. Use a torque control device to tighten the abutment to 25 Ncm. Take impressions using the mucodynamic technique and fabricate the master cast with type 4 dental stone.
Similar procedures to the Equator system, with specific instructions for selecting abutment height and taking impressions. The completed overdenture is returned to the doctor’s office for final placement.
Features a bar with dual surfaces for different applications. The system includes various clips and tools for installation. Select the height of the multi-use abutment and take impressions using elastomeric materials. Fabricate the master cast and ensure a tension-free fit of the framework.
The document references B&B Dental’s quality certification under UNI EN ISO 13485 standards.
Catalog excerpts

implant company PROSTHETIC PROCEDURES BASIC INFO DURAVIT IMPLANT LINES 3P - EVOLUTION - WIDE
Open the catalog to page 1
implant company Welcome to this updated edition of DURAVIT prosthetic procedure manual. B. & B. Dental S.r.l. is an Italian leading company in biomedical field specialized in the development of dental implants and materials for bone regeneration. The experience gained over the years has helped to provide high quality prosthetic implant technologies and innovative materials with affordable prices. Products and techniques are constantly improved, developed and innovated, paying attention to customer satisfaction and to meet customer needs. This is the main goal that B. & B. Dental aims to achieve....
Open the catalog to page 3
THE REVOLUTIONARY CONNECTION CONEXA PROSTHETIC SCREW The only function is to bring in total connection the abutment and the implant. It is not subjected to loads, eliminating the risk of breakage. PLATFORM SWITCHING Reduction of bone loss Long term esthetic stability Perfect bacterial seal CONICAL CONNECTION "TAPER MORSE 5° " Cold weld seal Elimination of micro-movements Elimination of unscrewing INTERNAL HEXAGON The hexagon enhances the resistance to torsional loads and allows an easy transfer of the abutment’s position from the laboratory to the dental office. UNIQUE PROSTHETIC CONNECTION Thanks...
Open the catalog to page 4
UNLOCKING SYSTEM The morse taper is created by the friction between two conical surfaces (implant and abutment), that combined with the push and pressure applied in the insertion, locks them. The locking can be deleted only using an extractor screw “EXTRACTOR” (Ref. INN-6060). Insert the extractor screw inside the abutment by using the hexagonal driver. Screw clockwise the extractor screw until the abutment comes out. Once the abutment comes out unscrew the extractor. SPHERICAL SCREW DRIVERS Ref. INN-00637 PROSTHETIC SCREW DRIVER Ref. INN-61000 (short) Ref. INN-61000L (long) Surgical procedures...
Open the catalog to page 5
Prosthetic options CEMENT-RETAINED RESTORATION The cemented implant is defined as an intermediate element of cemented prosthesis (abutments), screwed directly on the implants. Advantages: - Improved esthetics due to compliance with the emergence profile; - The concrete sealant facilitates the passivation of the structure; - Easy occlusal balancing. Disadvantages: - Difficulty in the removal of the prosthesis; - Risk that the concrete comes out below the gum line. Abutment used for the cement-retained restoration in a cemented prosthesis. SCREW-RETAINED RESTORATION The screwed implant is defined...
Open the catalog to page 6
Healing components tightening: Insert the healing screw into the implant and tighten with only light finger force. COVER SCREW It is provided in the implant package. Use it when you want to cover completely the implant after its insertion. The implant will be reopened 3-6 months later, followed by the use of healing screw. indicated for anterior area These components are used to rehabilitate soft tissue on the implant in order to ø5 insert the nal prosthetic abutment later on. ø5 indicated for posterior area These components are used to rehabilitate soft tissue on the implant in order to insert...
Open the catalog to page 7
IMPRESSION COMPONENTS Pull-off transfer (closed tray technique) Made of plastic and single-use only. It provides an impression taking that is easy and fast for each patient. Each package contains 3 pieces. Ref. INN-00306 The transfer has to be combined with the analog. Ref. INN-00585 Transfer Facility (closed tray technique) t is packaged in 3 pieces. It ensures optimal fit and precise impression taking in cases of large disparallelism. Each package contains: 1 plastic cap, 1 screw and 1 metal transfer. Each package of plastic cap contains 2 pieces. The transfer has to be combined with the analog...
Open the catalog to page 8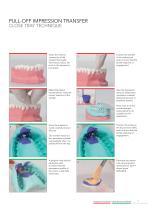
PULL-OFF IMPRESSION TRANSFER CLOSE TRAY TECHNIQUE Clean the internal connection of the implant thoroughly from blood, tissue, etc. prior to the impression procedure. Make little lateral movements to verify the correct insertion of the transfer. Position the transfer in the analog and push until you feel the tactile response of engagement. Take the impression using an elastomeric impression material (polyvinyl siloxane or polyether rubber). Note: Due to its low tensile strength, hydrocolloid is not suitable for this application. Once the material is cured, carefully remove the tray. The transfer...
Open the catalog to page 9
facility transfer close tray TEChNIQUE Place the facility transfer accurately into the implant and tight the guide screw by hand or using the hexagonal screwdriver. Place the plastic impression cap on the top of the transfer and push the impression cap in apical direction until it clicks. The impression cap is now firmly seated on the facility transfer. Take the impression using an elastomeric impression material (polyvinyl siloxane or polyether rubber). The impression cap remains in the impression material. Note: Due to its low tensile strength, hydrocolloid is not suitable for this application....
Open the catalog to page 10
pick-up transfer Open tray TEChNIQUE Clean the internal connection of the implant thoroughly from blood, tissue, etc. prior to the impression procedure. Make perforations in the custom-made impression tray Place the pick-up transfer accurately into the implant and by hand (Fig. A) or using the hexagonal screwdriver tight the pick-up screw. B Take the impression using an elastomeric impression material (polyvinyl siloxane or polyether rubber). Uncover the screws before the material is cured. Once the material is cured, loosen the pickup screws and remove the tray. Reposition and fix the analog...
Open the catalog to page 11
TEMPORARY ABUTMENT - PEEK The peek abutment has been designed as temporary abutment easily customized by the clinician or in the laboratory by the dental technician. PEEK STRAIGHT ABUTMENTS - Immediate loading in anterior area out of occlusion - Individual soft tissue management for esthetic cases - Screw- or cement-retained temporary crowns Complete with prosthetic screw Characteristics - Peek material allows a modification that is easy and quick - Easy-to-achieve esthetics due to tooth-colored and metal free - Conexa connection Note Do not use for longer than 180 days. PEEK 15° ANGLED ABUTMENTS...
Open the catalog to page 12All B&B DENTAL catalogs and technical brochures
 T-BARRIER
4 Pages
 OralSed
2 Pages
 A SMILE FOR EVERYONE
9 Pages
 Implatn bdbdental
2 Pages
 PTERYGOID IMPLANTS
4 Pages
 MILLING CENTER
20 Pages
 GUIDED SURGERY TECHNIQUE
36 Pages
 Novocor Plus
6 Pages
 IMPRESSION COMPONENTS
2 Pages
 DURAVIT WIDE
3 Pages
 Duravit 3p
5 Pages
 Surgical Procedures
36 Pages
 Products Catalog
88 Pages

- Implant abutment
- Analysis software
- Titanium implant abutment
- Straight implant abutment
- Dental surgery instrument kit
- Titanium dental implant
- Visualization software
- Internal implant abutment
- Conical dental implant
- Angled implant abutment
- Dental implant surgery instrument kit
- Bone substitute
- Dental software
- Internal dental implant
- Surgery software
- Hexagonal dental implant
- Healing abutment
- Narrow dental implant
- Internal hexagon dental implant