- Catalogs
- BA International
- BASE410
BASE410
1 /68Pages

BASE410
1 /68Pages
Catalog excerpts
ULTRASONIC CLEANING UNIT Instructions For Use EQUIPO DE LIMPIEZA POR ULTRASONIDOS CON TEMPORIZADOR Instrucciones de uso NETTOYEUR À ULTRASONS AVEC MINUTERIE Mode d’emploi ULTRASCHALLREINIGUNGSGERÄT MIT ZEITSCHALTUHR Gebrauchsanweisung DISPOSITIVO DI PULIZIA AD ULTRASUONI CON CRONOMETRO B.A International Ltd. Unit 9, Kingsthorpe Business Centre, Studland Road, Kingsthorpe, MADE IN USA Northampton, NN2 6NE fabricado en los EE.UU./Fabriqué aux États-Unis/Hergestellt in den USA/Prodotto negli
Open the catalog to page 1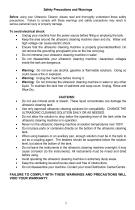
Safety Precautions and Warnings Before using your Ultrasonic Cleaner, please read and thoroughly understand these safety precautions. Failure to comply with these warnings and safety precautions may result in serious personal injury or property damage. To avoid electrical shock: Unplug your machine from the power source before filling or emptying the tank. Keep the area around the ultrasonic cleaning machine clean and dry. Water and high voltage can cause electric shock. Ensure that the ultrasonic cleaning machine is properly grounded/earthed. Do not remove the grounding prong/earth...
Open the catalog to page 3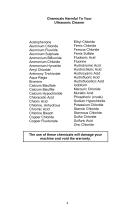
Chemicals Harmful To Your Ultrasonic Cleaner Ethyl Chloride Ferric Chloride Ferrous Chloride Ferris Sulfate Fluoboric Acid Fluorine Hydrobromic Acid Hyrdrochloric Acid Hydrocyanic Acid Hydrofluoric Acid Hydrofluosilicic Acid Iodoform Mercuric Chloride Muriatic Acid Phosphoric (crude) Sodium Hypochlorite Potassium Chloride Stannic Chloride Stannous Chloride Sulfur Chloride Sulfuric Acid Zinc Chloride Acetophenone Aluminum Chloride Aluminum Fluoride Aluminum Sulphate Ammonium Bifluoride Ammonium Chloride Ammonium Hyroxide Amyl Chloride Antimony Trichloride Aqua Regia Bromine Calcium Bisulfate Calcium...
Open the catalog to page 4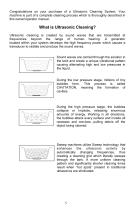
Congratulations on your purchase of a Ultrasonic Cleaning System. Your machine is part of a complete cleaning process which is thoroughly described in this owner/operator manual. What is Ultrasonic Cleaning? Ultrasonic cleaning is created by sound waves that are transmitted at frequencies beyond the range of human hearing. A generator located within your system develops the high frequency power which causes a transducer to radiate and produce the sound waves. Sound waves are carried through the solution in the tank and create a unique vibrational pattern causing alternating high and low pressures...
Open the catalog to page 5
Unpack, Set-Up and Start-Up Unpack Remove your ultrasonic cleaner from its shipping container and inspect it for any possible damage which may have occurred during shipping. (Claims for shipping damage should be made immediately against the carrier.) Check the serial number of your machine with the serial number on the shipping carton. If they are not the same, contact your dealer. Set-Up Table Top Machines Select your desired location for the cleaner. It should be in close proximity to a sink or waste lines to facilitate ease of draining. A drain assembly, supplied with the cleaners...
Open the catalog to page 6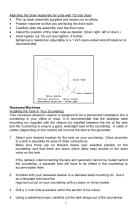
Attaching the Drain Assembly for units with 1/2 inch drain Pick up drain assembly supplied and loosen nut on elbow. Position machine so that you are facing the drain tube. Carefully slide the assembly over the drain tube. Adjust the position of the drain tube as desired. (Drain right, left or down.) Hand tighten nut. Do not over-tighten. If further tightening is needed an adjustable or a 1 inch open-ended wrench/spanner is recommended. Drain Tube Drain Assembly Valve Handle Vertical position - valve closed Horizontal position - valve open Recessed Machines Installing the Tank in...
Open the catalog to page 7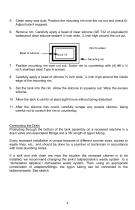
Clean away saw dust. Position the mounting rim over the cut out and check fit. Adjust hole if required. Remove rim. Carefully apply a bead of clear silicone (GE 732 or equivalent)/ waterproof clear silicone sealant ½ inch wide, ⅛ inch high around the cut out. (Not to scale) Bead of silicone Position mounting rim over cut out. Screw rim to countertop with (4) #6 x ¾ inch stainless steel Type A screws. Carefully apply a bead of silicone ⅜ inch wide, ⅛ inch high around the inside edge of the mounting rim. Set the tank into the rim. Allow the silicone to squeeze out. Wipe the excess silicone. 10....
Open the catalog to page 8
Interconnecting The Tank and Generator 1-gallon machine—Connect the coaxial cable from the tank into the R.F. connector on the rear of the generator (Turn Clockwise to lock connector). Larger machines—Connect the coaxial cable from the tank into the R.F. connector on the rear of the generator (Turn Clockwise to lock connector) and the thermo probe cable into the 3 pin connector on the rear of the generator. Connect the green/yellow wire from the tank to an appropriate earth ground such as a cold water supply pipe using a grounding clamp or similar approved grounding device. Do not attempt to...
Open the catalog to page 9
Select the appropriate Cleaning Solution. Dilute with warm tap water as specified and fill one half to two-thirds of the tank. Add parts to be cleaned. Use a basket or other accessory which keeps material off the bottom of the tank. If necessary, add more solution to bring the level to about 1 inch from the top of the tank. Plug the cleaner’s line cord into a grounded/earthed outlet. To activate your machine, simply set your timer to the number of minutes desired for cleaning. These self-timing units will automatically shut themselves off at the end of the cycle. For recessed installations with...
Open the catalog to page 10
Digital Timer The Digital timer controls the operation of the Ultrasonic cleaning machine and its options. There are three sections of control; Main Power, Timer, Heat. The Main power on / off switch: Located on the rear panel of the machine near the line cord/power cord and fuse holder. This switch controls the main power to the unit. When this switch is in the on position it is illuminated and the yellow standby light, on the front panel, is lit (item 2). Timer Section: The timer section controls the Ultrasonic operation of the machine. There are five different selectable predefined timer settings...
Open the catalog to page 11
Cleaning Methods Direct Method In this method, the part(s) to be cleaned are placed in your accessory basket. The basket is then placed directly into the main tank already containing an appropriate cleaning solution. items in basket* Cleaning times may vary depending on the amount and types of contamination on the items. We suggest that a 3-5 minute cycle be initiated and more time added if necessary. Bur tray suspended directly into the tank. Instrument cassettes, held in a cassette rack and placed directly into the tank.
Open the catalog to page 12All BA International catalogs and technical brochures
 BA Product Catalogue
44 Pages


- Drill
- Micromotor
- Dental scaler
- Electric micromotor
- Turbine
- Air turbine
- Dental turbine
- Contra-angle
- Dental contra-angle
- Dental micromotor
- Curing light
- Dental office curing light
- Ultrasonic dental scaler
- Dental handpiece
- Benchtop thermosealer
- Sterilization cassette
- Instrument sterilization cassette
- Air contra-angle
- X-ray film viewer
- Micromotor control unit