Béaba - Stéril'box

Béaba - Stéril'box
- Wash the bottle and accessories with a bottlebrush and lukewarm soapy water before each sterilization, then rinse thoroughly.
- Pour 100 ml of tap water into the bottom of the Stéril’box using a clean bottle.
- Arrange accessories according to the provided diagrams to ensure proper steam circulation.
- Place the Stéril’box in the microwave's center and set it to maximum power.
- Sterilize for 2 minutes 30 seconds for one Stéril’box, or 3 minutes for two or more.
- Allow the Stéril’box to cool for a few minutes post-cycle to prevent burns.
- Drain the sterilization water through the three designated holes.
- Keep the lid closed to maintain sterility for up to 3 hours.
- Retain and adhere to the instructions; BEABA is not liable for non-compliance.
- Ensure bottles and accessories are cleaned and rinsed before sterilization.
- Avoid placing bottles on surfaces recently cleaned with disinfectants.
- Do not use chemical sterilization solutions or tablets in the Stéril’box.
- Ensure the microwave's grill function is off and cooled before use.
- Follow stacking instructions carefully and avoid overloading the Stéril’box.
- Verify that all items are compatible with microwave sterilization; contact the manufacturer if uncertain.
- Keep the Stéril’box out of children's reach and supervise use by disabled individuals.
- Do not use the Stéril’box if damaged; contact BEABA’s after-sales service for repairs.
- Use only BEABA accessories and parts for safety.
- Post-sterilization, allow the Stéril’Box to cool to avoid burns and empty water through the three holes.
- Accessories remain sterile for 3 hours if the lid is closed.
- Wash bottles and accessories with warm soapy water and rinse thoroughly before sterilization.
- Pour 100 ml of tap water into the Stéril’Box and arrange accessories as per diagrams for steam circulation.
- Set microwave to maximum power: 2 minutes 30 seconds for one Stéril’Box, 3 minutes for two or more.
- Clean the Stéril’Box with hot soapy water or in a dishwasher, ensuring it is clean and dry before use.
- Ensure all products are microwave sterilization compatible; contact the manufacturer if unsure.
- Refer to the microwave manufacturer's instructions for use.
Catalog excerpts
Notice d’utilisation Instructions Gebrauchsanweisung Handleiding Folleto de Instrucciones Istruzioni per l’uso Instruçoes de utilizaçáo
Open the catalog to page 1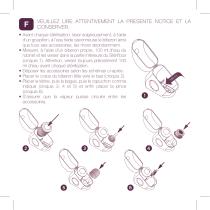
VEUILLEZ LIRE ATTENTIVEMENT LA PRESENTE NOTICE ET LA CONSERVER. • vant chaque stérilisation, laver soigneusement, à l’aide A d’un goupillon, à l’eau tiède savonneuse le biberon ainsi que tous ses accessoires, les rincer abondamment. • esurer, à l’aide d’un biberon propre, 100 ml d’eau du M robinet et les verser dans la partie inférieure du Stéril’box (croquis 1). Attention, verser toujours précisément 100 ml d’eau avant chaque stérilisation. • époser les accessoires selon les schémas ci-après. D • lacer le corps du biberon tête vers le bas (croquis 2). P • lacer la tétine, puis la bague, puis...
Open the catalog to page 2
Fermer le couvercle. Placer le Stéril’box au centre du four à micro-ondes. Sélectionner la puissance maximum. T emps de cycle de stérilisation : (four à partir de 800 W) Pour 1 seul Stéril’box => 2 min 30 s Pour 2 Stéril’box ou plus => 3 min ATTENTION : E JAMAIS DÉPASSER LE TEMPS N CONSEILLÉ. • e cycle de stérilisation terminé, laisser, dans tous les cas, le L Stéril’box refroidir quelques minutes afin de ne pas se brûler. • idanger l’eau de stérilisation par les 3 orifices (croquis 7). V • es accessoires restent stérilisés durant 3 heures dans l’appareil L si le couvercle reste fermé. RECOMMANDATIONS...
Open the catalog to page 3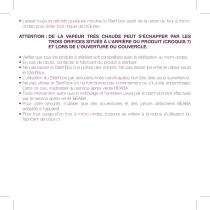
• aisser toujours refroidir quelques minutes le Stéril’box avant de le retirer du four à microL ondes pour éviter tout risque de brûlures. ATTENTION : E LA VAPEUR TRÈS CHAUDE PEUT S’ÉCHAPPER PAR LES D TROIS ORIFICES SITUÉS À L’ARRIÈRE DU PRODUIT (CROQUIS 7) ET LORS DE L’OUVERTURE DU COUVERCLE. • érifier que tous les produits à stériliser soit compatibles avec la stérilisation au micro-ondes. V • En cas de doute, contacter le fabricant du produit à stériliser. • e pas laisser le Stéril’Box à la portée des enfants. Ne pas laisser les enfants utiliser seuls N le Stéril’Box. • L’utilisation du Stéril’box...
Open the catalog to page 4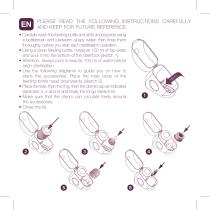
PLEASE READ THE FOLLOWING INSTRUCTIONS CAREFULLY AND KEEP FOR FUTURE REFERENCE. • arefully wash the feeding bottle and all its accessories using C a bottlebrush and lukewarm soapy water, then rinse them thoroughly, before you start each sterilisation operation. • sing a clean feeding bottle, measure 100 ml of tap water U and pour it into the bottom of the Stéril’box (sketch 1). • ttention, always pour in exactly 100 ml of water before A each sterilisation. • se the following diagrams to guide you on how to U stack the accessories. Place the main body of the feeding bottle head downwards (sketch...
Open the catalog to page 5
• Put the Stéril’box in the centre of the microwave oven. • Select maximum power. • terilising cycle time: (800 W-rated ovens ) S For 1 single Stéril’box => 2.30 min For 2 or more Stéril’box units => 3 min WARNING: EVER EXCEED THE GIVEN MICROWAVE N TIMES. • nce the sterilisation cycle is over, always let the Stéril’box cool O down for a few minutes to avoid the risk of burns. • Drain the sterilisation water out by the 3 holes (sketch 7). • he accessories will remain sterile for 3 hours inside the unit if T the lid is kept closed. IMPORTANT RECOMMENDATIONS • ead the instructions carefully and...
Open the catalog to page 6
• lways let the Stéril’box cool down for a few minutes before you take it out of the A microwave oven to avoid any risk of burns. W ARNING: ERY HOT STEAM MAY ESCAPE THROUGH THE THREE HOLES AT V THE BACK OF THE PRODUCT (SKETCH 7) AND WHEN OPENING THE COVER. • heck that all the products to be sterilised are compatible with microwave sterilisation. If in C any doubt, contact the manufacturer of the product you wish to sterilise. • eep the Stéril’Box out of children’s reach. K • Do not let children use the Stéril’Box on their own. • The use of the Stéril’box by disabled people should be supervised....
Open the catalog to page 7
BITTE LESEN SIE DIE NACHFOLGENDEN HINWEISE AUFMERKSAM DURCH UND HEBEN SIE SIE ANSCHLIESSEND GUT AUF. • or jedem Sterilisiervorgang das Fläschchen und sein V Zubehör sorgfältig mit einer Flaschenbürste und lauwarmem Seifenwasser reinigen und mit reichlich klarem Wasser spülen. • it einem sauberen Fläschchen 100 ml Leitungswasser M abmessen und in den oberen Teil der Stéril’box gießen (siehe Abb. 1). Achten Sie darauf, dass Sie vor jedem Sterilisiervorgang genau100 ml Wasser einfüllen. • lle Teile so hinstellen, wie nachstehend abgebildet. Die A Flasche mit dem Kopf nach unten stellen (Abb. 2)....
Open the catalog to page 8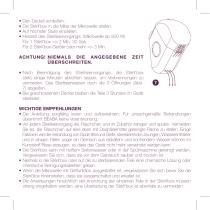
D en Deckel schließen. Die Stéril’box in die Mitte der Mikrowelle stellen. Auf höchster Stufe einstellen. H eizzeit des Sterilisiervorgangs: (Mikrowelle ab 800 W) Für 1 Stéril’box => 2 Min. 30 Sek. Für 2 Stéril’box-Geräte oder mehr => 3 Min. • ach Beendigung des Sterilisiervorgangs, die Stéril’box N stets einige Minuten abkühlen lassen, um Verbrennungen zu vermeiden. Das Sterilisierwasser duch die 3 Öffnungen (Abb. 7) abgießen. • ei geschlossenem Deckel bleiben die Teile 3 Stunden im Gerät B sterilisiert. WICHTIGE EMPFEHLUNGEN • ie Anleitung sorgfältig lesen und aufbewahren: Für unsachgemäße...
Open the catalog to page 9
• ach Beendigung des Sterilisiervorgangs die Stéril’box einige Minuten in der Mikrowelle N abkühlen lassen, um Verbrennungen auszuschließen. VORSICHT: URCH DIE DREI ÖFFNUNGEN HINTEN AM GERÄT (ABB. 7) UND D BEIM ÖFFNEN DES DECKELS KANN SEHR HEISSER DAMPF AUSTRETEN. • berprüfen Sie, dass alle zu sterilisierende Teile mit einer Sterilisierung in der Mikrowelle Ü kompatibel sind. Im Zweifelsfall wenden Sie sich an den Hersteller des zu sterilisierenden Produkts. • ie Stéril’Box nicht in Reichweite von Kindern lassen. Kinder dürfen die Stéril’Box nicht D allein benutzen. Behinderte Personen sollten...
Open the catalog to page 10All Béaba catalogs and technical brochures
 BÉABA,
28 Pages
 Béaba - Mini Therm
84 Pages
 Béaba - Infra-red thermometer
21 Pages
 Béaba - Thermobip
2 Pages
 Béaba - Exacto
23 Pages
 Béaba - Tomydoo
32 Pages
 Béaba - Ballidoo
20 Pages
 Béaba - Stéril'Express Evolutif
32 Pages
 Béaba - Bib'Bain Marie
48 Pages
 Béaba - Bib'car
16 Pages
 Béaba - Bib'secondes
32 Pages
 Béaba - Bib'expresso
45 Pages
 Béaba - Balidoo
20 Pages

- Thermometer
- Rectangular table
- Medical thermometer
- Foam mattress
- Container
- Digital thermometer
- Healthcare facility air sterilizer
- Seat cushion
- Emergency bag
- Infrared thermometer
- Forehead thermometer
- Shoulder bag
- Rack
- Floors and surface disinfectant
- Waterproof mattress
- Hospital air recirculator
- Hand sanitizer
- Air purifier with HEPA filter
- Ergonomic chair