Cerclage System
1 /12Pages

Cerclage System
1 /12Pages
Catalog excerpts
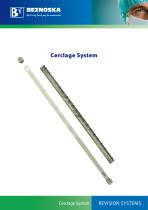
Cerclage System Cerclage System REVISION SYSTEMS
Open the catalog to page 1
Implant Description Surgical Technique ■ Preface The new cerclage system of BEZNOSKA Ltd. is a supplementary osteosynthetic method that was developed with the aim to solve successfully incidental situations and complications that may occur both during primary and revision surgeries of total joint replacements. In the first scenario, there might appear fissures in the upper end of the femur when the femoral component is being inserted, either due to bone osteoporosis or poor matching between the implant and the prepared intramedullary canal. Also, the system might be a suitable solution in cases...
Open the catalog to page 2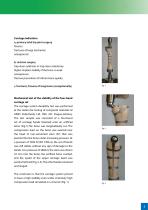
Cerclage Indication a, primary total hip joint surgery fissures fractures of large trochanter osteoporosis b, revision surgery trap-door synthesis or trap-door osteotomy higher implant stability if the bone is weak osteoporosis fracture prevention of inferior bone quality c, fractures, fissures of long bones (exceptionally) Mechanical test of the stability of the four-band cerclage set The cerclage system durability test was performed at the station for testing of composite materials of AERO Vodochody Ltd. RVK 355 Prague-Letnany. The test sample was consisted of a four-band set of cerclage bands...
Open the catalog to page 3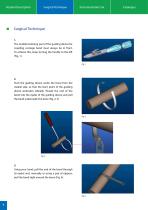
Implant Description Surgical Technique Surgical Technique 1. The mobile fastening part of the guiding device for coupling cerclage band must always be in front. To achieve this, keep turning the handle to the left (Fig. 1). Fig. 1 2. Push the guiding device under the bone from the medial side, so that the bent point of the guiding device protrudes laterally. Thread the end of the band into the eyelet of the guiding device and pull the band underneath the bone (Fig. 2, 3). 3. Using your hand, pull the end of the band through its eyelet and, manually or using a pair of nippers, pull the band tight...
Open the catalog to page 4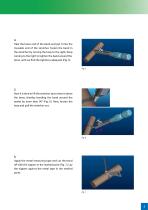
4. Take the loose end of the band and put it into the movable end of the stretcher. Fasten the band in the stretcher by turning the loop to the right. Keep turning to the right to tighten the band around the bone, until we find the tightness adequate (Fig. 5). Fig. 5 5. Now it is time to lift the stretcher up to draw it above the bone, thereby bending the band around the eyelet by more than 90° (Fig. 6). Next, loosen the loop and pull the stretcher out. 6. Apply the metal measuring tape and cut the band off with the nippers in the marked point (Fig. 7). Lay the nippers against the metal tape...
Open the catalog to page 5
Implant Description Surgical Technique 7. Put the bending device on the band in the place just cut, and bend the loose end of the band by about 90° (Fig. 8, 9, 10). 8. Pull out the bending device and, using the stamper, fold the bent part of the band onto the bone (Fig. 11,12,13,14).
Open the catalog to page 6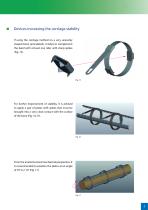
Devices increasing the cerclage stability If using the cerclage method on a very unevenly shaped bone (articulated), it helps to complement the band with at least one rider with sharp spikes (Fig. 15). For further improvement of stability, it is advised to apply a pair of plates with spikes that must be brought into a very close contact with the surface of the bone (Fig. 16,17). From the anatomical and mechanical perspective, it is recommended to position the plates at an angle of 70° to 110° (Fig. 17).
Open the catalog to page 7
Implant Description Surgical Technique Extraction of the cerclage band 1. Accessing the eyelet PStraighten out the bent part of the band over the eyelet, using a flat tool – chisel or flat screwdriver, etc. (Fig. 1, 2). 2. Opening up the eyelet Open up the eyelet using a flat tool and a pair of nippers (Fig. 3-6).
Open the catalog to page 8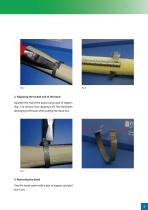
3. Adjusting the locked end of the band Squeeze the end of the band using a pair of nippers (Fig. 7) or remove it by clipping it off. This eliminates damaging soft tissue when pulling the band out. 4. Removing the band Grip the band eyelet with a pair of nippers and pull out it out.
Open the catalog to page 9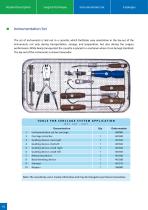
Implant Description Surgical Technique ■ Instrumentation Set The set of instruments is laid out in a cassette, which facilitates easy orientation in the lay-out of the instruments, not only during transportation, storage, and preparation, but also during the surgery performance. While being transported, the cassette is placed in a container where it can be kept sterilized. The lay-out of the instruments is shown hereunder. TOOLS FOR CERCLAGE SYSTEM APPLICATION NET LAY - OUT Note: The cassette lay-out is merely informative and may be changed as per future innovations.
Open the catalog to page 10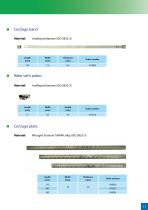
Material: Unalloyed titanium (ISO 5832-2)
Open the catalog to page 11
BEZNOSKA, s.r.o. Delnicka 2727, 272 01 Kladno, Czech Republic www.beznoska.com, [email protected]
Open the catalog to page 12All Beznoska catalogs and technical brochures
 SKIN STAPLER 35W
1 Page
 Cementless cup – type SF
20 Pages
 Radial Head Replacement
12 Pages
 Humeral head resurfacing
12 Pages
 Hip Joint Head Replacements
8 Pages
 Cemented femoral stem - type CSC
16 Pages
 Hip Hemiarthroplasty – type CSB
20 Pages
 Implants for Traumatology
16 Pages
 Revision systems
32 Pages
 Implants for primary surgery
44 Pages
 Individual oncological implants
24 Pages


- Femoral stem
- Knee prosthesis
- Acetabular prosthesis
- Cementless femoral stem
- Cementless acetabular prosthesis
- Cemented femoral stem
- Femoral head prosthesis
- Fixed-bearing knee prosthesis
- Revision femoral stem
- Revision knee prosthesis
- Cemented knee prosthesis
- Cemented acetabular prosthesis
- Revision acetabular prosthesis
- Digit joint implant
- Tibial bearing
- Trapeziometacarpal joint implant