Total Knee Joint Replacement - Type SVL
1 /36Pages

Total Knee Joint Replacement - Type SVL
1 /36Pages
Catalog excerpts

Total Knee Joint Replacement Type SVL PRIMARY IMPLANTS – KNEE
Open the catalog to page 1
Implant Description Surgical Technique Instrumentation Set Catalogue Preface The knee implant, type BEZNOSKA/SVL, was designed according to the latest know-how and experience with this type of knee implant. The design provides for a simple and perfect fixation of the implant at minimal bone resection. Shape optimization of the joint facets ensures maximal scope of mobility at good functional stability and minimization of polyethylene (UHMWPE) wear. The assortment of available sizes, always in left and right options each, makes it possible to cover the entire range of sizes ever needed. In combination...
Open the catalog to page 2
□ The implant is designated for surgeries where the posterior cruciate ligament (LCP) is to be preserved. □ The anatomical shape of the femoral and tibial component, i.e. both left (L) and right (R) options. □ Adequate choice of sizes (six). □ Variability allowing for combining femoral and tibial component of different sizes. □ Sophisticated design provides for solving femorotibial and femoropatellar defects. □ Patella available in four sizes. □ Subsequent revision system options (SVR). □ Navigation system options. Possibility to Avail the Navigation System The total knee endoprosthesis - type...
Open the catalog to page 3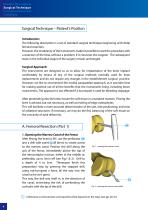
Implant Description Surgical Technique Instrumentation Set Catalogue Surgical Technique – Patient’s Position Introduction: The following description is a set of standard surgical techniques beginning with distal femoral resection. However, the modularity of the instruments makes it possible to start the procedure with a resection of the tibia, without a problem, if it convenes the surgeon. The subsequent steps in the individual stages of the surgery remain unchanged. Surgical Approach: The instruments are designed so as to allow for implantation of the knee implant comfortably by means of any...
Open the catalog to page 4
2. Preparation of Distal Femoral Resection Into the marrow canal, prepared as described above, insert (not forcefully) the nail 14 , after fitting it onto the femoral centering device 16 . We may now complement the set with the resection block for distal femoral resection 20 (see Fig. 3). I) Adjusting the angle between mechanical and femoral axes The centering matrix facilitates a smooth adjustment of the angle (valgosity) within a range of 0 to 9° for right and left leg. Adjustment of the position is done by turning the stop screw , while simultaneously keeping control over the runner position...
Open the catalog to page 5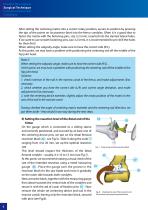
Implant Description Surgical Technique Instrumentation Set Catalogue After setting the centering matrix into a correct rotary position, secure its position by pressing the tips of the points on its posterior facet into the femur condyles. Often it is a good idea to fasten the matrix with the fastening pins, size 3.2 (mm), inserted into the slanted lateral holes. If we want to use smooth fastening pins, size 3.2 (mm), it is recommended to pre-drill the holes for them first! When setting the valgosity angle, make sure to have the correct side (R/L). At this point, we may have a problem with positioning...
Open the catalog to page 6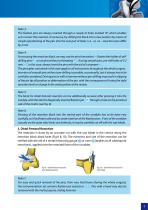
Note 3: The fixation pins are always inserted through a couple of holes marked “0”, which enables us to correct the resection, if necessary, by shifting the block into a new position by means of simple repositioning of the pins into the next pair of holes (+2, +4, +6 – resection sizes differ by 2 mm. Note 4: For securing the resection block, we may use the pins themselves 56 (fasten the holder of selfdrilling pins 61 or use pins without a threading 55 . If using smooth pins, pre-drill holes of 3.2 mm 59 . In this case, always insert the pins with the aid of a stamper 63 . The principles contained...
Open the catalog to page 7
Implant Description Surgical Technique Instrumentation Set Catalogue B. Tibial Resection 4. Preparation of Tibial Resection For adjustment of the tibial plateau resection, the extramedullary (4a) and intramedullary (4b) targeting device (pointer) can be used. The tibial pointer is designed like modular building blocks that allow the surgeon liberal transition between both options any time during the surgery. Resection blocks with dorsal angle of 0° and 5° are always applied to the outer proximal part (pointer). The pointer shoulder is also used in both cases. The only difference is that the sleeve...
Open the catalog to page 8
After loosening the tibia from the soft tissue adequately and pulling it out frontwards with the aid of the crowbar, apply the previously assembled tibial targeting device (pointer), so that the tip of the pointer arm remains approximately in the middle of the intercondylar eminence, a little closer to the front edge of the tibial plateau (it is recommended to knock the tip lightly into this position), and subsequently, fasten the ankle so that the long axis of the instrument runs along the line that connects to the middle of the tibial plateau – i.e., the middle of the ankle. Simultaneously,...
Open the catalog to page 9
Implant Description Surgical Technique Instrumentation Set Catalogue Note 8: After securing the tibial pointer in its position, prior to making the resection, check: 1. whether the tibial pointer longitudinal axis point to the middle of the ankle, i.e. whether the resection facet is perpendicular to the tibia mechanical axis (this does not apply I cases involving a very severe deformity of tibial diaphysis, where the situation has to be handled individually – ad hoc). 2. adjusting desired dorsal angle of the resection facet… 3÷5° (side view) 3. correct rotary position 4. resection level on the...
Open the catalog to page 10
Now assemble the tibial targeting device - pointer (pointer arm 24 + take the bar 25 with the matrix 32 and complement it with the resection block making sure to have the correct side (L/R) and set the dorsal angle (in this stage always at 5°) and also the control centering rod 33 (see Fig.17). While preparing the intramedullary pointer set, proceed exactly as with the extramedullary pointer. Adjustment of the resection block height is done by turning the matrix. Complement the set by driving the nail for the marrow canal through the front hole of the pointer arm. Assembling and inserting the...
Open the catalog to page 11All Beznoska catalogs and technical brochures
 SKIN STAPLER 35W
1 Page
 Cementless cup – type SF
20 Pages
 Radial Head Replacement
12 Pages
 Humeral head resurfacing
12 Pages
 Hip Joint Head Replacements
8 Pages
 Cemented femoral stem - type CSC
16 Pages
 Hip Hemiarthroplasty – type CSB
20 Pages
 Cerclage System
12 Pages
 Implants for Traumatology
16 Pages
 Revision systems
32 Pages
 Implants for primary surgery
44 Pages
 Individual oncological implants
24 Pages


- Femoral stem
- Knee prosthesis
- Acetabular prosthesis
- Cementless femoral stem
- Cementless acetabular prosthesis
- Cemented femoral stem
- Femoral head prosthesis
- Fixed-bearing knee prosthesis
- Revision femoral stem
- Revision knee prosthesis
- Cemented knee prosthesis
- Cemented acetabular prosthesis
- Revision acetabular prosthesis
- Digit joint implant
- Tibial bearing
- Trapeziometacarpal joint implant