- Catalogs
- BIOTECH DENTAL
- ATLASURGERY - EN
ATLASURGERY - EN

ATLASURGERY - EN
Biotech Dental, established in 1987, focuses on building trust with dental professionals by developing innovative and cost-effective dental products. The company has sold over a million dental implants, enhancing patient lives globally. Biotech Dental invests significantly in research and development to remain at the forefront of dental technology.
Guided Surgery System
The AtlaSurgery guided surgery system optimizes treatment time and ensures precise implant placement. It is designed for use with the Kontact® implant, excluding the Ø 5.4 mm size. The system simplifies interactions with laboratories and patients, offering pre-planned operations and live demonstrations.
Components and Tools
- Simplant® Software: Used for planning operations based on patient scans. Training is required for optimal use.
- Surgical Guide: Custom-made by Materialise Dental, available for bone, mucous, or dental supports.
- Mastertubes: Metal guides integrated into the surgical guide, available in two diameters.
- Guided Surgery Kit: Contains all necessary tools for implant insertion, excluding Ø 5.4 mm implants.
- Guide-Fixing Screws: Available in three lengths, used to secure the surgical guide.
- Punch: Essential for flapless techniques, available in regular and wide sizes.
- Spoons and Fixation Handle: Used as axial guides, identified by colored rings for different implant diameters.
- Step Drills and Reamers: Available in short and long versions, used for drilling and finishing in dense bone.
- Drill Stops: Modify drilling depth, available in two heights and color-coded.
- Implant Holder and Screwing Connector: Ensure precise implant positioning and insertion.
Conclusion
Biotech Dental's AtlaSurgery system and comprehensive range of tools support dental professionals in delivering precise and efficient implant procedures, enhancing patient outcomes.
Catalog excerpts

BIOTECH DENTAL ATLASURGERY BIOTECH DENTAL
Open the catalog to page 1
BIOTECH DENTAL GROUP, 2.0 DENTAL OFFICE PARTNER Since its creation in 1987, Biotech Dental is committed to developing a strong relationship of trust with dentists and dental technicians. Together, we design and develop ever more tailored product lines to the challenges of the future. Our position is located at the crossroads of their expectations, innovation and technology. Allow practitioners to offer the best products at the best prices for their patients: that is the first objective of Biotech Dental. With more than a million sold dental implants, we have helped to improve the lives of thousands...
Open the catalog to page 2
TABLE OF CONTENTS Presentation Page 6 3. Surgical guide Page 8 12. Drill stops Page 14 13. Implant holder Page 16 14. Implant screwing connector Page 17
Open the catalog to page 3
BIOTECH DENTAL ATLASURGERY Deliv nece
Open the catalog to page 4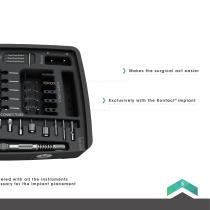
ve re d w i t h all the inst r u ment s es sar y fo r t he implant pl acem ent
Open the catalog to page 5
PRESENTATION Guided surgery allows treatment time to be optimised, whilst maintaining the bone volumes and controlling aesthetics. Thanks to this system, the operation is planned in advance and the implants are inserted with extreme accuracy. But this technique also simplifies your contact with the laboratory and your patients (part tests and live demonstrations). It is to offer you these advantages that Biotech Dental has created AtlaSurgery in collaboration with experienced surgeons. SCOPE OF APPLICATION The AtlaSurgery guided surgery system has been designed to facilitate the operation, from...
Open the catalog to page 6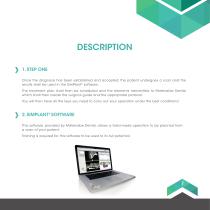
DESCRIPTION 1. STEP ONE Once the diagnosis has been established and accepted, the patient undergoes a scan and the results shall be used in the SimPlant ® software. The treatment plan shall then be scheduled and the elements transmitted to Materialise Dental which shall then create the surgical guide and the appropriate protocol. You will then have all the keys you need to carry out your operation under the best conditions! 2. SIMPLANT® SOFTWARE This software, provided by Materialise Dental, allows a tailor-made operation to be planned from a scan of your patient. Training is required for this...
Open the catalog to page 7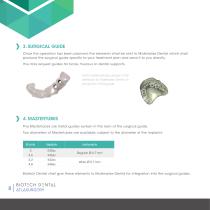
) 3. SURGICAL GUIDE Once the operation has been planned, the elements shall be sent to Materialise Dental which shall produce the surgical guide specific to your treatment plan and send it to you directly. You may request guides for bone, mucous or dental supports. Notch systematically placed in the vestibular by Materialise Dental on production of the guide. 4. MASTERTUBES The Mastertubes are metal guides sunken in the resin of the surgical guide. Two diameters of Mastertubes are available, subject to the diameter of the implants: Biotech Dental shall give these elements to Materialise Dental...
Open the catalog to page 8
5. THE KIT The AtlaSurgery guided surgery kit contains all the equipment needed to insert a Kontact ® implant (other than for Ø 5.4 mm). Wide spoons Dental tip screwdriver handle Guide-fixing screws Long reamers and drills Screwdriver axis Stops for long drills Implant holders Short reamers and drills Surgical dynamometric ratchet Stops for short drills Manual screwing connectors Regular spoons Contra-angle screwing connector Spoon fixation handle Manual screwdriver Angle screwdriver Drill extension
Open the catalog to page 9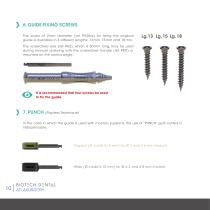
6. GUIDE-FIXING SCREWS The screw of 2 mm diameter (ref. PV20xx) for fixing the surgical guide is available in 3 different lengths: 13 mm, 15 mm and 18 mm. The screwdriver axis (ref. PA2), which is 30 mm long, may be used during manual screwing with the screwdriver handle (ref. PMT) or mounted on the contra-angle. It is recommended that four screws be used to fix the guide. 7. PUNCH (Flapless Technique) In the case in which the guide is used with mucous supports, the use of “PUNCH” gum cutters is indispensable. Regular (Ø inside 4.10 mm) for Ø 3 and 3.6 mm implant.
Open the catalog to page 10
8. SPOON FIXATION HANDLE The spoon fixation handle has two ends, a straight one and one angled at 30°. The spoon inserts into the handle. They are kept in place by a spring steel ring. They are indexed relative to the handle. The 6-sided connector guarantees maximum flexibility of orientation. 9. SPOONS The spoons act as an axial guide for passing the instruments into the surgical guide. These are easy and quick to identify thanks to the coloured ring. The spoons are identified by the implant diameters: Regular spoons for implants of Ø 3.0 mm and 3.6 mm Wide spoons for implants of Ø 4.2 mm and...
Open the catalog to page 11
9. SPOONS Their 20° angle makes them easy to handle during the operation. The spoon is a removable instrument. It acts as an axial guide for passing the instruments into the surgical kit. Total height of the guide and the spoon is 10 mm (9mm for the guide and 1 mm for the spoon). The Mastertube, which is directly integrated in the guide during production, acts as an axial guide whilst the implant compartment is being drilled. SPOON MASTERTUBE SIMPLANT® GUIDE
Open the catalog to page 12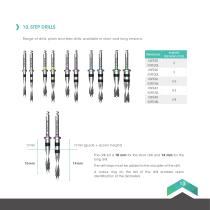
Range of drills, pilots and step drills, available in short and long versions. 10 mm (guide + spoon height) The drill bit is 10 mm for the short drill and 14 mm for the long drill. The drill stops must be added to the shoulder of the drill. A colour ring on the tail of the drill enables quick identification of the diameters.
Open the catalog to page 13
Range of reamers for finishing the apical part of the compartment in case of dense bone, available in short and long versions. BIOTECH DENTAL ATLASURGERY
Open the catalog to page 14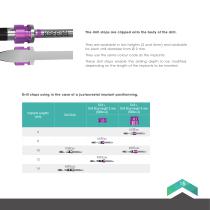
The drill stops are clipped onto the body of the drill. They are available in two heights (2 and 4mm) and available for each drill diameter from Ø 2 mm. They use the same colour code as the implants. These drill stops enable the drilling depth to be modified, depending on the length of the implants to be inserted. Drill stops using in the case of a juxtacrestal implant positionning. Drill Only Drill + Drill Stop height 2 mm (KSBxx-2) KSFExx KSFExxL Drill + Drill Stop height 4 mm (KSBxx-4)
Open the catalog to page 15
Drill stops using in the case of a subcrestal implant positionning 2 mm recommended). Drill Only KSFExx KSFExxL Drill + Drill Stop height 2 mm (KSBxx-2) Same use of the drill stop for the reamers (KSFxx). 13. IMPLANT HOLDER The implant holder is screwed into the implant in order to ensure it is positioned perfectly. The implant holder is guided into the Mastertube. There are three versions available: Implant holder REGULAR WIDE Ø3 Implant holder Implant holder
Open the catalog to page 16All BIOTECH DENTAL catalogs and technical brochures
 IMPLANT Kontact ™ Perio Level
23 Pages
 WOW - EN
7 Pages
 SURGERY - EN
19 Pages
 FIX IN - EN
16 Pages
 ATP38 - EN
20 Pages
 PROTHESE - EN
29 Pages
 NEA COVA - EN
12 Pages
 MATRI INJECT - EN
12 Pages
 RAPI D EN
12 Pages
 SMILERS - EN
7 Pages
 WEEGO.fr
16 Pages

- Implant abutment
- Titanium implant abutment
- Straight implant abutment
- Dental surgery instrument kit
- Titanium dental implant
- Internal implant abutment
- Conical dental implant
- Angled implant abutment
- Dental implant surgery instrument kit
- Hexagonal implant abutment
- Medical lamp
- Screw implant abutment
- Internal hexagon implant abutment
- Dental implant analog
- Straight dental implant analog
- External implant abutment
- Hexagonal dental implant
- 3D scanner