HEKTOR
1 /28Pages

HEKTOR
1 /28Pages
Catalog excerpts

T^L^' Global Medical Company
Open the catalog to page 1
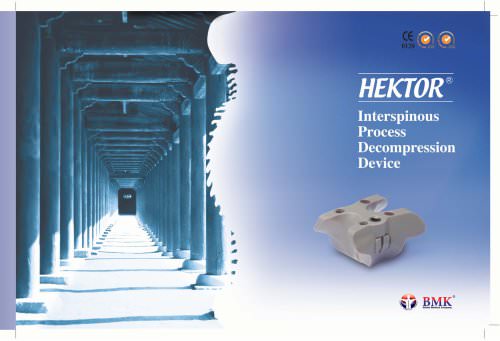
HEKTOR is implanted through a small incision in patient's back, often using just local anesthesia. The procedure takes anywhere form 45-60 minutes, but the pain relief and improved physical function may last for years. HEKTOR is a optima peek implant that is placed between two bones, called spinous processes, in patient's back. HEKTOR is minimally invasive. When implanted, the HEKTOR# is not positioned close to nerves or the spinal cord, but rather behind the spinal cord, between the spinous processes. • Anatomical shape • Minimally invasive procedure with simple steps • preservation of the supraspinous...
Open the catalog to page 2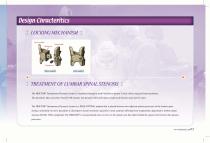
Design Chracteritics % LOCKING MECHANISM TREATMENT OF LUMBAR SPINAL STENOSIS % The HEKTOR" Interspinous Dynamic System is implanted through a small incision in patient's back, often using just local anesthesia. The procedure takes anywhere from 45~60 minutes, but the pain relief and improved physical function may last for years. The HEKTOR" Interspinous Dynamic System is a PEEK OPTIMA implant that is placed between two adjacent spinous processes of the lumbar spine during a minimally-invasive procedure to decompress neural structures, typically to treat a patient suffering from symptomatic degenerative...
Open the catalog to page 3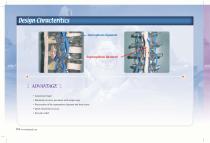
Design Chracteritics Interspinous ligament Supraspinous ligament • Anatomical shape • Minimally invasive procedure with simple steps • Preservation of the supraspinous ligament and bone tissue • Quick functional recovery • Fast pain relief
Open the catalog to page 4
Surgical Technique 3 SITE IDENTIFICATION & INCISION 8 ATTACHING IMPLANT TO INSERTER 10 COMPRESSING & TIGHTENING LOCKING SCREW 11 FINAL IMPLANT POSITION 12 REMOVAL AND/OR REVISION OF IMPLANT 13 SPECIFICATION OF INDIVIDUAL COMPONENTS 14 ACCESSORIES- SURGICAL INSTRUMENTS
Open the catalog to page 5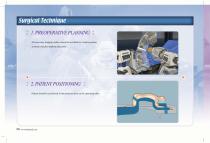
Surgical Technique All necessary imaging studies should be available to visualize patient anatomy and plan implant placement. Patient should be positioned in the prone position on the operating table.
Open the catalog to page 6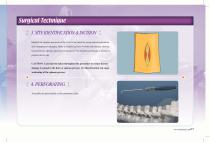
Surgical Technique 3. SITE IDENTIFICATION & INCISION t Identify the spinous processes at the level to be joined by using manual palpitation and intraoperative imaging. Make a midline incision (4-8cm) and distract, clearing tissue between spinous processes to be joined. Use Curettes and Rasps as needed to prepare device site CAUTION: Care must be taken throughout the procedure to ensure that no damage is caused to the dura or spinous process. Overdecortication can cause weakening of the spinous process. Assemble the palm handle on the perforator shaft.
Open the catalog to page 7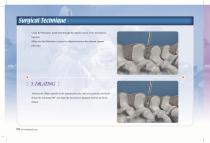
Surgical Technique Using the Perforator, punch hole through the anterior region of the interspinous Make sure that Perforator is placed at midpoint between the adjacent spinous Advance the Dilator parallel to the spinous processes until you encounter the facets. Rotate the instrument 90° and dilate the interspinous ligament with the tip of the
Open the catalog to page 8
Surgical Technique Attach the Biter into the desired interspinous space of spinous process. Gouge bone and tissue out with the Biter and/or Scalpel to expose areas for operation. and to insert a spacer assembly easily. CAUTION: Do not Biter the supraspinous ligament.
Open the catalog to page 10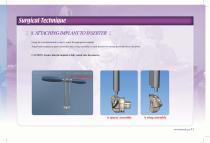
Surgical Technique t 8. ATTACHING IMPLANT TO INSERTER % Using the size determined in step 6, select the appropriate implant. Attach each implant (a spacer assembly and a wing assembly) to each Inserter by turning the Hold driver clockwise. CAUTION: Ensure that the implant is fully seated onto the inserter.
Open the catalog to page 11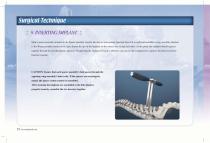
Surgical Technique Slide a spacer assembly attached to the Spacer assembly inserter into the cut interspinous ligament from left to right and assemble a wing assembly attached to the Wing assembly inserter in the right. Ensure the tips of the implants on the correct side facing each other. At this point, the implants should squeeze together through the cut interspinous ligament. If squeezing the implants by hand is difficult, you can use the Compressors to squeeze the distal end of the Inserters together. CAUTION: Ensure that each spacer assembly's hub passes through the opposing wing assembly's...
Open the catalog to page 12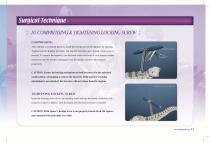
Surgical Technique 10. COMPRESSING & TIGHTENING LOCKING SCREW After implant is in desired position, attach the Compressor to the implants by aligning. Tighten until the Implant will click. The Implant will click once desired compression is reached. To remove the Inserters, turn the knob at the distal end of each Inserter counter clockwise until the Inserter disengages from the implant. Remove the Inserters CAUTION: Ensure the locking mechanism on both Inserters is in the unlocked position before attempting to remove the Inserters. If the Inserter's locking mechanism is not unlocked, the Inserters...
Open the catalog to page 13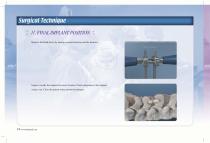
Surgical Technique % 11. FINAL IMPLANT POSITION $ Remove the Hold driver by turning counterclockwise and the Inserters. Inspect visually the implant for secure fixation. Check placement of the implant using x-ray. Close the patient using standard techniques.
Open the catalog to page 14
Surgical Technique 12. REMOVAL AND/OR REVISION OF IMPLANT Revision could be necessary under the following situations: 1. Larger implant preferred after initial implant inserted 2. Misplaced implant: too anterior or not straight 3. Implant placed too far into interspinous process space 4. Implant fracture during insertion 5. Wrong level surgery 6. Loss of neurologic function of unknown cause 7. Spinous process fracture during procedure I. Removal following fusion 4. Psychological patient fear of having a device in forever 5. Painful hardware irritating soft tissues or nerves 6. Spacer migration...
Open the catalog to page 15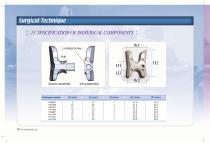
Surgical Technique $ 13. SPECIFICATION OF INDIVIDUAL COMPONENTS t
Open the catalog to page 16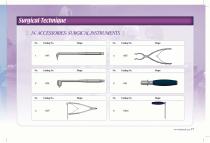
Surgical Technique 14. ACCESSORIES- SURGICAL INSTRUMENTS X No. Catalog No. Shape No. Catalog No. Shape
Open the catalog to page 17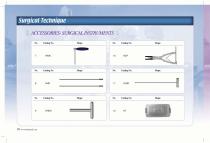
Surgical Technique ACCESSORIES- SURGICAL INSTRUMENTS
Open the catalog to page 18
Surgical Technique The HEKTOR* Interspinous Dynamic System is a PEEK implant with locking screw and marker pin made from Ti-6A1-4V ELI alloy (ASTM F136) that is fitted between the spinous processes of the lumbar spine. It consists of two components: a spacer assembly with marker pin, a wing assembly with locking screw. The spacers are offered in four hub diameters (8mm to 14mm in 2mm increments) and four wing length configurations (27mm to 33mm in 2mm increments). The device height measured from the base of the central hub to the top of the wing is fixed across all configurations at 12mm and...
Open the catalog to page 19All BM Korea catalogs and technical brochures
 GUARDIAN - SG
4 Pages
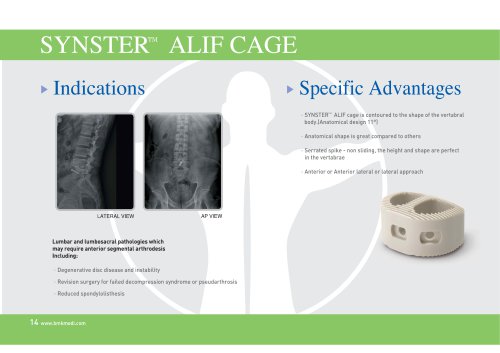 SYNSTER? ALIF CAGE
2 Pages
 Guardian
2 Pages
 Hera
Hera2 Pages
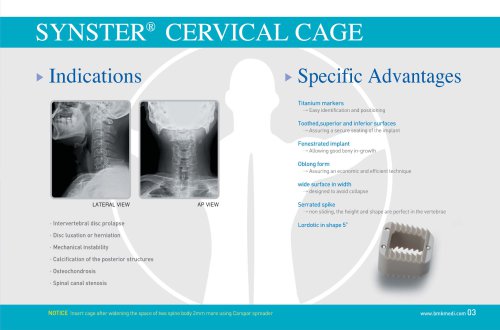 SYNSTER® CERVICAL CAGE
2 Pages
 Synster
16 Pages

Archived catalogs
 HEKTOR Old
28 Pages
- Orthopedic surgery instrument kit
- Interbody fusion cage
- PEEK interbody fusion cage
- Lumbar interbody fusion cage
- Spinal stabilization system
- Posterior spinal osteosynthesis unit
- Sterile instrument kit
- Adult spinal osteosynthesis unit
- Single-use instrument kit
- Transforaminal interbody fusion cage
- Bone cement
- Thoraco-lumbar osteosynthesis unit
- Orthopedic surgery bone cement
- Spine augmentation system
- Percutaneous kyphoplasty spine augmentation system
- Balloon catheter spine augmentation system
- Pedicle screw positioning system
- Percutaneous vertebroplasty spine augmentation system
- Minimally invasive pedicle screw positioning system
- Lumbar interspinous vertebral implant