Work methodology with BTR Pen
1 /28Pages
Work methodology with BTR Pen
1 /28Pages
Catalog excerpts

Dental training Work methodology with BTR Pen
Open the catalog to page 1
Spis treści
Open the catalog to page 2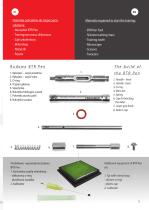
Materiatv potrzebne do rozpoczecia szkolenia: - Treningowa masa silikonowa Materials requiered to start the training: - Silicone training mass - Training tooth Budowa BTR Pen 1. R^kojesc - czqsc przednia 2. R^kojesc - czqsc tylna 3.0-ring 6. Nakr^tka blokujqca suwak M. The build ofthe BTR Pen 1. Handle - front 7. Loop's grip knob 7. Dodatkowe wyposazenie zestawu BTR Pen: 1. Koncowka z petlq nitinolowq: - silikonowy o-ring - plastikowa nasadka 1. Tip with nitinol loop - silicone o-ring
Open the catalog to page 3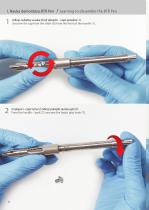
Odkręć nakrętkę suwaka (8) od rękojeści – część przednia (1). Unscrew the cap from the slider (8) from the front of the handle (1). Z rękojeści - część tylna (2) odkręć pokrętło zacisku pętli (7). From the handle – back (2) unscrew the loo
Open the catalog to page 4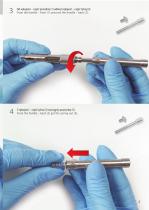
Od rękojeści – część przednia (1) odkręć rękojeść – część tylną (2). From the handle – front (1) unscrew the handle – back (2). Z rękojeści – część tylna (2) wyciągnij sprężynkę (5). From the handle – bac
Open the catalog to page 5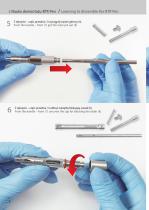
Z rękojeści – część przednia (1) wyciągnij trzpień główny (4). From the handle – front (1) get the main pin out (4) Z rękojeści – część przednia (1) odkręć nakrętkę blokującą suwak (6). From the handle – front (1) unscrew the cap f
Open the catalog to page 6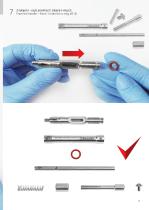
Z rękojeści – część przednia (1) zdejmij o-ring (3). From the handle – front (1) take the o-ring off
Open the catalog to page 7
Na rękojeść – część przednia (1) załóż o-ring (3) w wyżłobionym miejscu. On the handle – front (1) place the o-ring (3) in a designated space. Na rękojeść – część przednia (1) nakręć nakrętkę blokującą suwak (6) otworem o większej średnicy skierowanym w kierunku o-ringu (3). On the handle – front (1) screw the cap for blocking the slider (6) with a hole with bigger dia
Open the catalog to page 8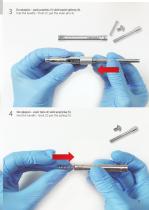
Do rękojeści – część przednia (1) włóż trzpień główny (4). Into the handle – front (1) put the main pin (4). Do rękojeści – część tylna (2) włóż sprężynkę (5). Into the handle – back
Open the catalog to page 9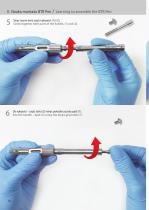
Skręć razem dwie części rękojeści (1) i (2). Screw together both parts of the handle, (1) and (2). Do rękojeści – część tylna (2) wkręć pokrętło zacisku pętli (7). Into the handle – back (2) screw the loop’
Open the catalog to page 10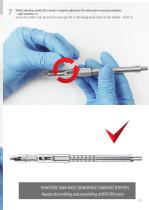
Wkręć nakrętkę suwaka (8) w otwór w trzpieniu głównym (4) widocznym w wycięciu rękojeści – część przednia (1). Screw the slider’s cap (8) into the main pin (4), in the designated notch in the handle – front (1). POWTÓRZ DWA RAZY DEMONTAŻ I MONTAŻ BTR PEN Repeat dissembling and assembling
Open the catalog to page 11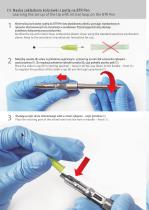
I I I . Nauka zakładania końcówki z pętlą na BTR Pen Learning the set up of the tip with nitinol loop on the BTR Pen Wysterylizuj końcówkę z pętlą do BTR Pen bez plastikowej osłonki, używając standardowych rękawów dostosowanych do sterylizacji w autoklawie. Przestrzegaj instrukcji obsługi autoklawu dołączonej przez producenta. Sterilize the tip with nitinol loop, without the plastic cover, using the standard autoclave sterilization sleeve. Keep to the autoclave’s manufacturer instraction for use. Nakrętkę suwaka (8) ustaw w położeniu wyjściowym - przesuń ją na sam dół w kierunku rękojeści – część...
Open the catalog to page 12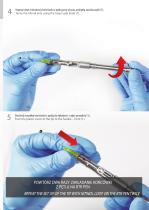
Napręż drut nitinolowy końcówki z pętlą przy użyciu pokrętła zacisku pętli (7). Tense the nitinol wire using the loop’s grip knob (7). Dociśnij nasadkę końcówki z pętlą do rękojeści- część przednia (1). Push the plastic cover of the tip to the handle – front (1). POWTÓRZ DWA RAZY ZAKŁADANIE KOŃCÓWKI Z PĘTLĄ NA BTR PEN REPEAT THE SET UP OF THE TIP WITH NITINOL
Open the catalog to page 13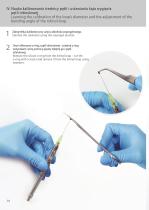
IV. Nauka kalibrowania średnicy pętli i ustawiania kąta wygięcia pętli nitinolowej Learning the calibration of the loop’s diameter and the adjustment of the bending angle of the nitinol loop. Zdezynfekuj kalibrator przy użyciu alkoholu izopropylowego. Sterilize the calibrator using the isopropyl alcohol. Usuń silikonowy o-ring z pętli nitinolowej – przetnij o-ring nożyczkami i przy pomocy pęsety zdejmij go z pętli nitinolowej. Remove the silicon o-ring from the nitinol loop – cut the o-ring with scissors and remove it from the nitinol loop using
Open the catalog to page 14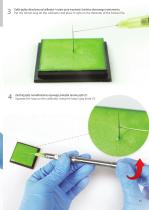
Załóż pętlę nitinolową na kalibrator i ustaw ją na wysokości średnicy złamanego instrumentu. Put the nitinol loop on the calibrator and place it right on the diameter of the broken file. Zaciśnij pętlę na kalibratorze używając pokrętła zacisku pętli (7). Squeeze the loop on the calibrator using the loop’s g
Open the catalog to page 15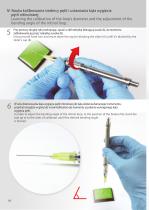
IV. Nauka kalibrowania średnicy pętli i ustawiania kąta wygięcia pętli nitinolowej Learning the calibration of the loop’s diameter and the adjustment of the bending angle of the nitinol loop. Przy pomocy drugiej ręki przekręcając, opuść w dół nakrętkę blokującą suwak (6), do momentu zablokowania jej przez nakrętkę suwaka (8). Using second hand turn and move down the cap for blocking the slider (6) untill it’s blocked by the slider’s cap (8). W celu dostosowania kąta wygięcia pętli nitinolowej do kąta ułożenia złamanego instrumentu, przechyl narzędzie w górę lub w bok kalibratora do momentu uzyskania...
Open the catalog to page 16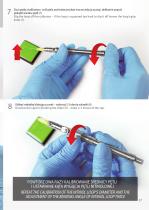
Zsuń pętlę z kalibratora - jeśli pętla zaciśnięta jest zbyt mocno żeby ją zsunąć, delikatnie popuść pokrętło zacisku pętli (7). Slip the loop off the calibrator – if the loop is squeezed too hard to slip it off loosen the loop’s grip knob (7). Odkręć nakrętkę blokującą suwak – wykonaj 2-3 obroty nakrętki (6) Unscrew the cap for blocking the slider (6) – make 2-3 moves of the cap. POWTÓRZ DWA RAZY KALIBROWANIE ŚREDNICY PĘTLI I USTAWIANIE KĄTA WYGIĘCIA PĘTLI NITINOLOWEJ REPEAT THE CALIBRATION OF THE NITINOL LOOP’S DIAMETER AND THE ADJUSTMENT OF THE BEND
Open the catalog to page 17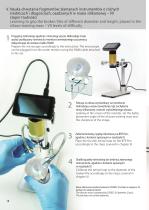
V. Nauka chwytania fragmentów złamanych instrumentów o różnych średnicach i długościach, osadzonych w masie silikonowej – VII stopni trudności Learning to grip the broken files of different diameter and length, placed in the silicon training mass – VII levels of difficulty Przygotuj mikroskop zgodnie z instrukcją użycia. Mikroskop może zostać podłączony również do monitora zewnętrznego za pomocą dołączonego do zestawu kabla HDMI. Prepare the microscope accordingly to the instruction. The microscope can be plugged in to the outter monitor using the HDMI cable attached to the set. Patrząc na obraz...
Open the catalog to page 18All CERKAMED catalogs and technical brochures
 ISOPROPYL ALCOHOL
2 Pages
 CALCIUM HYDROTOXIDE
1 Page
 Catalog
32 Pages

- Dental material
- Anatomy model
- Training anatomy model
- Dental restoration material
- Dental surgery instrument kit
- Cannula
- Resin dental material
- Protection mask
- Sterile needle
- Dental bond
- Dental model
- Protective glasses
- Biocompatible dental material
- Unisex protection mask
- Suction cannula
- Pipette
- Mouth anatomical model
- White protection mask
- Composite dental material
- Rack