- Catalogs
- CooperSurgical
- Carter-Thomason II Port Site Closure System
Carter-Thomason II Port Site Closure System
1 /6Pages

Carter-Thomason II Port Site Closure System
1 /6Pages
Catalog excerpts

! W NE Procedure Guide Eliminate Big Problems – Safely and Quickly Close Your Patients’ Port Sites Following the trocar track helps prevent loss of pneumoperitoneu
Open the catalog to page 1
Ergonomically engineered handle with ribbed surfaces provides multiple grip options Safely and Quickly Close Port Sites, Especially on Challenging Obese Patients ® Carter-Thomason Port Closure System (Shown Actual Size) Textured needle surface ensures a safe, firm hold for needle puncture Intuitive plunger mechanism retracts and extends grasping fingers to facilitate entry through the trocar and deployment in the abdomen Rigid needle design enables precise control Ribbed surface texture provides a safe, firm hold of the device Suture Passer Fixed entry and exit holes guide the Suture Passer at a...
Open the catalog to page 2
Suturing Tips Suture Guide Orientation Trocar Wound Closure Suture Guide entry and exit holes should be perpendicular to trocar wound. Ligating Abdominal Wall Bleeders Align Suture Guide entry and exit holes perpendicular to vessel. • Recommend use of synthetic, braided absorbable suture, size 0. • To aid in passage through tissue and to retrieve suture, it is recommended to place a small tail of about 1 inch in distal end of grasping finger. • Grasp near fingertips for easier release. (Monofilament suture not recommended.) STEP 1 • Use the laparoscope inserted in Site #1 to visualize Sites #2...
Open the catalog to page 3
Port Closure System STEP 2 • Use the Suture Passer to push suture through the Suture Guide, fascia, muscle and peritoneum into the abdomen. • Drop the suture and remove the Suture Passer. STEP 3 • Push the Suture Passer through the opposite side of the Suture Guide and surround the vessel. • Pick up the suture and pull back through the peritoneum, muscle, fascia and Suture Guide. STEP 4 • Remove the Suture Guide and tie off the bleeding vessel. NOTE - At times more than one suture pass is required. STEP 1 • Measure the defect. • Tailor a patch so that it extends approximately 3-5 cm beyond the hernia...
Open the catalog to page 4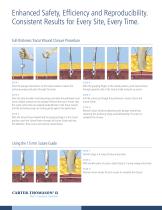
STEP 1 Press the plunger mechanism on the Suture Guide to retract the anchoring wings and place through the trocar. STEP 4 With the grasping fingers in the closed position, push Suture Passer through opposite side of the Suture Guide and pick up suture. STEP 2 Once the Suture Guide's anchoring wings are below the peritoneum and trocar, release pressure on the plunger. Remove the trocar. Ensure that the suture entry holes are aligned perpendicular to the trocar wound and the anchoring wings are resting gently against the peritoneum. STEP 3 With the Suture Passer loaded and the grasping fingers...
Open the catalog to page 5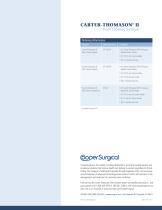
Order Number Carter-Thomason H CTI-1012P • (1) Carter-Thomason I Port Closure Port Closure System System Suture Passer • (1) 10/12 mm Suture Guide • Qty: 5 systems per box Carter-Thomason n CTI-1015P • (1) Carter-Thomason I Port Closure Port Closure System System Suture Passer • (1) 10/12 mm Suture Guide • (1) 15 mm Suture Guide • Qty: 5 systems per box *Carter-Thomason n CTXL-P • (1) Carter-Thomason I Port Closure Port Closure System XL System XL Suture Passer • (1) 10/12 mm XL Suture Guide • (1) 15 mm XL Suture Guide • Qty: 3 systems per box *Available Spring 2013 (§oper Surgical...
Open the catalog to page 6All CooperSurgical catalogs and technical brochures
 Labor and Delivery Products
16 Pages
 Surgical Products
32 Pages
 Leisegang OptiK
4 Pages
 Her Option®
6 Pages


Archived catalogs

- Detection kit
- Blood detection kit
- Catheter
- Plasma detection kit
- Surgery forceps
- Grasping forceps
- Human scissors
- Stainless steel forceps
- Retractor
- Straight forceps
- Surgical scissors
- Reusable forceps
- Endoscopy forceps
- Surgical retractor
- Bent forceps
- Tissue grasping forceps
- Curved scissors
- Curette
- Speculum
- Surgical tubing