Unity knee surgical technique

Unity knee surgical technique
- Approach: Standard medial parapatellar approach, with optional thigh tourniquet.
- Initial Tibial Preparation: EM tibial alignment guide sets flexion-extension and varus/valgus alignment, with micro-adjustments for resection depth.
- Tibial Resection: Tibial resection block is pinned for stability, alignment verified before resection.
- Initial Femoral Preparation: IM canal drill and rod used for femoral alignment, with pre-operative varus/valgus settings.
- Distal Femoral Resection: Distal femoral cutting block is pinned, alignment confirmed before resection.
- Rotational Alignment and Femoral Sizing: Femoral sizer allows rotational alignment and sizing, with shims for joint line restoration.
- 4-in-1 Femoral Resection: Cutting block facilitates anterior, posterior, and chamfer cuts, with joint line shift adjustments.
- Balancing Flexion-Extension Gaps: Gap checkers ensure balanced gaps, with adjustable or modular shim checkers.
- Tibial Inserts: Sizes 4 to 9, thickness options 9mm to 20mm, each with a specific product code.
- Dome Patella: Sizes 1 to 5, thicknesses 7.5mm to 9.5mm, with offset dome options.
- Sizing guide for PS and CR thicknesses, indicating available options for each size category.
- Patella options categorized into offset dome and centered dome, with size and thickness details.
Catalog excerpts

Responsible Innovation Unity Knee Surgical technique Measured resection approach Think isometry Feel balance
Open the catalog to page 1
Contents Operative summary Pre-operative assessment Instrumentation rationale Operative technique 2. Initial tibial preparation 4. Initial femoral preparation 6. Distal femoral resection 7. Rotational alignment and femoral sizing 9. Balancing flexion-extension gaps 10. Initial femoral trial 11. Final tibial preparation 12. Final femoral preparation 18. Insertion of definitive implants Device description Indications and Contraindications Unity Knee™ femoral sizing chart Ordering information Sizing guide Corin would like to thank Professor J Bellemans, Professor J Victor, Professor R Wittenberg,...
Open the catalog to page 2
Unity Knee™ Think isometry Feel balance Responsible Innovation
Open the catalog to page 3
Operative summary a. Initial tibial preparation c. Initial femoral preparation g. Balancing flexion/extension gaps
Open the catalog to page 4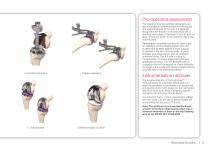
Pre-operative assessment Pre-operative long leg standing radiographs are recommended to determine both the mechanical and anatomical axes of the limb. It is generally recognised that the joint is reconstructed with a standing knee valgus of between 5° and 9° and the tibial component at 90° to the anatomic axis in the coronal plane. Radiographic templates can also be used to get an indication of the probable implant size and to determine whether additional bone support is required in the form of bone grafts. A lateral template should be used to give an indication of femoral sizing. The A-P size...
Open the catalog to page 5
Operative technique Figure A : EM tibial assembly with proximal spike attachment Figure B: EM tibial assembly with proximal spike removed AP movement button Tibial spike lock Tibial micro-adjuster release button Tibial micro-adjuster Cam lock Quick release button Ankle clamp Medial/lateral adjustment button 2. Initial tibial preparation A standard medial parapatellar approach can be used in the majority of cases. With the knee in 90° of flexion or more, the ankle clamp arms of the EM tibial alignment guide are opened and placed around the ankle. The ankle clamp can be locked into an open position...
Open the catalog to page 6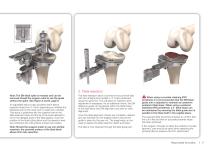
3. Tibial resection Note: The EM tibial spike is modular and can be removed should the surgeon want to use the guide without the spike. See Figure A and B, page 6. An adjustable stylus is also provided which allows resection levels from 2-10mm depending on whether the reference point is the most worn or least worn condyle. This stylus is positioned into the superior hole on the tibial resection block and the tip of the stylus allowed to rest in the deepest point of the tibial plateau. Once the position of the tibial cutting block and the resection level are confirmed, the cutting block is fixed...
Open the catalog to page 7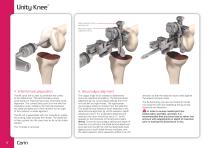
Distal resection block locking knob Resection depth adjustment drum 4. Initial femoral preparation The IM canal drill is used to penetrate the cortex of the distal femur. This drill includes a sharp proximal tip for improved accuracy of femoral canal alignment. The correct entry point is in line with the medullary canal, medial to the mid point between the distal condyles and 10mm anterior to the origin of the posterior cruciate ligament. The valgus angle to be created is determined from pre-operative templating. The femoral distal alignment jig has varus/valgus settings from 0-9° for both left...
Open the catalog to page 8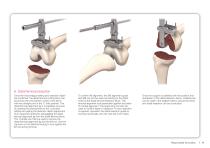
6. Distal femoral resection Once the varus/valgus setting and resection depth are confirmed, the distal femoral cutting block can be pinned onto the anterior cortex of the femur with two straight pins in the ‘0’ hole position. The distal femoral alignment jig is completely removed by rotating the locking knob to the 'unlocked' setting and pulling the resection depth adjustment drum assembly anteriorly, disengaging the distal femoral alignment jig from the distal femoral block. The T-handle can then be used to remove the distal femoral alignment jig and the IM rod. Use the camlock on the distal...
Open the catalog to page 9
1mm removable shim to compensate for 1mm condylar wear 7. Rotational alignment and femoral sizing The Unity Knee™ femoral sizer allows for both rotational alignment via the proximal angular settings and femoral sizing in conjunction with the femoral stylus. Unity Knee™ is a posterior referencing system allowing for 9mm bone resection from the medial posterior femoral condyles at all angular settings in the sizer. This facilitates preservation of the natural joint line and facilitates in providing medial collateral isometry post surgery. In instances of posterior condylar wear 1 and 2mm femoral...
Open the catalog to page 10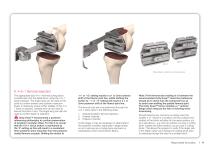
Top surface = anterior cut of size above 8. 4-in-1 femoral resection The appropriate size 4-in-1 femoral cutting block is positioned onto the distal femur using the 4-in-1 block impactor. The angel wing can be used at this point to confirm anterior and posterior resection levels. In instances where further stability of the 4-in1 block is required, collared pins can be used to secure the block in situ. The angel wing can also be used to confirm depth of resection. Unity Knee™ recommends a posterior referencing philosophy to confirm preservation of posterior condylar offset. For this it is crucial...
Open the catalog to page 11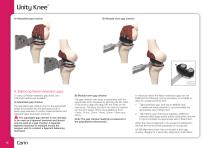
B) Modular shim gap checker push here to release 9. Balancing flexion-extension gaps To carry out flexion-extension gap check, two instrument options are available. A) Adjustable gap checker The adjustable gap checker is set to the appropriate height and inserted into the joint space both in flexion and extension to confirm balanced flexion and extension gaps have been achieved. The adjustable gap checker is not intended to be used as a ligament tensioner and should only be used as a gap checker. A separate ligament tensioner is available should the surgeon wish to conduct a ligament balancing...
Open the catalog to page 12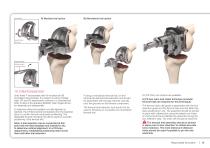
A) Modular trial option B) Monoblock trial option push here to lock Disassembly attachment removal tool 10. Initial femoral trial Unity Knee™ incorporates both A) modular and B) monoblock femoral trials. If a surgeon is using modular trials, CR and PS attachments connect to a universal trial body to allow intra-operative flexibility. See images above for assembly and disassembly. In instances where the posterior cruciate ligament is retained, the CR femoral trial is impacted onto the resected femur to confirm femoral component positioning. The dedicated femoral introducer should be used for accurate...
Open the catalog to page 13All Corin catalogs and technical brochures
 MiniHip™ - The evidence base
16 Pages
 MiniHip™ - product overview
12 Pages
 Trinity™ - surgical technique
16 Pages
 Trinity - design rationale
12 Pages
 Biomimetic Cementless Technology
12 Pages
 ECiMa™
12 Pages
 TriFit TS™
12 Pages
 Trinity™ - product overview
12 Pages
 Optimized Positioning System
12 Pages
 TriFit TS surgical technique
12 Pages
 MiniHip™ - surgical technique
12 Pages
 OPS™
OPS™6 Pages
 Unity KneeTM
16 Pages
 TriFit TS?
12 Pages
 MiniHip - design rationale
16 Pages
 MiniHip - product overview
12 Pages
 Trinity
12 Pages


- Femoral stem
- Knee prosthesis
- Acetabular prosthesis
- Cementless femoral stem
- Cementless acetabular prosthesis
- Hip prosthesis
- Cemented femoral stem
- Femoral head prosthesis
- Primary hip prosthesis
- Cementless hip prosthesis
- Revision knee prosthesis
- Mobile-bearing knee prosthesis
- Cemented knee prosthesis
- Motion assessment system
- Cemented hip prosthesis
- Mobile assessment system
- Minimally invasive femoral stem
- Minimally invasive hip prosthesis