- Catalogs
- Cowellmedi
- Atraumatic Extraction Kit
- Company
- Products
- Catalogs
- News & Trends
- Exhibitions
Atraumatic Extraction Kit
1 /6Pages

Atraumatic Extraction Kit
1 /6Pages
Catalog excerpts

Used for the immediate and effortless extraction of the root of the tooth with simple procedures.
Open the catalog to page 1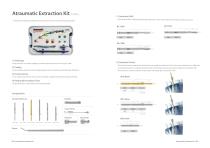
1. Extraction Drill > The Extraction Drill is composed of three types of Drills (Ø1.3 / Ø1.7 / Ø2.1) that can be selected according to the case. > Used for the immediate and effortless extraction of the root of the tooth with simple procedures. A root extraction can be done regardless of whether residual amount of root is large or small. > The Extraction Screw is fastened into the hole that was created by the Extraction Drill via the Screw method, and it is stably fixed to the remaining root. It is composed of the Ø1.8 / Ø2.2 / Ø2.6 Screws that can be selected according to the Extraction Drill....
Open the catalog to page 2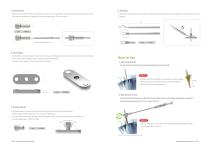
> After connecting the Post Driver to the Extraction Screw, turn the Torque Wrench in a clockwise direction in order to fix it to the > The Elevator is used by connecting it with the Torque Head and extracting the root by applying force toward a distal or mesial hole that was created by the Extraction Drill (recommended torque : 30 N.cm or more). * Connect to the Extraction Screw 4. Rest Plate > The Rest Plate is connected between the Extraction Screw and the Torque Head. It protects the part with silicon that comes into direct contact with the adjacent teeth in order to prevent teeth damage....
Open the catalog to page 3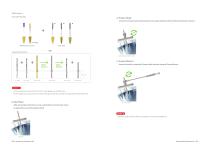
* Drilling Sequence Root Canal Preparation 4. Torque Head Connect the Torque Head to the Extraction Screw projected above the Rest Plate by rotating it clockwise. #1 Canal filling Gate drills Atraumatic Extraction kit Connect Torque Head to Screw 5. Torque Wrench Under 20 N.cm Extract the tooth by rotating the Torque Head clockwise using the Torque Wrench. - Fix the screw with a torque of 20~25 N.cm. If it is not applied, use a thicker Screw. - The low torque force causes the Screw to fall out during the extraction, and the over torque force fractures tooth root. Extraction Root After removing...
Open the catalog to page 4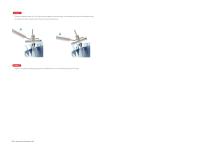
- If there are adjacent teeth with 2 or higher swaying degrees, upward pulling or downward pressing should be applied using the Elevator so that the teeth will not receive force during extraction. - If there is an adjacent tooth projected to the mesiodistal root, it must be extracted using the Elevator.
Open the catalog to page 5
Cowellmedi Co.,Ltd Floor 6, Blue Fin Tower, 42, Seochojungang-ro,Seocho-gu, Seoul, Korea Tel. +82-2-3453-5085 Fax. +82-2-3453-5086 E-mail. [email protected] Cowellmedi USA INC 218 Trianon LN Villanova PA 19085-1442 USA Tel. 1-623-939-1344 Fax. 1-623-939-1472 Cowell R&D Institute 48, Hakgam-daero 221beon-gil, Sasang-gu, Busan, 46986, Korea Tel. +82-51-314-2028 Fax. +82-51-314-2026
Open the catalog to page 6All Cowellmedi catalogs and technical brochures
 COWELL® Implant Solution v.29
137 Pages
 InnoGenic™ Wifi-Mesh
26 Pages
 Diaderm® M
3 Pages
 MEGA DERM™ Plus
3 Pages
 DIABONE
3 Pages
 INNO OSS & INNO OSS Allo
3 Pages
 INNO-CaP
3 Pages
 COWELL® BMP
6 Pages
 COWELL® Regenerative Solution
13 Pages
 InnoGenic™ Bone Carrier
5 Pages
 Volume-up™ Guide System
4 Pages
 AO4 Surgical Stent
3 Pages
 Direct Surgical Guide Kit
7 Pages
 COWELL® BMP Trephine Kit
4 Pages
 InnoGenic™ GBR Kit
7 Pages
 Sinus Lift Kit
5 Pages
 COWELL® Expert Instruments
33 Pages
 Digital Prosthesis (InnoFit)
13 Pages
 Digital Prosthesis (SFIT)
14 Pages
 InnoFit® Lodestar Kit
7 Pages
 InnoFit® Lodestar Plus Kit
11 Pages
 COWELL® Digital Products
39 Pages
 Surgical Kit
11 Pages
 Bite Impression Coping Catalog
10 Pages
 SONATOR™ 80’s
16 Pages
 Multi S & A Abutment
20 Pages
 Beauty-up™ Abutment
31 Pages
 Ball Abutment System
15 Pages
 Mini Plus® Implant
5 Pages
 INNO External Implant
9 Pages
 INNO Internal Impant
12 Pages
 INNO Submerged Narrow Implant
10 Pages
 INNO Submerged Implant
18 Pages
 COWELL® Implant System
66 Pages


- Dental material
- Dental restoration material
- Cowellmedi implant abutment
- Cowellmedi titanium implant abutment
- Cowellmedi straight implant abutment
- Cowellmedi dental surgery instrument kit
- Cowellmedi dental implant
- Cowellmedi titanium dental implant
- Cowellmedi internal implant abutment
- Cowellmedi conical dental implant
- Biocompatible dental material
- Cowellmedi angled implant abutment
- Straight dental implant
- Cowellmedi dental implant surgery instrument kit
- Cowellmedi hexagonal implant abutment
- Cowellmedi bone substitute
- Cowellmedi screw implant abutment
- Cowellmedi internal hexagon implant abutment
- Cowellmedi dental implant analog
- Internal dental implant