- Catalogs
- Cowellmedi
- COWELL® Expert Instruments
- Company
- Products
- Catalogs
- News & Trends
- Exhibitions
COWELL® Expert Instruments
1 /33Pages

COWELL® Expert Instruments
1 /33Pages
Catalog excerpts

COWELL® EXPERT INSTRUMENTS COWELL® Expert Instruments An Expert knows what makes the results
Open the catalog to page 1
• InnoGenic™ Autobone Harvester • Direct Surgical Guide Kit at makes the results An Expert knows wh
Open the catalog to page 2
COWELL® EXPERT INSTRUMENTS An Expert knows what makes the results Designed to perform maxillary sinus lifting. Aqua Membrane Lifter, Drill designs and Stopper System prevent perforation of sinus membrane. The kit includes all the instruments required for both crestal and lateral approach. Used for the immediate and effortless extraction of the root of the tooth with simple procedures. Sinus Lift Kit This revolutionary kit contains US Patented Modified Tap Drills and Spreaders in order to allow any dentists to easily lift, split or condense surrounding bone with simple drilling. Dentists can expect...
Open the catalog to page 3
MFS KIT [KSA004] > A comprehensive kit to approach direct & indirect maxillary sinus lift simply. Aqua Ratchet Connector Point Ø2.2 Crestal Drill Stopper Crestal Drill Aqua Lifter Aqua Syringe Connector Bone Carrier Aqua Tube Bone Condenser Depth Gauge Torque Wrench Sinus Elevator Lateral Stopper Lateral Drill Side Cutter
Open the catalog to page 4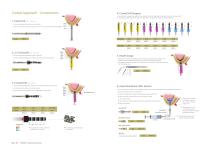
Crestal Approach - Components 4. Crestal Drill Stopper > Connected with a stopper to be drilled to the same length of the cartilage height of maxillary sinus which is measured by CT. > If not equipped with CT, fasten the stopper one step lower than expected and gradually increase the length. > Use to mark the point of perforation on cortical bone. > In the case of the remaining bone height is as low as 3.5mm, pay more attention when drilling. 3.5mm 7mm Drilling Depth Drilling Depth 2. 2.2 Twist Drill 800~1,000 rpm > Use for making guide hole before using the Crestal Drill. > Connect the Crestal...
Open the catalog to page 5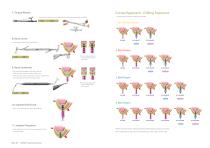
Crestal Approach - Drilling Sequence > Placing implant over Ø 4.0 is highly recommended. > Use the Torque Wrench to fix the Aqua Lifer Drill in the hole formed using Crestal Drill. Code Point Drill > Insert bone graft material using the Bone Carrier. Soft Bone Ø2.8 Crestal Drill Normal Bone If you need to expand hole, drill 1mm deeper using the crestal drill. Point Drill > After connecting the stopper with the Bone Condenser, Ø2.8 Crestal Drill Soft Bone Ø3.3 Crestal Drill Normal Bone elevate bone graft materials to inside of maxillary sinus. > Rotate bone graft material using the Bone Condenser...
Open the catalog to page 6
Lateral Approach - Components > CSE-02 : as stepwise, after using CSE-01, used for elevation of sinus membrane. > Drill after fastening the stopper according to the height of the bone. > Round shape to prevent membrane perforation. > CSE-03 : as stepwise, after using CSE-02, used for elevation of sinus membrane. 2. Ø6 Lateral Round Drill 800~1,000 rpm > Drill after fastening the stopper according to the height of the bone. > Round shaped edge. > When you expand window, must be connected with Stopper. > The residual bone should be replaced in the original position after drilling, sinus lifting...
Open the catalog to page 7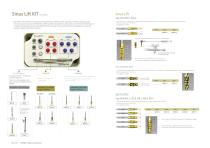
Sinus Lift Tap Drill (Ø3.6 ,Ø4.6) > Sinus Lift Kit is the world’s most innovating kit for performing maxillary sinus lift, ridge splits, and bone condensing cases. This revolutionary kit contains US Patented modified Tap Drills and Spreaders in order to allow any dentists to easily lift, split, or condense surrounding bone with simple drilling. Dentists can expect more predictable results, and patients can enjoy less traumatic surgeries with shorter chair time. > The Tap Drill uses low speed and high torque to grind through the maxillary bone, and safely elevates sinus without membrane perforation....
Open the catalog to page 8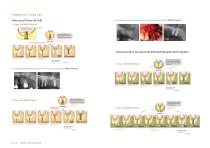
Sequence -Sinus Lift Immediate Implantation and Sinus Lift Technique with Tap Drill (Ø5.0 Fixture) Only use of Sinus Lift Drill 1. Sinus Lift (Ø4.0 Fixture) Cortical Bone piece after perforation by the Tap Drill Sinus Membrane Cortical Bone Use as Final Drill when placing Ø4.2~Ø4.5 fixture (Drilling under 30 rpm) Ø3.6 Drill Drill Speed : 20~30 rpm Torque : 45 N.cm Recommend to lift under 3mm Recommend to use Sinus Lift Drill and Spreader Drill together Ø2.2 Drill Bone Graft Fixture Placement Point Drill Drill Speed : 800~2,000 rpm Drill Speed : 20~30 rpm Torque : 45 N.cm Bone Graft using Osteotome...
Open the catalog to page 9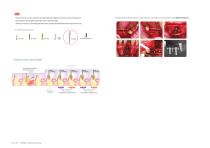
Note Ridge Split and Block Bone Augmentation Technique with Spreader Drill (Ø4.0 Fixture) > Recommend to use Sinus Lift Drill and Spreader Drill together during the Sinus Lift operation. > Easily operate by using Ø3.2 Spreader rather than Point Drill. > Avoid to over press surrounding alveolar bone using Final Drill before fixture placement in D2. Point Drill Bone Graft Final drill Sequence-Spreader Drill Speed : 20~30 rpm Torque : 45 N.cm COWELL® Expert Instruments Ø4.0 Fixture Recommend to use Tapered Fixture Use Round Bur or Chisel etc. Mark the placing area
Open the catalog to page 10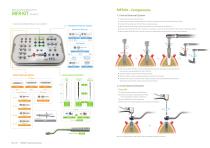
1. Fixture Removal System Connect the F/R Screw to the FRS Driver. Connect the F/R Screw mounted FRS Driver to the fixture (clockwise 40~60 N.cm) and remove the FRS Driver. > Easy removal of fractured fixture / screw / abutment. Abutment Removal System Connect the Fixture Remover to the F/R Screw (counterclockwise). Remove the fixture after connecting the Torque Wrench (counterclockwise, 100~400 N.cm). To remove the fixture from the Fixture remover, use such device as vise to fix the Fixture Remover and connect to the Torque Wrench. Abutment Remover After connecting the FRS Driver to the F/R...
Open the catalog to page 11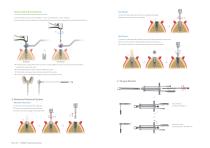
Reverse Drill & Screw Remover If the screw could not be removed by the Talon Drill Used when the thread inside the fixture is occluded and damaged. Form the hole on the fractured screw (depth 1~2mm / counterclockwise / 1,200~1,400 rpm). Reproduce the thread using the Tap Repair. Use the Screw Remover according to the created drill hole, remove the screw by pressing force (counterclockwise, 80 N.cm). Slot Driver Used for the damaged solid abutment (1piece type), healing abutment and cover screw. Form a slot on the surface of the damaged abutment using round bur. Connect the Slot Driver to the...
Open the catalog to page 12All Cowellmedi catalogs and technical brochures
 COWELL® Implant Solution v.29
137 Pages
 InnoGenic™ Wifi-Mesh
26 Pages
 Diaderm® M
3 Pages
 MEGA DERM™ Plus
3 Pages
 DIABONE
3 Pages
 INNO OSS & INNO OSS Allo
3 Pages
 INNO-CaP
3 Pages
 COWELL® BMP
6 Pages
 COWELL® Regenerative Solution
13 Pages
 InnoGenic™ Bone Carrier
5 Pages
 Volume-up™ Guide System
4 Pages
 AO4 Surgical Stent
3 Pages
 Direct Surgical Guide Kit
7 Pages
 Atraumatic Extraction Kit
6 Pages
 COWELL® BMP Trephine Kit
4 Pages
 InnoGenic™ GBR Kit
7 Pages
 Sinus Lift Kit
5 Pages
 Digital Prosthesis (InnoFit)
13 Pages
 Digital Prosthesis (SFIT)
14 Pages
 InnoFit® Lodestar Kit
7 Pages
 InnoFit® Lodestar Plus Kit
11 Pages
 COWELL® Digital Products
39 Pages
 Surgical Kit
11 Pages
 Bite Impression Coping Catalog
10 Pages
 SONATOR™ 80’s
16 Pages
 Multi S & A Abutment
20 Pages
 Beauty-up™ Abutment
31 Pages
 Ball Abutment System
15 Pages
 Mini Plus® Implant
5 Pages
 INNO External Implant
9 Pages
 INNO Internal Impant
12 Pages
 INNO Submerged Narrow Implant
10 Pages
 INNO Submerged Implant
18 Pages
 COWELL® Implant System
66 Pages


- Dental material
- Dental restoration material
- Cowellmedi implant abutment
- Cowellmedi titanium implant abutment
- Cowellmedi straight implant abutment
- Cowellmedi dental surgery instrument kit
- Cowellmedi dental implant
- Cowellmedi titanium dental implant
- Cowellmedi internal implant abutment
- Cowellmedi conical dental implant
- Biocompatible dental material
- Cowellmedi angled implant abutment
- Straight dental implant
- Cowellmedi dental implant surgery instrument kit
- Cowellmedi hexagonal implant abutment
- Cowellmedi bone substitute
- Cowellmedi screw implant abutment
- Cowellmedi internal hexagon implant abutment
- Cowellmedi dental implant analog
- Internal dental implant