- Catalogs
- Cowellmedi
- InnoFit® Lodestar Plus Kit
- Company
- Products
- Catalogs
- News & Trends
- Exhibitions
InnoFit® Lodestar Plus Kit
1 /11Pages

InnoFit® Lodestar Plus Kit
1 /11Pages
Catalog excerpts

InnoFit® Lodestar Plus Kit Exclusive for the INNO Submergedand Submerged Narrow Implant System.
Open the catalog to page 1
InnoFit® Lodestar Plus Kit > A total guided surgery solution applicable to various types of clinical cases. > Exclusive for the INNO Submerged and Submerged Narrow Implant System. Bone Flattening Drill Fixture Driver Drill Extension 002 InnoFit® Lodestar Plus Kit InnoFit® Lodestar Plus K
Open the catalog to page 2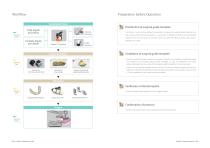
Preparation before Operation Consultation & Scan Dental Clinic Disinfection of surgical guide template Fully digital procedure Partially digital procedure Intraoral Scanning Model Scanning Installation of surgical guide template Implant Simulation Dental Lab Fabrication 3D Printing & CAD/CAM Abutment & crown design Implant simulation & surgical guide template Verification of dental implant Dental Lab Surgical guide template Temporary crown Customized abutment Dental Clinic 004 InnoFit® Lodestar Plus Kit InnoFit® Lodestar Plus Kit 005
Open the catalog to page 3
Comprehension and Usage of Offset > Used for soft tissue elimination (the gingiva in the position where the implant is to be Tissue Punch placed can be incised in a circular shape). > The basic length from the fixture platform to the top of the Sleeve is 9mm. > In case that gingiva is thick or fixture needs to be placed deeper due to low bone density, use the Sleeve 2 or 4mm upright to the top. > The higher offset value, the less accurate it will be, so use 9mm if possible. > Hemostatic effect, small scar, fast wound healing affect is occurred after the operation due to small diameter of tissue...
Open the catalog to page 4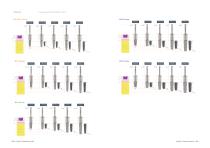
Pilot Drill > Low speed, 50 rpm without irrigation / 50 N.cm 008 InnoFit® Lodestar Plus Kit InnoFit® Lodestar Plus Ki
Open the catalog to page 5
> Expand the cortical bone in D1/D2 bone to prevent excessive implantation of the fixture. > Able to apply offset (9mm, 11mm, 13mm). > 50 rpm without irrigation. Fixture Driver - Molar > Use in case the Implant Adapter can not be used due to small size of opened mouth or narrow gap between antagonist tooth. > After implanting 4~5mm, change to the Implant Adapter to complete placement. Adapter Extension ② Change to the Implant Adapter. Abutment Profile > In case the Implant Adapter is too short to use, connect the Ratchet or > Used for elimination of the alveolar bone that interferes with the...
Open the catalog to page 6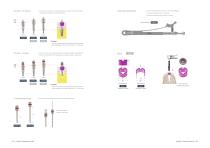
> Connect the 1.2 Hex Driver to implanted fixture to prevent the movement of the Torque Wrench(Square) > Use to implant the fixture (Connect to the Implant Adapter). > Use after connecting to the 1.2 Hex Driver. > Use after connecting to the V Anchor (Fix Bone). surgical guide template in cases as edentulous. Torque Wrench * Caution - Connect by aligning to the Sleeve offset of connected fixture. - Basic composition of the Sleeve offset 9mm (11, 13mm extra). > Fix the V Anchor using the Torque Wrench in the hole made after initial drilling to prevent the movement of the surgical guide template...
Open the catalog to page 7
Drill Protocol * Drilling method Drill Protocol (7~10mm) INNO Sub Fixture Ø5 x 10mm Bone Tissue Punch Flattening Initial Drill - Make sure with drilling in a desired direction without a change in path through the primary drill contact (A) with the hole created by the previous drilling and the secondary contact (B) with the sleeve. - Create the hole using the initial drill and insert the next drill into the hole made during the previous step and drill after achieving the drill and sleeve contact (A&B). - If drilling only with the sleeve contact (B) without the drill contact (A), the path may not...
Open the catalog to page 8
User Manual for Library of InnoFit® Lodestar Plus Kit 016 InnoFit® Lodestar Plus Kit InnoFit® Lodestar Plus Kit 017
Open the catalog to page 9
1. Start your ImplaStation program. 2. Click the ‘New Project Load DICOM’ button on the left menu to load CBCT DICOM files of the patient. 1. Start your Implant Studio program and load Scan Data(Surface, CT) for implant planning. 2. Place crowns according to the planning. 3. Select the area that you want to visualize by adjusting angles. 4. Click the ‘Show STLs’ button on the right menu, then click ‘STL’ to load STL file of the patient. Click ‘Align to DICOM or another STL’ when a pop-up appears. 3. Select the area that you want to visualize by adjusting 3 views. 4. Draw a panoramic curve which...
Open the catalog to page 10
InnoFit® Lodestar Plus Kit Cowellmedi Co.,Ltd Floor 6, Blue Fin Tower, 42, Seochojungang-ro,Seocho-gu, Seoul, Korea Tel. +82-2-3453-5085 Fax. +82-2-3453-5086 E-mail. [email protected] Cowellmedi USA INC 218 Trianon LN Villanova PA 19085-1442 USA Tel. 1-623-939-1344 Fax. 1-623-939-1472 Cowell R&D Institute 48, Hakgam-daero 221beon-gil, Sasang-gu, Busan, 46986, Korea Tel. +82-51-314-2028 Fax. +82-51-314-2026
Open the catalog to page 11All Cowellmedi catalogs and technical brochures
 COWELL® Implant Solution v.29
137 Pages
 InnoGenic™ Wifi-Mesh
26 Pages
 Diaderm® M
3 Pages
 MEGA DERM™ Plus
3 Pages
 DIABONE
3 Pages
 INNO OSS & INNO OSS Allo
3 Pages
 INNO-CaP
3 Pages
 COWELL® BMP
6 Pages
 COWELL® Regenerative Solution
13 Pages
 InnoGenic™ Bone Carrier
5 Pages
 Volume-up™ Guide System
4 Pages
 AO4 Surgical Stent
3 Pages
 Direct Surgical Guide Kit
7 Pages
 Atraumatic Extraction Kit
6 Pages
 COWELL® BMP Trephine Kit
4 Pages
 InnoGenic™ GBR Kit
7 Pages
 Sinus Lift Kit
5 Pages
 COWELL® Expert Instruments
33 Pages
 Digital Prosthesis (InnoFit)
13 Pages
 Digital Prosthesis (SFIT)
14 Pages
 InnoFit® Lodestar Kit
7 Pages
 COWELL® Digital Products
39 Pages
 Surgical Kit
11 Pages
 Bite Impression Coping Catalog
10 Pages
 SONATOR™ 80’s
16 Pages
 Multi S & A Abutment
20 Pages
 Beauty-up™ Abutment
31 Pages
 Ball Abutment System
15 Pages
 Mini Plus® Implant
5 Pages
 INNO External Implant
9 Pages
 INNO Internal Impant
12 Pages
 INNO Submerged Narrow Implant
10 Pages
 INNO Submerged Implant
18 Pages
 COWELL® Implant System
66 Pages


- Dental material
- Dental restoration material
- Implant abutment
- Titanium implant abutment
- Straight implant abutment
- Dental surgery instrument kit
- Titanium dental implant
- Internal implant abutment
- Conical dental implant
- Biocompatible dental material
- Angled implant abutment
- Straight dental implant
- Dental implant surgery instrument kit
- Hexagonal implant abutment
- Bone substitute
- Screw implant abutment
- Internal hexagon implant abutment
- Dental implant analog
- Internal dental implant