- Catalogs
- Cowellmedi
- MFR Kit (Multi-Functional Removal™ Kit)
- Company
- Products
- Catalogs
- News & Trends
- Exhibitions
MFR Kit (Multi-Functional Removal™ Kit)
1 /4Pages

MFR Kit (Multi-Functional Removal™ Kit)
1 /4Pages
Catalog excerpts
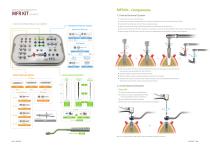
1. Fixture Removal System ① Connect the F/R Screw to the FRS Driver. ② Connect the F/R Screw mounted FRS Driver to the fixture (clockwise 40~60 N.cm) and remove the FRS Driver. > Easy removal of fractured fixture / screw / abutment. Abutment Removal System ④ Remove the fixture after connecting the Torque Wrench (counterclockwise, 100~400 N.cm). ⑤ To remove the fixture from the Fixture remover, use such device as vise to fix the Fixture Remover and connect to the Torque Wrench. Abutment Remover ③ Connect the Fixture Remover to the F/R Screw (counterclockwise). ⑥ After connecting the FRS Driver...
Open the catalog to page 2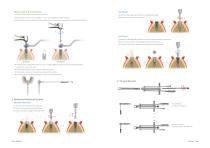
Reverse Drill & Screw Remover If the screw could not be removed by the Talon Drill ① Used when the thread inside the fixture is occluded and damaged. ① Form the hole on the fractured screw (depth 1~2mm / counterclockwise / 1,200~1,400 rpm). ② Reproduce the thread using the Tap Repair. ② Use the Screw Remover according to the created drill hole, remove the screw by pressing force (counterclockwise, 80 N.cm). Slot Driver ① Used for the damaged solid abutment (1piece type), healing abutment and cover screw. ② Form a slot on the surface of the damaged abutment using round bur. ③ Connect the Slot...
Open the catalog to page 3
Cowellmedi Co.,Ltd Floor 6, Blue Fin Tower, 42, Seochojungang-ro,Seocho-gu, Seoul, Korea Tel. +82-2-3453-5085 Fax. +82-2-3453-5086 E-mail. [email protected] Cowellmedi USA INC 218 Trianon LN Villanova PA 19085-1442 USA Tel. 1-623-939-1344 Fax. 1-623-939-1472 Cowell R&D Institute 48, Hakgam-daero 221beon-gil, Sasang-gu, Busan, 46986, Korea Tel. +82-51-314-2028 Fax. +82-51-314-2026
Open the catalog to page 4All Cowellmedi catalogs and technical brochures
 COWELL® Implant Solution v.29
137 Pages
 InnoGenic™ Wifi-Mesh
26 Pages
 Diaderm® M
3 Pages
 MEGA DERM™ Plus
3 Pages
 DIABONE
3 Pages
 INNO OSS & INNO OSS Allo
3 Pages
 INNO-CaP
3 Pages
 COWELL® BMP
6 Pages
 COWELL® Regenerative Solution
13 Pages
 InnoGenic™ Bone Carrier
5 Pages
 Volume-up™ Guide System
4 Pages
 AO4 Surgical Stent
3 Pages
 Direct Surgical Guide Kit
7 Pages
 Atraumatic Extraction Kit
6 Pages
 COWELL® BMP Trephine Kit
4 Pages
 InnoGenic™ GBR Kit
7 Pages
 Sinus Lift Kit
5 Pages
 COWELL® Expert Instruments
33 Pages
 Digital Prosthesis (InnoFit)
13 Pages
 Digital Prosthesis (SFIT)
14 Pages
 InnoFit® Lodestar Kit
7 Pages
 InnoFit® Lodestar Plus Kit
11 Pages
 COWELL® Digital Products
39 Pages
 Surgical Kit
11 Pages
 Bite Impression Coping Catalog
10 Pages
 SONATOR™ 80’s
16 Pages
 Multi S & A Abutment
20 Pages
 Beauty-up™ Abutment
31 Pages
 Ball Abutment System
15 Pages
 Mini Plus® Implant
5 Pages
 INNO External Implant
9 Pages
 INNO Internal Impant
12 Pages
 INNO Submerged Narrow Implant
10 Pages
 INNO Submerged Implant
18 Pages
 COWELL® Implant System
66 Pages


- Dental material
- Dental restoration material
- Implant abutment
- Titanium implant abutment
- Straight implant abutment
- Dental surgery instrument kit
- Dental implant
- Titanium dental implant
- Internal implant abutment
- Conical dental implant
- Biocompatible dental material
- Angled implant abutment
- Straight dental implant
- Dental implant surgery instrument kit
- Hexagonal implant abutment
- Bone substitute
- Screw implant abutment
- Internal hexagon implant abutment
- Dental implant analog
- Internal dental implant