- Catalogs
- CrossRoads Extremity Systems
- LAPIDUS IMPLANT SYSTEM
LAPIDUS IMPLANT SYSTEM
1 /8Pages

LAPIDUS IMPLANT SYSTEM
1 /8Pages
Catalog excerpts

OVERVIEW A C T I V E S T A B I L I Z A T I O N® The Active Stabilization® System is the only hybrid plating system to replace static compression with dynamic continuous compression. It is designed to address the most challenging foot & ankle procedures. Bending & Rotational Stability Continuous Compression P RO D U C T F E AT U R E S Two distinct plate options Plate and clip designed with 10˚ contour to match patient anatomy 3x more effective at maintaining compression than a traditional plate and cross screw* Sterile recoverable instrumentation with EcoSMART® *data on file Active Stabilization...
Open the catalog to page 2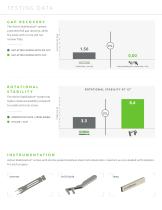
gap recovery The Active Stabilization® system presented full gap recovery, while the plate with no clip did not recover fully. # gap after loading with no clip # gap after loading with clip r o t at i o n a l stability The Active Stabilization® system has higher rotational stability compared to a plate and cross screw. # competitive plate + cross screw # z-plate + clip INSTRUMEN TAT IO N Active Stabilization® comes with sterile packed stainless steel instrumentation. Inserters are pre-loaded with implants for each surgery.
Open the catalog to page 3
acceptable clip size 18 slot length / clip size 18 acceptable clip size 18 slot length / clip size 18 SIZE RANGE SIZE OPTION
Open the catalog to page 4
instruments included in each kit Instrumentation is packaged in sterile kits for efficiency and convenience. After surgery, the instrumentation is returned to CrossRoads® via the EcoSMART® Instrument Recovery Service providing a significant cost savings over typical disposable reusable instrument kits. Driver Bits (2) Fixation Pins (2) Locking Drill Guide (2) Non-Locking Drill Guide E Depth Gauge Probe clips • 1 each, (18x18 Kit) • 1 each, (18x20 Kit) • 2 each Single Pack, (18x18,18x20) PLATES • 2 each, Lapidus Z Alpha • 2 each, Lapidus Z Beta • 2 each, Lapidus C Alpha • 2 each, Lapidus C Beta...
Open the catalog to page 5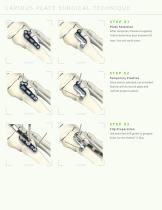
L A P I D U S P L AT E S U R G I C A L T EC H N I Q U E STEP 01 Plate Selection After temporary fixation is applied, trial to determine best anatomic fit. Note: Trial with sterile plates. STEP 02 Temporary Fixation Once plate is selected, use provided fixation pins to secure plate and confirm proper location. STEP 03 Clip Preparation Use provided drill guide to prepare holes for the HiMAX™-C Clip.
Open the catalog to page 6
step 0 4 Clip Placement insert HiMAX™-C Clip through the plate and tamp flush. STEP 05 Screw Placement Starting with the most distal hole, prepare screw holes and fill with appropriate length nonflocking screws using nonflocking drill guide. Repeat until all holes are filled. Note: Non-locking screws are recommended *Patents Issued
Open the catalog to page 7
S'CrossRoads HHl H Extremity Systems 6055 Primacy Parkway, Suite 140, Memphis, Tennessee 38119 (901) 221-8406 | [email protected] | crextremity.com
Open the catalog to page 8All CrossRoads Extremity Systems catalogs and technical brochures
 Hybrid Implant System
6 Pages
 ACTIVE STABILIZATION®
8 Pages
 STEP IMPLANT SYSTEM
4 Pages
 MotoClip® Max & HiMAX™ Clips
4 Pages

- Bone plate
- Bone substitute
- Arthrodesis plate
- Orthopedic surgery bone substitute
- Metallic arthrodesis plate
- Osteotomy plate
- Allograft bone substitute
- Rigid bone substitute
- Non-absorbable bone staple
- Foot arthrodesis plate
- Arthrodesis screw
- Metallic arthrodesis screw
- Foot arthrodesis screw
- Foot osteotomy plate
- Hallux valgus osteotomy plate