Implantium II

Implantium II
The Implantium II Product Catalog is a comprehensive resource detailing the characteristics, components, and procedures associated with the Implantium II dental implant system. It covers specifications for fixtures, surgical components, and prosthetic procedures.
The system features CaP coating and S.L.A. surface treatments to enhance cell adhesion and bone stability. Its biologic connection and thread design ensure hermetic sealing and effective load distribution, reducing micro-movement and bone loss. Compatibility with existing Implantium II components is maintained.
Fixtures are color-coded by diameter for easy identification, with detailed specifications provided for each diameter, including platform and body dimensions.
Available with CaP coating or S.L.A. surface, fixtures come with specific dimensions and art numbers. The catalog advises against over-torquing during insertion to prevent damage.
Includes cover screws and healing abutments, with specifications for single-use components and torque recommendations.
Outlines multiple prosthetic procedures, including abutment level and fixture level impressions, with detailed specifications for various abutment types such as dual, combi, and custom abutments. Each procedure includes specific components and torque recommendations.
Details on surgical kits, drill stopper kits, and other necessary instruments are provided, ensuring compatibility with the Implantium II system.
The catalog serves as a comprehensive guide for dental professionals, offering detailed specifications and procedures to ensure successful implant placement and restoration.
The catalog provides detailed specifications and guidelines for various dental surgical instruments and kits, including drills, stoppers, instruments, and kits used in dental implant procedures.
Lists different types of drills with specifications such as diameter, length, and article numbers. Recommended drill speeds are 1,000 rpm with a torque of 30-45 N·cm, and irrigation is advised. Stoppers are available for different drilling depths, suitable for both guide and final drills.
Details various instruments, including parallel pins, path pins, adapters, ratchets, hex drivers, and tissue punches, each specified with dimensions and article numbers to ensure compatibility with the dental implant system.
Describes several kits, including the DASK (Dentium Advanced Sinus Kit), Sinus Bur Kit, Osteotome Kit, Trephine Kit, and Prosthetic Kit. Each kit contains specific tools designed for particular procedures, such as sinus elevation or bone compression, with detailed specifications for each component.
Includes reamer guides, hex drivers, and other tools necessary for prosthetic and laboratory work, with specifications for precise identification and use.
Provides tools for screw removal, abutment hex removal, and fixture removal, with detailed specifications for each tool.
The catalog emphasizes that specifications are subject to change and some products may not be available due to pending approvals. It is a comprehensive guide for dental professionals using the Implantium II system.
Catalog excerpts

Implantium II Product Catalog Product Catalog
Open the catalog to page 1
Implantium II ^da-ice tAe 'Wudtome/*
Open the catalog to page 2
Implantium ll Color Coding by Diameter 08 Implantium ll Fixture [CaP Coating] 09 Implantium ll Fixture [S.L.A. Surface] 10 Surgical Components Covei Sciew II Dual / Combi Abutment - Abutment Level I mpression 14 Dual Abutment [Non-hex] 17 Abutment Level Impression Components 18 Dual / Custom / Dual Milling / Angled / Direct-Casting / Metal-Casting / Temporary (Plastic & Ti) Abutment - Fixture Level Impression 20 Fixture Level Impression Components 21 Dual Milling Abutment 24 Screw Abutment - Abutment Level Impression 30 Angled Screw Abutment 32 Screw Abutment...
Open the catalog to page 3
Implantium II Product Catalog Allows faster rate of cell adhesion Achieve primary stability of surrounding bone earlier after initial implant placement
Open the catalog to page 4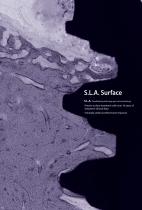
S.L.A. Surface S.L.A. (Sandblasting with large grit and acid etching) Proven surface treatment with over 10 years of long-term clinical data Clinically yields excellent bone response
Open the catalog to page 5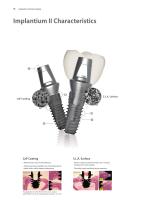
Implantium II Product Catalog · Allows faster rate of cell adhesion · Achieve primary stability of surrounding bone earlier after initial implant placement · Proven surface treatment with over 10 years of long-term clinical data · Clinically yields excellent bone response The application of a thin film of CaP on S.L.A. surface yielded better results in osseointegration during in vivo tes
Open the catalog to page 6
Implantium II Product Catalog Implantium II Characteristics A Extended Cutting Edge B Bacteria Resistant Bevel · Improved self-tapping ability · llows more control over the depth of fixture A placement · lleviates the occurrence of over-torque A during placement in dense bone · he tapered bevel platform design may make bone T profiling unnecessary at 1st, 2nd surgery. · he conical hex connection between implant and abutment T interface ensures hermetic sealing. · he biologic connection distributes the load to the fixture evenly. T Therefore it helps minimize micro-movement and marginal bone loss....
Open the catalog to page 7
Implantium II Product Catalog Implantium II Color Coding by Diameter Color Coding by Diameter • Cover screw is not included. Fixture Platform Diameter Fixture Body Diameter Fixture Bevel Height Fixture Implantium II (Mount Free) Platform Ø
Open the catalog to page 8
Implantium II Product Catalog 09 Note: To pievent damage to the Implant driver or fixture, do not ovei toique during fixture insertion
Open the catalog to page 9
10 Implantium II Product Catalog Note: To prevent damage to the Implant driver or fixture, do not over torque during fixture insertion
Open the catalog to page 10
Implantium II Product Catalog Cover Screw • Single use only Color: Green
Open the catalog to page 11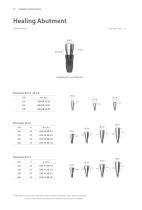
12 Implantium II Product Catalog • Single use only Unit: mm, Scale 1 : 1.5 Hex driver: Use no more than 5N-cm torque when screwing a cover screw to a fixture. If hex is worn, slot on the head of the product can be used to rotate it.
Open the catalog to page 12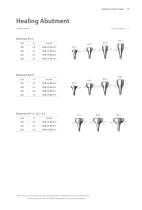
Implantium II Product Catalog 13 • Single use only Unit: mm, Scale 1 : 1.5 Hex driver: Use no more than 5N-cm torque when screwing a cover screw to a fixture. If hex is worn, slot on the head of the product can be used to rotate it.
Open the catalog to page 13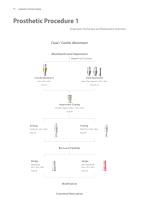
Implantium II Product Catalog Prosthetic Procedure 1 Impression Technique and Restoration Selection Dual / Combi Abutment Abutment Level Impression Closed Tray Technique Combi Abutment Dual Abutment Impression Coping Transfer (Snap on) Ø4.5 / Ø5.5 / Ø6.5 Page 18 Burn-out Cylinder
Open the catalog to page 14
Implantium II Product Catalog 15 # Note: It is recommended to keep the torque level at 25~30 Ncm to tighten the combi abutment with fixture
Open the catalog to page 15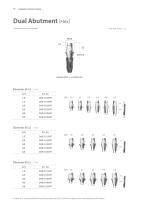
Implantium II Product Catalog Dual Abutment [Hex] • Abutment screw is included I ※Note: t is recommended to keep the torque level at 25~30 N·cm to tighten the dual abutment with fixture
Open the catalog to page 16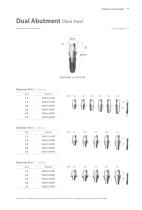
Implantium II Product Catalog Dual Abutment [Non-hex] • Abutment screw is included I ※Note: t is recommended to keep the torque level at 25~30 N·cm to tighten the dual abutment with fixture
Open the catalog to page 17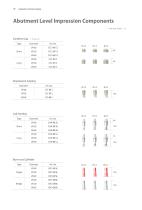
18 Implantium II Product Catalog Impression Coping Art. No. CIC 45 L CIC 55 L CIC 65 L Burn-out Cylinder Type
Open the catalog to page 18
Implantium II Product Catalog 19
Open the catalog to page 19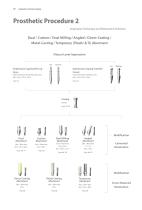
Implantium II Product Catalog Prosthetic Procedure 2 Impression Technique and Restoration Selection Dual / Custom / Dual Milling / Angled / Direct-Casting / Metal-Casting / Temporary (Plastic & Ti) Abutment Fixture Level Impression Hex Impression Coping Pick-up Impression Coping Transfer tray technique (Simple case) tray technique (Complicated case) Analog DANSE Page 21, 22 Dual Abutment Custom Abutment Dual Milling Abutment Angled Abutment Modification Cemented Restoration Modification Direct-Casting Abutment Metal-Casting Abutment Temporary Abutment
Open the catalog to page 20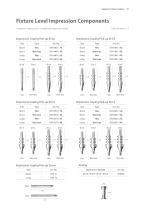
Implantium II Product Catalog 21 • Impression coping screw is included with Impression coping Unit: mm, Scale 1 : 1.5 Impression Coping Pick-up 0 4.0 Impression Coping Pick-up 0 4.5 Impression Coping Pick-up Screw Size Short Long
Open the catalog to page 21
22 Implantium II Product Catalog • Impression coping screw is included with Impression coping Unit: mm, Scale 1 : 1.5 Impression Coping Transfer 0 4.0 Impression Coping Transfer 0 4.5 Impression Coping Transfer Screw Size Short Long
Open the catalog to page 22
Implantium II Product Catalog 23 • Abutment screw is included Unit: mm, Scale 1 : 1.5 ^ Note: It is recommended to keep the torque level at 25~30 N-cm to tighten the custom abutment with fixture
Open the catalog to page 23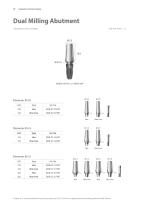
24 Implantium II Product Catalog • Abutment screw is included Unit: mm, Scale 1 : 1.5 ^ Note: It is recommended to keep the torque level at 25~30 N-cm to tighten the dual milling abutment with fixture
Open the catalog to page 24
Implantium II Product Catalog 25 • Abutment screw is included Unit: mm, Scale 1 : 1.5 ^ Note: It is recommended to keep the torque level at 25~30 N-cm to tighten the dual milling abutment with fixture
Open the catalog to page 25
26 Implantium II Product Catalog • Abutment screw is included Unit: mm, Scale 1 : 1.5 Note: It is recommended to keep the torque level at 25~30 N-cm to tighten the angled abutment with fixture
Open the catalog to page 26All Dentium catalogs and technical brochures
 SlimLine
28 Pages
 Overdenture System
26 Pages
 SuperLine Product
130 Pages
 Instrument Catalog
46 Pages
 Regeneration
26 Pages
 Why Dentium
52 Pages
 Digital dentistry 1403
20 Pages
 lab system
38 Pages
 Dental Lab System
44 Pages
 SlimLine SPM-1403
28 Pages
![Surgical Guide SGCM-1312 [Rev.1]](https://img.medicalexpo.com/pdf/repository_me/72062/surgical-guide-sgcm-1312-rev1-138906_1mg.jpg) Surgical Guide SGCM-1312 [Rev.1]
Surgical Guide SGCM-1312 [Rev.1]15 Pages
 Paste Stain
2 Pages
 Temporary Shell_1501 1501
4 Pages
 Introduction of Dentium 2014
23 Pages
 Maxillofacial Implant
20 Pages
 Help kit XIH-1301
16 Pages
 SimpleLine II Product
42 Pages
 DASK-1402
12 Pages
 Product from Dentium
48 Pages
 RS Kit RSKP-1308
12 Pages
 GBR system GSPS-1304
16 Pages
 NR Line Product Catalog
49 Pages
 rainbow Porcelain
26 Pages
 Lab Product catalog
24 Pages

Archived catalogs
- Implant abutment
- Titanium implant abutment
- Syringe
- Straight implant abutment
- Dental surgery instrument kit
- Titanium dental implant
- Internal implant abutment
- Conical dental implant
- Micromotor
- Dental implant surgery instrument kit
- Hexagonal implant abutment
- Bone substitute
- Electric micromotor
- Dental radiography system
- Internal hexagon implant abutment
- Dental implant analog
- Cylindrical dental implant
- Dental milling machine
- Dental micromotor