Instrument Catalog

Instrument Catalog
- Polymer Guide: A thermoplastic surgical template designed for quick fabrication and improved infection control, compatible with Dentium drills, and features a disposable design.
- Implant Guide: Uses silicon spacers and parallel pins for implant positioning and prosthetic alignment, with various drill sizes to accommodate different prosthetic widths.
- DASK (Dentium Advanced Sinus Kit): Includes tools for sinus cavity access with crestal and lateral approaches, with specific speed and torque recommendations for safe sinus elevation.
- Osteotome Kit: Compresses bone laterally to enhance density without removing material, available in convex and concave types.
- Sinus Elevator: Elevates sinus membrane using balloon inflation, reducing membrane perforation risk.
- RS Kit (Ridge Spreader Kit): Allows bone spreading for implant space creation without drilling, includes various spreader sizes and a mini saw.
- Harvest Drill: Designed for autogenous bone collection and osteotomy preparation, featuring a sharp tip and depth control stoppers.
- Help Kit: Addresses prosthetic process issues with tools for screw removal and fixture removal, compatible with most dental implant products.
- Temporary Shell, White Seal, TN-Brush: Additional tools for specific dental procedures, enhancing surgical and prosthetic workflow.
- Follow legal and hygienic guidelines for instrument maintenance to prevent contamination.
- Adhere to manufacturer recommendations for drill usage based on bone density and wear.
- Ensure proper sterilization and storage of instruments.
- Application: Removes remaining hex when abutment hex is broken.
- Advantage: Protects internal threads.
- Usage: Insert tool, lock with ratchet, and gently rock to remove hex.
- Caution: Apply moderate pressure.
- Application: Recreates internal thread lines of damaged fixtures.
- Advantage: Easy recreation with guides.
- Usage: Use guide, assemble tap tool, tap with appropriate torque.
- Caution: Avoid excessive torque.
- Application: Removes critically damaged fixtures.
- Advantage: Does not damage adjacent bone.
- Usage: Assemble tool, lock into fixture, rotate to remove.
- Caution: Ensure sufficient irrigation.
- Application: Disengages screws with stripped or damaged hex.
- Advantage: Easy removal of damaged screws.
- Usage: Assemble tool, engage with ratchet, rotate to remove.
- Features: Mimics natural tooth appearance, suitable for restoration.
- Specifications: Various shades and thicknesses available.
- Features: Easy filling and removal, maintains form stability.
- Usage: Cut length, insert into abutment hole, seal with resin.
- Application: Removes plaque and granulation tissue.
- Usage: Use with irrigation at 500-800 rpm.
Catalog excerpts

Product Catalog Dentium Instruments for Total Solution Catalog & Manual
Open the catalog to page 1
Surgical Guide Sinus Instruments
Open the catalog to page 2
Surgical Guide Polymer Guide Implant Guide
Open the catalog to page 3
Dentium Instruments Polymer Guide Polymer Guide Thermoplastic Surgical Template for Dental Implant Placement • Fabricate precise surgical template in just minutes using hot water • Disposable material to promote control of infection and contamination • Titanium sleeve is compatible with Dentium Guide and Final Drills Thermoplastic surgical template Fully compatible with Dentium drill system Fabricate an accurate surgical template in just minutes, greatly reducing the lab and chairside time Suitable template shape Improved infection/contamination control Polymer Guide is designed to maximize contact...
Open the catalog to page 4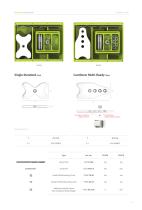
Dentium Instruments Polymer Guide Type Stone Drill Guide Pin Guide Drill Brushing (First) Guide Drill Brushing (Second) Additional Metal Sleeve (for Cantilever Multi-Ready)
Open the catalog to page 5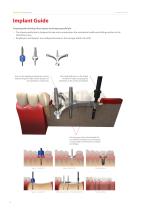
Dentium Instruments Implant Guide Implant Guide Surgical guide utilizing silicon spacer and unique parallel pin • The tripod parallel pin is designed to take into consideration the mesiodistal width and drilling position in the edentulous area • Parallel pins and Spacers are configured based on the average width of a tooth Assist in the implant positioning as well as determining the width and the position of the prosthetic components The Guide Drill holes on the Tripod Parallel Pin help in prepping the osteotomy in the correct orientation The three legs of the Tripod Parallel Pin are of different...
Open the catalog to page 6
Dentium Instruments Implant Guide Tripod Parallel Pins Ellipse Parallel Pins (x2)
Open the catalog to page 7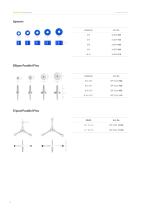
Dentium Instruments Implant Guide Art. No. XLDSP 60S XLDSP70S XLDSP 80S XLDSP 90S XLDSP01S Ellipse Parallel Pins 6 8 10
Open the catalog to page 8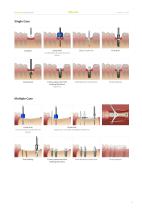
Dentium Instruments Manual Implant Guide Guide Drill Ellipse Parallel Pin Final Drill Combination of Guide Drill and Spacer Fixture placement with Dual Abutment Connection Final prosthesis Healing Abutment SuperLine Guide Drill Combination of Guide Drill and Spacer Guide Drill Application of Tripod and Ellipse Parallel Pin Fixture placement with Dual Abutment connection Healing Abutment
Open the catalog to page 9
Dentium Instruments Sinus Instruments DASK Osteotome Kit Sinus Elevator
Open the catalog to page 10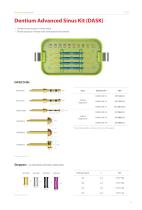
Dentium Instruments DASK Dentium Advanced Sinus Kit (DASK) • Simple & easy access to sinus cavity • Broad exposure of bony walls with special instruments Dentium Instruments DASK Crestal Approach Lateral Approach * Note: Drill speed 800 to 1,200rpm, 30~45N-cm with irrigation
Open the catalog to page 11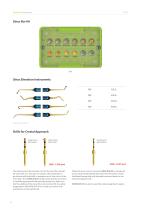
Dentium Instruments Sinus Elevation Instruments REF Drills for Crestal Approach DASK Drill #1 XRT332035 [800~1,200 rpm] The distance from the alveolar crest to the sinus floor should be measured on x-rays prior to surgery. Site preparation is performed with final drills in sequence up to 1mm short of the sinus floor. Then DASK Drill #1 or #2 is used and the sinus floor is carefully approached with light apical pressure. When you feel the yielding of the sinus floor, remove the drill. Or, partial preparations with DASK Drill #1 or #2 and up-fracture with osteotomes can be performed [800~1,200...
Open the catalog to page 12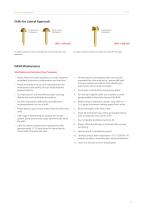
Dentium Instruments Drills for Lateral Approach DASK Drill #4 XRT064025 [800~1,200 rpm] To make a lateral window through the antrostomy (thin-out) approach [800~1,200 rpm] To make a lateral window through the wall-off technique DASK Maintenance Sterilization and Instrument Care Procedures • Please follow for legal regulations, as well as hygienic guidelines to prevent contamination and infection • Please remember that you are responsible for the maintenance and sterility of your medical/dental products/device 1. All instruments, immediately after use, must be presoaked for a few minutes in a...
Open the catalog to page 13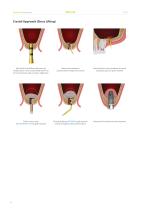
Dentium Instruments Crestal Approach (Sinus Lifting) After Ø3.8 Final drilling, eliminate the residual bone (1mm) using a DASK Drill #1 or #2 (in hard bone) until you feel a slight drop Detaching the sinus membrane to create adequate space for graft material Fill the sinus cavity with [OSTEON™ Lifting] graft material Detach sinus membran using the dome-shape sinus curette Fill and distribute OSTEON™ graft material evenly throughout the achieved space Placement of implant into the osteoto
Open the catalog to page 14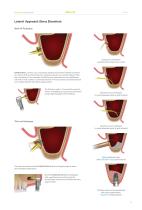
Dentium Instruments Lateral Approach (Sinus Elevation) Wall-off Technique Detach sinus membrane using the dome-shape sinus curette DASK Drill #6 is used to cut a round bony island from the lateral wall like a trephine bur. Start to drill at a desired location and proceed until you see the shadow of the sinus membrane. Then, separate and lift the bony island up from the neighboring wall with a molt curette or a periosteal elevator. The bony island is repositioned back in its original position after bone augmentation The first laser mark is 1.5mm and the second is 3.0mm. Overdrilling can cause...
Open the catalog to page 15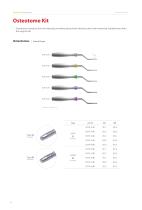
Dentium Instruments Osteotomes | Final drill type
Open the catalog to page 16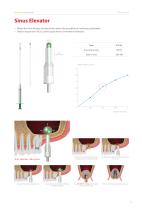
Dentium Instruments Sinus Elevator Sinus Elevator • Makes the sinus lift easy and drastically reduce the possibility of membrane perforation • Balloon expansion of 0.5cc saline equals 6mm of membrane elevation Type Including Syringe 6.0 (1.0 X 6 lines) Balloon Only Balloon inflation size(mm) Injection Volume(cc) Detach the sinus membrane to create adequate space for graft material Expand the balloon progressively Elevate the sinus membrane through the balloon inflation Carefully insert the Sinus Elevator into the osteotomy Use [OSTEONTM Lifting] graft material to fill the sinus cavity Placement...
Open the catalog to page 17
Dentium Instruments GBR Instruments RS Kit Harvest Drill
Open the catalog to page 18
Dentium Instruments Allows the achievement of space for implantation through the spreading of the bone with chisel without drilling There are three types of Ridge Spreaders to create space up to Ø4.5mm Convenient surgeries due to the compatibility with hand-piece and ratchet Easy-to-use kit compone
Open the catalog to page 19
BONE CHISEL Kit contents Bone Chisel Ridge Spreader Drills Ratchet Adapter
Open the catalog to page 20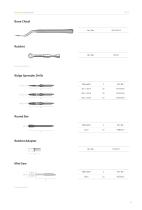
Ridge Spreader Drills 02.4 I 01.41 < Ratchet Adapter Mini Saw 35
Open the catalog to page 21All Dentium catalogs and technical brochures
 SlimLine
28 Pages
 Overdenture System
26 Pages
 SuperLine Product
130 Pages
 Regeneration
26 Pages
 Why Dentium
52 Pages
 Digital dentistry 1403
20 Pages
 lab system
38 Pages
 Dental Lab System
44 Pages
 SlimLine SPM-1403
28 Pages
 Implantium II
68 Pages
![Surgical Guide SGCM-1312 [Rev.1]](https://img.medicalexpo.com/pdf/repository_me/72062/surgical-guide-sgcm-1312-rev1-138906_1mg.jpg) Surgical Guide SGCM-1312 [Rev.1]
Surgical Guide SGCM-1312 [Rev.1]15 Pages
 Paste Stain
2 Pages
 Temporary Shell_1501 1501
4 Pages
 Introduction of Dentium 2014
23 Pages
 Maxillofacial Implant
20 Pages
 Help kit XIH-1301
16 Pages
 SimpleLine II Product
42 Pages
 DASK-1402
12 Pages
 Product from Dentium
48 Pages
 RS Kit RSKP-1308
12 Pages
 GBR system GSPS-1304
16 Pages
 NR Line Product Catalog
49 Pages
 rainbow Porcelain
26 Pages
 Lab Product catalog
24 Pages

Archived catalogs

- Implant abutment
- Titanium implant abutment
- Straight implant abutment
- Dental surgery instrument kit
- Titanium dental implant
- Internal implant abutment
- Conical dental implant
- Micromotor
- Dental implant surgery instrument kit
- Hexagonal implant abutment
- Bone substitute
- Electric micromotor
- Dental radiography system
- Internal hexagon implant abutment
- Dental implant analog
- Cylindrical dental implant
- Dental milling machine
- Dental micromotor