SlimLine SPM-1403
1 /28Pages

SlimLine SPM-1403
1 /28Pages
Catalog excerpts

SlimLine Product Catalog / Manual
Open the catalog to page 1
Contents Introduction S.L.A. Surface SlimLine Characteristics SlimLine Fixture Prosthetic Procedure Denture Components Dual Abutment (Fix Type) Angled Abutment (Fix Type) Abutment Level Impression Components Instruments Surgical Kit Drill Instrument Surgical Manual Surgical Drill Sequence Surgical Process Prosthesis Manual Prosthetic Process Prosthetic Manual Prosthetic Manual - Indirect Prosthetic Manual - Direct
Open the catalog to page 3
S.L.A. Surface S.L.A. (Sandblasting with large grit and acid etching) • • Higher bone-to-implant contact. Faster bone formation on the surface. Human osteoblast • Well attached and proliferated human osteoblasts.
Open the catalog to page 5
SlimLine Product Catalog & Manual SlimLine Characteristics Unit: mm S.L.A. surface enables immediate or early loading Mini ball (Ø1.8) & metal socket make denture production easy Wide range of choice for prosthetic options Mini Ball Type
Open the catalog to page 6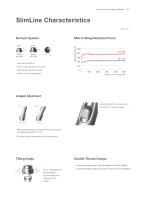
SlimLine Product Catalog & Manual SlimLine Characteristics Unit: mm Mini O-Ring Retention Force Mini O-ring Mini ball size (Ø1.8) Mini o-ring type denture socket Minimal-size denture socket Mini o-ring are replaceable Selecting direction is easy due to the Octa 45° rotation angles. Slanted implanting is possible with the combination of angled abutment (15°, 25°). Cement the final restoration onto the abutment. Tilting Angle Double Thread Design • Up to ±15 degrees of tilting angles to accommodate the pathway of the implant. Increased thread height helps strengthen the initial stability. Double...
Open the catalog to page 7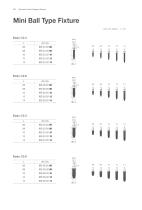
SlimLine Product Catalog & Manual Mini Ball Type Fixture Unit: mm, Scale 1 : 1 / mm
Open the catalog to page 8
SlimLine Product Catalog & Manual Fix Type Fixture Unit: mm, Scale 1 : 1 / mm
Open the catalog to page 9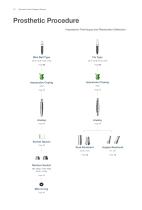
SlimLine Product Catalog & Manual Prosthetic Procedure Impression Technique and Restoration Selection Mini Ball Type Impression Coping Impression Coping Socket Spacer Page 11 Mini O-ring Page 11 Angled Abutment Denture Socket Dual Abutment
Open the catalog to page 10
SlimLine Product Catalog & Manual Denture Components Unit: mm, Scale 1 : 1.5 / mm Denture Socket
Open the catalog to page 11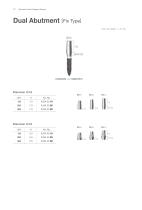
SlimLine Product Catalog & Manual Dual Abutment [ Fix Type] Unit: mm, Scale 1 : 1.5 / mm
Open the catalog to page 12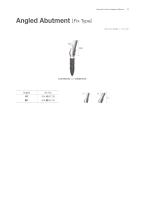
SlimLine Product Catalog & Manual Angled Abutment [ Fix Type] Unit: mm, Scale 1 : 1.5 / mm
Open the catalog to page 13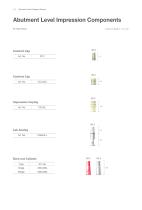
SlimLine Product Catalog & Manual Abutment Level Impression Components Fix Type Fixture Burn-out Cylinder
Open the catalog to page 14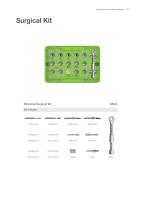
SlimLine Product Catalog & Manual
Open the catalog to page 15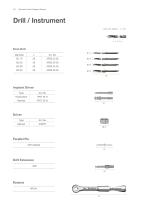
SlimLine Product Catalog & Manual Drill / Instrument Unit: mm, Scale 1 : 1 / mm Final Drill Diameter Implant Driver Type Driver Type
Open the catalog to page 16
Manual Surgical Manual Prosthesis Manual
Open the catalog to page 17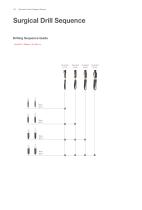
SlimLine Product Catalog & Manual Surgical Drill Sequence Drilling Sequence Guide . Final Drill: 1,000rpm / 30~45N.cm
Open the catalog to page 18
SlimLine Product Catalog & Manual Surgical Process Implantation Process: Use the cap to start the implantation of the fixture. When the linkage between the cap and fixture deforms after reaching 5N∙cm of tightening force, remove the disengaged cap and continue implantation using the MF tool in the surgical kit. Implant driver Please make sure that the fixture and the implant driver are engaged completely before loading. Complete engagement Incomplete engagement
Open the catalog to page 19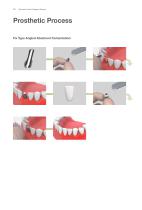
SlimLine Product Catalog & Manual Prosthetic Process Fix Type Angled Abutment Cementation:
Open the catalog to page 20
SlimLine Product Catalog & Manual Prosthetic Manual Ball Type Fixture Chairside SlimLine mini ball type fixture. Fixture installation. Produce the individual tray for denture impression Affix the impression coping on the mini ball type fixture. Apply the impression material. Take the final impression with the prepared individual tray. Remove the tray from the patient's mouth. Image of the set final impression (with impression coping). Ball analog Insert analogs into the coping embedded in impression. Create the master model.
Open the catalog to page 21
22 SlimLine Product Catalog & Manual Prosthetic Manual - indirect Socket spacer. Fabrication of the denture Secure spaces for the female with conventional method. sockets. Assemble the female sockets onto Apply the resin to the secured area. Position the denture on the master the ball analogs that are embedded in model and wait for it to set completely. Female sockets are placed Polish the denture. Denture delivery.
Open the catalog to page 22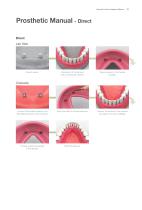
SlimLine Product Catalog & Manual Prosthetic Manual - Direct Direct Lab Side Socket spacer. Fabrication of the denture with conventional method. Secure spaces for the female sockets. Connect the female sockets to the Mini Ball Abutments in the intraoral. Apply the resin to the secured area. Position the denture in the intraoral and wait for it to set completely. Female sockets are placed in the denture.
Open the catalog to page 23
Final prosthesis
Open the catalog to page 24
Copyright April, 2014 DENTIUM
Open the catalog to page 27
Product Catalog / Manual | ) ^311 tl"U TH Specifications are subject to change without notice. For Dentists By Dentists Some products listed in this catalog are not available in the market due to pending approval. 3105 Trade Tower, 513 Yeongdong-daero, Gangnam-gu, Seoul, Korea 135-731 T+82-2-501-8560 F+82-2-567-9578
Open the catalog to page 28All Dentium catalogs and technical brochures
 SlimLine
28 Pages
 Overdenture System
26 Pages
 SuperLine Product
130 Pages
 Instrument Catalog
46 Pages
 Regeneration
26 Pages
 Why Dentium
52 Pages
 Digital dentistry 1403
20 Pages
 lab system
38 Pages
 Dental Lab System
44 Pages
 Implantium II
68 Pages
![Surgical Guide SGCM-1312 [Rev.1]](https://img.medicalexpo.com/pdf/repository_me/72062/surgical-guide-sgcm-1312-rev1-138906_1mg.jpg) Surgical Guide SGCM-1312 [Rev.1]
Surgical Guide SGCM-1312 [Rev.1]15 Pages
 Paste Stain
2 Pages
 Temporary Shell_1501 1501
4 Pages
 Introduction of Dentium 2014
23 Pages
 Maxillofacial Implant
20 Pages
 Help kit XIH-1301
16 Pages
 SimpleLine II Product
42 Pages
 DASK-1402
12 Pages
 Product from Dentium
48 Pages
 RS Kit RSKP-1308
12 Pages
 GBR system GSPS-1304
16 Pages
 NR Line Product Catalog
49 Pages
 rainbow Porcelain
26 Pages
 Lab Product catalog
24 Pages

Archived catalogs

- Implant abutment
- Titanium implant abutment
- Syringe
- Straight implant abutment
- Dental surgery instrument kit
- Dental implant
- Titanium dental implant
- Internal implant abutment
- Conical dental implant
- Micromotor
- Dental implant surgery instrument kit
- Hexagonal implant abutment
- Bone substitute
- Electric micromotor
- Dental radiography system
- Internal hexagon implant abutment
- Dental implant analog
- Cylindrical dental implant
- Dental milling machine
- Dental micromotor