
- Catalogs
- DENTSPLY MAILLEFER
- PrimeTaper® Implant System


PrimeTaper® Implant System
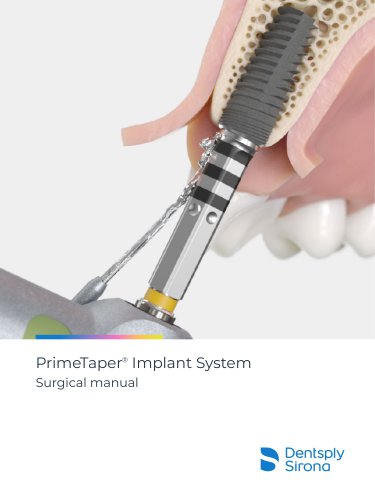
PrimeTaper® Implant System
The PrimeTaper EV implant is designed with a progressive taper and thread, featuring the OsseoSpeed surface and MicroThread technology. It comes in various diameters and lengths, with color coding for easy identification. The implant-abutment connection offers three options: one-position-only, six positions, and non-indexed. Restorative solutions include both prefabricated and patient-specific abutments with multiple fixation options.
Treatment planning involves considering the expected restorative outcome, healing time, and restorations. It requires a comprehensive consultation, medical history review, and intraoral examination. Key considerations include medical history, contraindications, and bone quality. The plan should address surgical procedures, loading protocols, and expected healing times for long-term success.
The manual details various instruments such as drills, implant drivers, torque wrenches, and surgical trays. Drills are depth-marked and available in different lengths. Implant drivers are color-coded and compatible with torque wrenches. The surgical tray organizes instruments for easy access and sterilization.
Understanding bone quality is crucial for implant site preparation. The drilling protocol varies for soft, medium, and dense bone qualities. Intermediate drills are available for fine-tuning osteotomy diameter, ensuring optimal implant placement.
The manual outlines one-stage and two-stage surgical protocols, emphasizing the importance of selecting the appropriate surgical approach based on bone quality and implant stability. A torque guide is provided for implant installation.
Guided surgery involves computer-guided 3D planning and implant installation using Simplant software and the SAFE Guide, offering a predictable and precise approach to implant placement.
All instruments must be cleaned and sterilized before use, except for sterile-packed products. Detailed instructions are provided in the cleaning and sterilization manual.
Begin by making an incision and mobilizing the mucoperiosteal flap. Use the Guide Drill or Precision Drill to mark the cortical bone, ensuring the drill is sterile before use.
Use Drill 1 Ø1.9 to drill in the planned direction to the appropriate depth, providing information about the bone structure. Insert the PrimeTaper Direction Indicator to verify direction. Maximum drilling speed is 1500 rpm with irrigation.
PrimeTaper EV implants are supplied in a blister container with an outer box, featuring color coding and QR codes for easy identification. Instructions for Use are available electronically.
Specific instruments are available for guided surgery, including the Sleeve-on-Drill system for precise guidance. Instruments are marked with diameter and length, designed for multiple uses except for single-use items like the mucosal punch.
The Simplant SAFE Guide is custom-made from digital planning data, ensuring precise transfer of planning into the patient's mouth. It supports tooth, mucosa, and bone-supported procedures, with dynamic guide sleeve positions adjusted to planned implant lengths.
These guides are used for edentulous regions. The guide must fit precisely and stably in the patient's mouth. For bone-supported guides, they are used when more than three teeth are missing. Fixation screws may be used if needed, but excessive force should be avoided to prevent breakage.
This minimally invasive procedure is for edentulous patients. The guide must fit stably on the master cast and in the patient's mouth. A bite index ensures the guide records the same position as the scanning template. Fixation screws can be used if necessary.
The preparation involves several steps, including mucosal punching and initial drilling. The mucosal punch is used for flapless surgery, and the initial drill removes soft tissue. Drilling should be performed at a maximum speed of 1500 rpm with adequate cooling.
The protocol varies for soft, medium, and dense bone qualities. Cortical preparation is marked in the protocol, and optional tapping is used for very dense bone.
The PrimeTaper EV implant is placed using a specific driver at 25 rpm and a maximum of 45 Ncm. The alignment between the driver and guide ensures optimal placement of abutments.
Stabilization abutments are used primarily for mucosa-supported guides to prevent movement during multiple implant site preparations.
Catalog excerpts
PrimeTaper® Implant System Surgical manual
Open the catalog to page 1
This manual is designed for use by clinicians who have undergone at least basic prosthetic and in-clinic implant training. Staying current on the latest trends and treatment techniques in implant dentistry through continued education is the responsibility of the clinician. All products may not be regulatory cleared/released/licensed in all markets. Please contact the local Dentsply Sirona sales office for current product assortment and availability. To improve readability for our customers, Dentsply Sirona does not use ® or ™ in body copy. However, Dentsply Sirona does not waive any right to...
Open the catalog to page 2
1. Introduction to PrimeTaper EV Implant Implant design Color coding Implant-abutment connection Restorative solutions Torque guide Computer-guided 3D planning and implant installation 8. Guided Surgery Instruments Mucosal punch Conventional treatment planning Implant driver Computer-guided treatment planning Stabilization abutment Clinical application Guide fixation Surgical tray guided surgery 9. Simplant SAFE Guide Tooth-supported procedure Bone-supported procedure Mucosa-supported procedure 10. Implant site preparation – Guided Surgery 11. Implant installation – Guided Surgery Implant drivers...
Open the catalog to page 3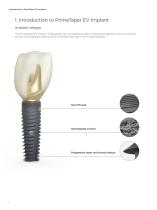
Introduction to PrimeTaper EV Implant 1. Introduction to PrimeTaper EV Implant Implant design The PrimeTaper EV implant is designed with a progressive taper and thread, together with the clinically proven OsseoSpeed surface and MicroThread from Astra Tech Implant System. OsseoSpeed surface Progressive taper and thread design
Open the catalog to page 4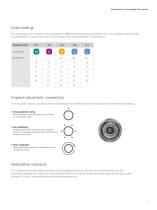
Introduction to PrimeTaper EV Implant Color coding The PrimeTaper EV Implant line is available in different diameters and lengths. The color coding makes it easy to identify the correct connection and to select the right prosthetic components. Implant Ø mm Implant-abutment connection The implants have a unique interface providing three different options for abutment placement/indexing. Atlantis patient-specific abutments will seat in one position only. Indexed abutments will seat in six available positions. Including pre-surgically manufactured Atlantis abutments. Non-indexed abutments will be...
Open the catalog to page 5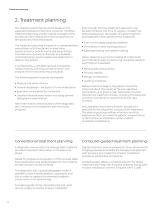
Treatment planning 2. Treatment planning Pre-operative planning should be based on the expected restorative treatment outcome. Therefore treatment planning should include all stages of the procedure, from healing time and components to temporary and final restorations. The treatment planning is based on a comprehensive consultation with the patient to determine exactly what the patient wants and expects from the treatment, but also to discover any possible contraindications and to explain the treatment in detail to the patient. It is followed by a complete general and specific medical history...
Open the catalog to page 6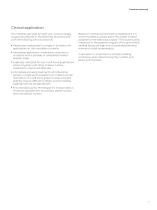
Treatment planning Clinical application The implants are used for both one- and two-stage surgical procedures in the following situations and with the following clinical protocols: ■ Replacing missing teeth in single or multiple unit applications in the mandible or maxilla. Immediate placement in extraction sites and in situations with a partially or completely healed alveolar ridge. Especially indicated for use in soft bone applications where implants with other implant surface treatments may be less effective. Based on mechanical strength considerations it is recommended to always place the...
Open the catalog to page 7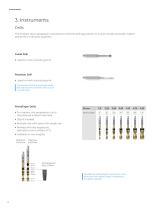
3. Instruments Drills The implant site is prepared in accordance with the drilling protocol to ensure simple and safe implant placement in all bone qualities. Used to mark a starting point Used to mark a starting point The Precision Drill is an extremely sharp drill and should be handled with caution to avoid injury. For implant site preparation up to the planned implant diameter Depth marked Multiple use with option for single use Drill number Marked with the respective diameters and numbers (1-7) Available in two lengths: Drill short 6.5-13mm The effective drilling depth is maximum 1mm more...
Open the catalog to page 8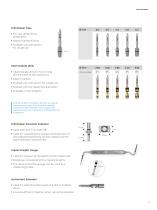
For very dense bone preparation Depth marked 6.5mm Multiple use with option for single use 6.5mm Intermediate drills for fine-tuning the diameter of the osteotomy Depth marked Multiple use with option for single use Marked with the respective diameters Drill number All drills except the Precision Drill can be used for maximum ten cases. They should be carefully cleaned and sterilized after each surgery and replaced as soon as a decrease in cutting efficiency is observed. PrimeTaper Direction indicator 6.5mm ■ ■ Used after drill Used for visualizing the position and direction of the prepared osteotomy...
Open the catalog to page 9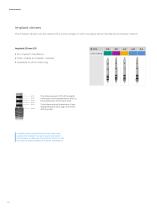
Implant drivers The implant drivers can be used with a contra angle or with a surgical driver handle and a torque wrench. Color-coded and depth marked Available in short and long he reference point (“0”) of the depth T markings is the intended bone level, i.e., the lowest point of the bone level. o facilitate optimal placement of preT designed abutments, align one of the dots buccally. Carefully clean and sterilize the driver after each surgery and replace it as soon as any decrease in functionality is observed. The Implant Driver EV can be used for approximately 50 implant installations. Color...
Open the catalog to page 10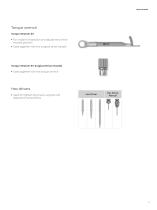
Torque wrench Torque Wrench EV ■ For implant installation and adjustment of the implant position Used together with the surgical driver handle Torque Wrench EV Surgical Driver Handle ■ Used together with the torque wrench Used for tightening screws, surgical and restorative components
Open the catalog to page 11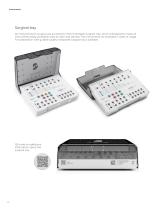
Surgical tray All instruments for surgical use are stored in the PrimeTaper Surgical Tray, which is designed to make all instruments easily accessible, easy to clean and sterilize. The instruments are arranged in order of usage. For preparation with guided surgery a separate surgical tray is available. QR code for additional information about the surgical tray.
Open the catalog to page 12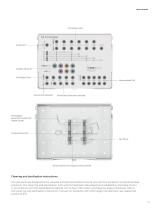
PrimeTaper Drill Guide Drill PrimeTaper Tap Intermediate Drill Instrument Extender PrimeTaper Direction Indicator PrimeTaper/ Astra Tech Implant EV Depth Gauge Torque Wrench EV Hex Driver Torque Wrench EV Surgical Driver Handle Cleaning and sterilization instructions The products are designed to be cleaned and sterilized before clinical use with the exception of sterile packed products. The cleaning and sterilization instructions have been developed and validated by Dentsply Sirona in accordance with the applicable standards. For further information and step-by-step procedures, refer to the Cleaning...
Open the catalog to page 13All DENTSPLY MAILLEFER catalogs and technical brochures
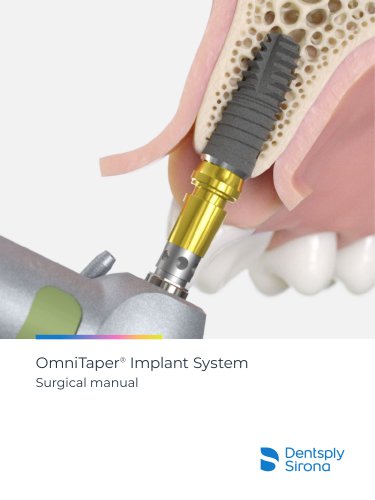 OmniTaper® Implant System
40 Pages
Archived catalogs
 EndoActivator
2 Pages
 Protaper Universal
8 Pages
 Waveone
18 Pages
 PROGLIDER
2 Pages
 X-SMART
2 Pages
 CALAMUS DUAL
2 Pages
 PROPEX II
2 Pages
 Gutta core
4 Pages
 THERMAFIL
6 Pages
 MAP SYSTEM
6 Pages
 ProUltra
6 Pages
 Uniclip
4 Pages
 Radix fiber post
6 Pages
 CARBIDE BURS
15 Pages
 PathFile
2 Pages
 Thermaprep
2 Pages
 Glyde
Glyde4 Pages
 PROPEX PIXI®
6 Pages
 READY STEEL
2 Pages
 X-SMART
48 Pages
 X-SMART iQ
2 Pages
 Cavity Access Set
7 Pages
 Radix-Anker® Posts
7 Pages
 Obturation Solution
74 Pages
 STAR-X
4 Pages
 Root Canal Conditioner
4 Pages
 ProTaper® Universal
7 Pages
 Rubber Dam System
2 Pages
 Tungsten Carbide Burs
16 Pages
 WAVEONE GOLD®
6 Pages
 PROFILE ® .04/.06 & O.S.
2 Pages
 Calamus® Dual
40 Pages
- Dental material
- Sterilizer
- Dental restoration material
- Steam sterilizer
- Analysis software
- Diode laser
- Benchtop sterilizer
- Resin dental material
- Tabletop laser
- Dental treatment unit
- Radiology software
- Visualization software
- Dental prosthesis dental material
- Tablet computer software
- Flat panel detector
- Tablet PC software
- Control software
- Dental unit with light
- Laboratory oven
- Heating oven