- Catalogs
- Depuy Synthes
- Concorde
Concorde
1 /28Pages

Concorde
1 /28Pages
Catalog excerpts

CONCORDE Interbody System ™ for Transforaminal Lumbar Interbody Fusion (TLIF) Surgical Technique
Open the catalog to page 1
Introduction CONCORDE™ Interbody System Surgical Technique Pedicle Screw Insertion 2 Facetectomy and Working Zone Preparation 3 Annulotomy and Initial Disc Dissection 5 Initial Distraction and Preparation of Disc Space 6 Final Disc Preparation and Endplate Cleaning 7 Decortication and Placement of Bone Graft 9 Cage Insertion—CONCORDE Interbody System 11 Implant orientation for lordotic CONCORDE 11 Interbody System Final Compression 12 Verification of Final Cage Placement 12 Product Information CONCORDE Interbody System Product catalog 14 CONCORDE Bullet Ti and CFRP Indications and Usage 20 Image...
Open the catalog to page 3
Surgical Technique 1 Pedicle Screw Insertion Pedicle screws can be placed either before or after the interbody reconstruction. It is often advantageous to have screws as a distraction point during the procedure. Many surgeons place screws before the spinal canal is exposed. If placing screws is done after the facetectomy as shown (Figure 1), take extra care to avoid dural injury during the placement of guide wires, taps, or screws. Identify proper pedicle insertion points for guide wires, taps or screws. The optimal insertion point is at the intersection of the transverse process and superior...
Open the catalog to page 4
Surgical Technique 2 Facetectomy and Working Zone Preparation (L5/S1) In order to gain transforaminal access to the disc space, a unilateral facetectomy is performed. The side chosen for the approach is often determined by the location of the pathology or the presence of scar tissue. Resect the ligamentum flavum from the anterior surface of the lamina with a curette. The inferior lamina of L5 can be removed by a Kerrison rongeur illustrated by the dotted line of Figure 2 to improve access to the ligamentum flavum. Resect the inferior articular process of L5 with a straight osteotome or a Kerrison...
Open the catalog to page 5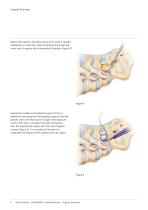
Surgical Technique Resect the superior articular process of S1 with a straight osteotome or a Kerrison while protecting the traversing nerve root to expose the intervertebral foramen (Figure 4). Expose the medial and cephalad margin of the S1 pedicle by removing the overhanging superior articular process with a Kerrison punch to gain final exposure of the L5/S1 disc. Complete thorough hemostasis over the exposed disc space with the use of bipolar cautery (Figure 5). It is essential at this point to coagulate the epidural veins overlying the disc space. 4 DePuy Synthes CONCORDE™ Interbody...
Open the catalog to page 6
Surgical Technique 3 Annulotomy and Initial Disc Dissection Care should be taken to gently retract and protect the exiting L5 nerve root and lateral part of the central dural sac. A dissector or nerve root retractor is used to protect these structures at every step of the procedure (Figure 6). The epidural veins have now been ligated to afford a corridor of approach to the disc space. Perform a box annulotomy to create a window into the disc space (Figure 7). After the box annulotomy, a pituitary rongeur is used to initially remove loose nuclear tissue in order to clear an initial space for the...
Open the catalog to page 7
Surgical Technique 4 Initial Distraction and Preparation of Disc Space Initial distraction of the disc space is necessary in order to access the disc for a thorough discectomy which is required for good fusion preparation and orientation for optimal cage insertion. Distraction can be achieved using one of the following methods: • Distraction between pedicle screws • Distraction between the spinous process Use of a starter dilator (8 mm) or a disc spreader from the disc preparation set as pictured in Figure 9. After the initial removal of disc tissue, a starter dilator (8 mm) or a spreader from...
Open the catalog to page 8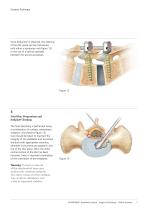
Surgical Technique Once distraction is obtained, the opening of the disc space can be maintained with either a temporary rod (Figure 12) or the use of a laminar spreader between the spinous processes. 5 Final Disc Preparation and Endplate Cleaning The final discetomy is performed using a combination of curettes, osteotomes, rongeurs, and shavers (Figure 13). Care should be taken to maintain the integrity of the endplates and to protect the dura with appropriate retractors wherever instruments are passed in and out of the disc space. Once the initial central portion of the disc has been removed,...
Open the catalog to page 9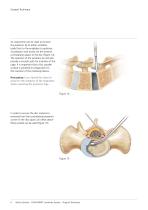
Surgical Technique An osteotome can be used to remove the posterior lip of either vertebral body flush to the endplates to optimize visualization and access for the anterior contralateral aspect of the disc (Figure 14). The resection of the posterior lip will also provide a smooth path for insertion of the cage. It is important that a flat, parallel surface is achieved in preparation for the insertion of the interbody device. Precaution: Care should be taken to preserve the integrity of the endplates when resecting the posterior lips. In order to ensure the disc material is removed from the contralateral...
Open the catalog to page 10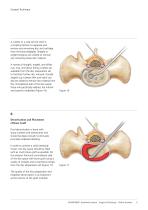
Surgical Technique A curette or a rasp can be used in a scraping fashion to separate and remove any remaining disc and cartilage from the bony endplates. Straight or angled rongeurs are utilized to remove any remaining loose disc material. A variety of straight, angled, and offset cup, ring, and down biting curettes are available from the disc preparation set to facilitate further disc removal. Double angled cup curettes (left and right) can also be utilized to remove disc material from the contralateral side of the disc space; these will specifically address the inferior and superior endplates...
Open the catalog to page 11
Surgical Technique 7 Cage Trialing Trialing to aid in correct selection of the implant is extremely important. A cage trial should be used prior to insertion of the implant to evaluate potential cage placement and determine the optimal implant fit (Figure 18). Lateral fluoroscopy may be useful in analyzing implant orientation and ultimate desired lordosis. The cage trials match the parallel configuration available with CONCORDE Interbody System Implants. Trials are sized to match the overall height of the corresponding implant, including the teeth of the implant. 11 DePuy Synthes CONCORDE™...
Open the catalog to page 12All Depuy Synthes catalogs and technical brochures
 Titanium Sternal Fixation System
34 Pages
 Small Battery Drive II
4 Pages
 Introducing The Variable Angle
12 Pages

Archived catalogs
 MatrixRIB®FixationSystem
86 Pages
 HEALIX ADVANCE
4 Pages
 HEALIX Anchor™ 3.4 mm
2 Pages
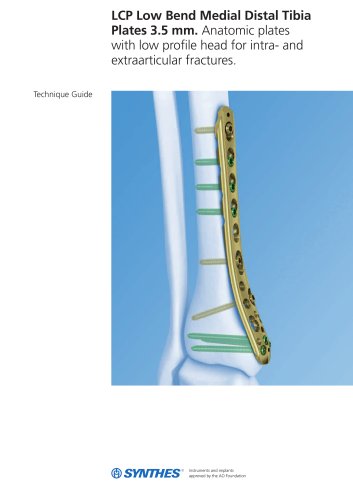
 3.5 mm LCP™ Medial
15 Pages
 RADIUS OF CURVATURE
3 Pages
 Building on Success
16 Pages
 2.0 mm LCP® Distal Ulna Plate
20 Pages
 2.4 mm VA LCP™
4 Pages
 Mandible Trauma Solutions
2 Pages
 Power line II
4 Pages
 LCP Intercarpal
31 Pages
 LCS® COMPLETE™
2 Pages
 Synthes TPLO.
8 Pages
 SynFix-LR System
56 Pages
 ATB Anterior Tension Band Plate
32 Pages
 CONDUIT™
15 Pages
 Brochure_FINAL
2 Pages
 DePuy Synthes
81 Pages
 Anspach
3 Pages
 Orthopedic Foot Instruments
32 Pages
 PINNACLE® Hip Solutions
12 Pages
 Corail
24 Pages
 S-ROM® NOILES™
68 Pages
 TRI-LOCK® Product Rationale
12 Pages
 Reclaim Surgical Technique
44 Pages
 Speed
Speed2 Pages
 attune
80 Pages
 HAMMERLOCK® 2
2 Pages
 DePuy Glenoid Solutions
2 Pages
 Trauma Solutions. Elbow
4 Pages
 Polar
Polar4 Pages
 Alveolar Distractor.
4 Pages
 Piezoelectric System
4 Pages
 Air Power Line II
6 Pages
 LCP Clavicle Hook Plate
4 Pages
 TruMatch Pin Guides
16 Pages
 P F N A
8 Pages
 SKILL, DEDICATION,
16 Pages
 Orthopaedics. Overview
20 Pages
 DURALOC
16 Pages
 Marathon Cemented Cup
20 Pages
 REEF Surgical Technique
16 Pages
 MatrixNEURO
8 Pages
 Anspach XMax
4 Pages
 Anspach eMax 2 Plus
4 Pages
 Small Electric Drive
4 Pages
 Air Pen Drive
4 Pages
 Colibri II
4 Pages
 Spine
Spine25 Pages
 Expert Hindfoot Arthrodesis Nail
48 Pages
 LCP Distal Fibula Plates
32 Pages
 TomoFix
60 Pages
 Expert Tibial Nail PROtect
16 Pages
 Expert Tibia Nail
84 Pages
 Sacral Bars
16 Pages
 Pelvic C-Clamp
20 Pages
 Low Profile Pelvic System
16 Pages
 Proximal Femoral (Hook) Plate
24 Pages
 LCP
LCP24 Pages
 PFNA
PFNA112 Pages
 HCS 1.5, 2.4, 3.0
36 Pages
 LCP Wrist Fusion
32 Pages
 LCP Compact Hand
28 Pages
 VA-LCP Elbow
48 Pages
 Distal Radius
44 Pages
 Olecranon
30 Pages
 LCP Hook Plate
28 Pages
 DHP & Olecranon
4 Pages
 LCP S-A
4 Pages
 Epoca
Epoca4 Pages
 Philos
32 Pages
 MultiLoc
68 Pages


- DePuy Synthes bone plate
- Compression plate
- Metallic compression plate
- Locking compression plate
- Titanium compression plate
- Distal compression plate
- Orthopedic surgery instrument kit
- Interbody fusion cage
- Sterilization container
- Instrument sterilization container
- Arthrodesis nail
- Bone substitute
- Metallic intramedullary nail
- Anterior interbody fusion cage
- Femoral stem
- Arthrodesis plate
- Orthopedic surgery bone substitute
- Femoral intramedullary nail
- Metallic arthrodesis plate
- Knee prosthesis