- Catalogs
- Depuy Synthes
- Corail
Corail

Corail
Catalog excerpts

Surgical Technique PART OF THE GomttCMMlfioWttMm FAMILY OF COMPANIES
Open the catalog to page 1
Surgical Technique Step 1: Pre-operative Planning 4 Step 2: Femoral Neck Resection 6 Step 3: Femoral Canal Preparation 7 Step 4: Calcar Reaming 9 Step 6: Trial Reduction 11 Step 7: Femoral Component Insertion 12 Primary Intra-operative Non Osteointegrated Stem Extraction 14 Ordering Information CORAIL Upgrade Kit Surgical Technique DePuy Synthes Joint Reconstruction
Open the catalog to page 3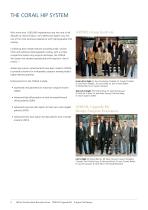
THE CORAIL HIP SYSTEM With more than 1,600,000 implantations and two and a half decades of clinical history1, the CORAIL Hip System now has one of the most extensive experience with hydroxyapatite (HA) coating. ARTRO Group Institute Combining basic design features including shape, surface finish and extensive hydroxyapatite coating, with a simple compaction broach-only surgical technique, the CORAIL Hip System has showed reproducible and long-term clinical results.2-4 Advancing science, enhancements have been made to CORAIL to provide solutions for orthopaedic surgeons treating today’s higher-demand...
Open the catalog to page 4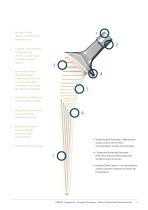
1. Multiple offset options to restore hip biomechanics 2. Tapered neck geometry and optimised ARTICUL/EZE® taper increase range of motion 3. Low-profile lateral shoulder design enables easy insertion in reduced incision techniques, including the anterior approach 4. Available in collared or non-collared versions 5. Step geometry converts hoop stresses to compressive loads 6. Vertical/horizontal grooves provide rotational and axial stability • Simple Surgical Technique - Reproducible surgical results with minimal instrumentation, broach-only technique • Compaction Broaching Technique -Preserves...
Open the catalog to page 5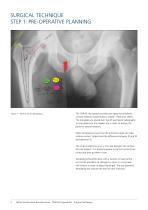
SURGICAL TECHNIQUE STEP 1: PRE-OPERATIVE PLANNING Figure 1 – Pelvis X-ray for templating. The CORAIL Hip System provides pre-operative templates at three different magnifications (100%, 115% and 120%). The templates are placed over the AP and lateral radiographs to help determine the implant size in order to restore the patient’s natural anatomy. When templating ensure that the prosthesis does not make cortical contact. Understand the difference between fit and fill and optimum fit. The surgical objective is a 1-2 mm gap between the cortices and the implant. If in doubt template a size that contacts...
Open the catalog to page 6
In Dorr Type A (‘champagne flute’) femurs (Figure 2) proper metaphyseal fit may require a larger size than the femoral canal can accommodate distally. In these cases consideration should be given to distal reaming to enlarge the canal to accommodate a broach of the appropriate size. Pre-operative Planning Serves Two Purposes: 1. Implant selection The ideal implant size should allow adequate femoral shaft filling while providing about 1 mm of space between the implant and the cortical walls. There must be no implantcortical wall contact. Narrow Canal Thick Cortices Figure 2 – Example of a DORR...
Open the catalog to page 7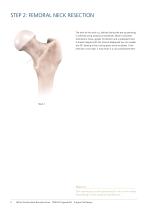
STEP 2: FEMORAL NECK RESECTION The level of the neck cut, defined during the pre-op planning, is achieved using anatomical landmarks (lesser trochanter, trochanteric fossa, greater trochanter) and a graduated ruler. A broach aligned with the femoral diaphyseal axis can enable the 45° slanting of the cutting plane to be visualised. If the resection is too high, it may result in a varus positioned stem. Note: 2.1 The osteotomy can be performed in one or two steps depending on the surgeon’s preference. 6 DePuy Synthes Joint Reconstruction CORAIL Upgrade Kit Surgical Tec
Open the catalog to page 8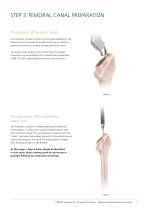
STEP 3: FEMORAL CANAL PREPARATION Preparation of the entry point It is important to select a point of entry posterolaterally to the Piriformis Fossa to avoid varus positioning. Use a curette or general instrument to indicate the direction of the canal. To prevent under-sizing or varus positioning, the greater trochanter may be prepared with a Modular Box Osteotome (2598-07-530) to allow better insertion of the broaches. Visualisation of the medullary canal axis The medullary canal axis is determined using the femoral canal explorer. Its entry point must be postero-lateral, near the trochanteric...
Open the catalog to page 9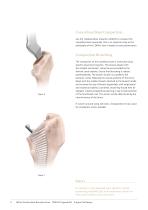
Cancellous Bone Compaction Use the Modular Bone Impactor (L94013) to compact the cancellous bone proximally. This is an important step as the philosophy of the CORAIL stem is based on bone preservation. Compaction Broaching The compaction of the cancellous bone is continued using specific atraumatic broaches. This process begins with the smallest size broach, along the axis provided by the femoral canal explorer. Ensure that broaching is started posterolaterally. The broach should run parallel to the posterior cortex following the natural anatomy of the femur. Begin with the smallest broach attached...
Open the catalog to page 10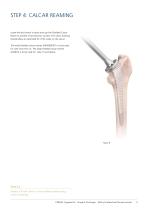
STEP 4: CALCAR REAMING Leave the last broach in place and use the Shielded Calcar Planer to achieve a flat resection surface. The calcar reaming should allow an optimised fit of the collar on the calcar. The small shielded calcar reamer (940080007) is to be used for sizes from 8 to 12. The large shielded calcar reamer (L94010) is to be used for sizes 13 and above. Note 4.1 Ensure all soft tissue is clear before performing calcar reaming. CORAIL Upgrade Kit Surgical Technique DePuy Synthes Joint Reconstruction
Open the catalog to page 11
STEP 5: TROCHOMETER (OPTIONAL) The trochometer is placed on the last broach inserted. Using the trochometer ruler, the level of the centre of head is checked relative to the apex of the greater trochanter. The grooves correspond to the various implant styles (STD 125/135, KHO, KLA or SN) with a neutral (+5) head. Note 5.1 If broach is in varus or valgus position in accordance with pre-operative planning you must be aware that the head centre level indicated by the trochometer maybe affected. DePuy Synthes Joint Reconstruction CORAIL Upgrade Kit Sur
Open the catalog to page 12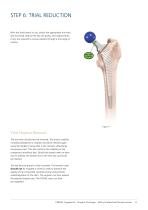
STEP 6: TRIAL REDUCTION With the final broach in situ, attach the appropriate trial neck and trial head. Reduce the hip and assess what adjustments, if any, are required to ensure stability through a full range of motion. Trial Implant Removal The trial neck should then be removed. The broach stability including subsidence or rotation should be checked again using the handle to prove that it has not been affected by the previous test. This also confirms the reliability of the compacted cancellous bed. Should the broach seem to have lost its stability, the broach that is the next size up should...
Open the catalog to page 13All Depuy Synthes catalogs and technical brochures
 Titanium Sternal Fixation System
34 Pages
 Small Battery Drive II
4 Pages
 Introducing The Variable Angle
12 Pages

Archived catalogs
 MatrixRIB®FixationSystem
86 Pages
 HEALIX ADVANCE
4 Pages
 HEALIX Anchor™ 3.4 mm
2 Pages
 3.5 mm LCP™ Medial
15 Pages
 RADIUS OF CURVATURE
3 Pages
 Building on Success
16 Pages
 2.0 mm LCP® Distal Ulna Plate
20 Pages
 2.4 mm VA LCP™
4 Pages
 Mandible Trauma Solutions
2 Pages
 Power line II
4 Pages
 Concorde
28 Pages
 LCP Intercarpal
31 Pages
 LCS® COMPLETE™
2 Pages
 Synthes TPLO.
8 Pages
 SynFix-LR System
56 Pages
 ATB Anterior Tension Band Plate
32 Pages
 CONDUIT™
15 Pages
 Brochure_FINAL
2 Pages
 DePuy Synthes
81 Pages
 Anspach
3 Pages
 Orthopedic Foot Instruments
32 Pages
 PINNACLE® Hip Solutions
12 Pages
 S-ROM® NOILES™
68 Pages
 TRI-LOCK® Product Rationale
12 Pages
 Reclaim Surgical Technique
44 Pages
 Speed
Speed2 Pages
 attune
80 Pages
 HAMMERLOCK® 2
2 Pages
 DePuy Glenoid Solutions
2 Pages
 Trauma Solutions. Elbow
4 Pages
 Polar
Polar4 Pages
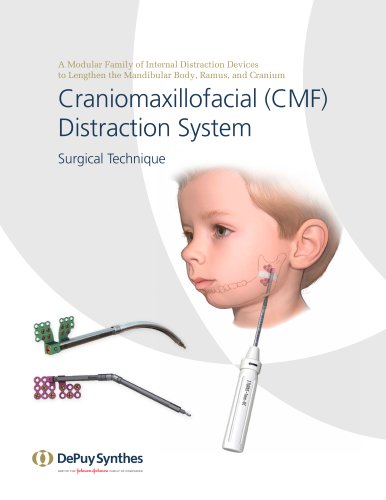
 Alveolar Distractor.
4 Pages
 Piezoelectric System
4 Pages
 Air Power Line II
6 Pages
 LCP Clavicle Hook Plate
4 Pages
 TruMatch Pin Guides
16 Pages
 P F N A
8 Pages
 SKILL, DEDICATION,
16 Pages
 Orthopaedics. Overview
20 Pages
 DURALOC
16 Pages
 Marathon Cemented Cup
20 Pages
 REEF Surgical Technique
16 Pages
 MatrixNEURO
8 Pages
 Anspach XMax
4 Pages
 Anspach eMax 2 Plus
4 Pages
 Small Electric Drive
4 Pages
 Air Pen Drive
4 Pages
 Colibri II
4 Pages
 Spine
Spine25 Pages
 Expert Hindfoot Arthrodesis Nail
48 Pages
 LCP Distal Fibula Plates
32 Pages
 TomoFix
60 Pages
 Expert Tibial Nail PROtect
16 Pages
 Expert Tibia Nail
84 Pages
 Sacral Bars
16 Pages
 Pelvic C-Clamp
20 Pages
 Low Profile Pelvic System
16 Pages
 Proximal Femoral (Hook) Plate
24 Pages
 LCP
LCP24 Pages
 PFNA
PFNA112 Pages
 HCS 1.5, 2.4, 3.0
36 Pages
 LCP Wrist Fusion
32 Pages
 LCP Compact Hand
28 Pages
 VA-LCP Elbow
48 Pages
 Distal Radius
44 Pages
 Olecranon
30 Pages
 LCP Hook Plate
28 Pages
 DHP & Olecranon
4 Pages
 LCP S-A
4 Pages
 Epoca
Epoca4 Pages
 Philos
32 Pages
 MultiLoc
68 Pages


- DePuy Synthes bone plate
- Compression plate
- Metallic compression plate
- Locking compression plate
- Titanium compression plate
- Distal compression plate
- Orthopedic surgery instrument kit
- Interbody fusion cage
- Sterilization container
- Instrument sterilization container
- Arthrodesis nail
- Bone substitute
- Metallic intramedullary nail
- Anterior interbody fusion cage
- Arthrodesis plate
- Orthopedic surgery bone substitute
- Femoral intramedullary nail
- Suture anchor
- Knee prosthesis