Catalog excerpts

LCP Compact Hand 1.5. Instrument Technique Guide
Open the catalog to page 1
Introduction LCP Compact Hand 1.5 2 Surgical Technique Preparation 6 Product Information Screws 18 Plates, with Preassembled Short LCP Drill Sleeves 21 This description alone does not provide sufficient background for direct use of the instrument set. Instruction by a surgeon experienced in handling these nstruments is highly recommended For information on fixation principles using conventional and locked plating techniques, please refer to the technique guide for LCP Locking Compression Plate Reprocessing, Care and Maintenance of Synthes Instruments For general guidelines, function control...
Open the catalog to page 3
LCP Compact Hand 1.5. Instrument and implant module. Adaptable Locking Plates for Various Indications LCP Plate 1.5, straight Locking Plate 1.5, straight Locking T-Plate 1.5 Locking Strut Plate 1.5 Locking Y-Plate 1.5 Locking Condylar Plate 1.5 Minimized soft tissue irritation Option for preassembled drill sleeves Locking or non-locking screw option Low profile plates with rounded edges and highly polished surface to minimize soft tissue irritation. All plates are available either with or without short drill sleeves preassembled. Self-tapping screws with low-profile screw head sit flush...
Open the catalog to page 4
Part of the LCP Compact Hand System - Adaptable plates for different indications - Complete range of implants - Broad range of non-locking, locking and LCP plates to address various fracture patterns - The use of locking screws allows creating a fixed-angle construct, which is particularly advantageous in osteopenic bone or in fractures near the joint
Open the catalog to page 5
AO Principles In 1958, the AO formulated four basic principles, which have become the guidelines for internal fixation.1, 2 Those principles as applied to the LCP Compact Hand 1.5 are: Anatomic reduction Anatomic plate profile assists in reduction and facilitates restoration anatomical relationships. Stable fixation The combination of conventional and locking screws offers optimum fixation regardless of bone density. Locking screws create a fixed-angle construct, providing angular stability. Preservation of blood supply Limited-contact plate design reduces plate-to-bone contact and helps to...
Open the catalog to page 6
Indications − − − − Fracture fixation of the phalanges and metacarpals Osteotomies Arthrodeses Replantations and reconstructions of phalanges and metacarpals, particularly in osteopenic bone Synthes 5
Open the catalog to page 7
Preparation 1 LCP Compact Hand 1.5 (LCP, Locking straight and Locking Condylar Plates) Preoperative planning 0X.114.002 0X.114.004 Holes 4 6 Length 23 mm 36 mm Holes 6 12 0X.114.003 0X.114.005 Length 29 mm 59 mm AP View Lateral View Locking Condylar Plate 1.5 0X.114.014 Shaft 6 Holes Head 2 Holes 0X.214.006–024 Locking Screw Stardrive self-tapping, length 6–24 mm 0 1.5 mm, 0X.214.106–124 Cortex Screw Stardrive self-tapping, length 6–24 mm 6 10 15 20 24 0 1.5 mm, 6 10 15 20 24 1.15 Magnification 0 10 20 30 40 50 60 70 80 90 x=2: Stainless Steel x=4: Titanium 100 mm Synthes GmbH Eimattstrasse...
Open the catalog to page 8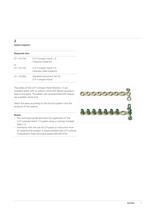
Select implant Required sets (Titanium Implants) (Stainless Steel Implants) The plates of the LCP Compact Hand Module 1.5 are available either with or without short drill sleeves preassem- bled to the plate. The plates with preassembled drill sleeves are available sterile only. Select the plate according to the fracture pattern and the - This technique guide describes the application of the LCP Compact Hand 1.5 system using a Locking Condylar - Familiarity with the use of LCP plates or instruction from an experienced surgeon is recommended (see LCP Locking Compression Plate technique guide...
Open the catalog to page 9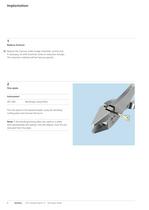
Reduce fracture O Reduce the fracture under image intensifier control and, if necessary, fix with Kirschner wires or reduction forceps. The reduction method will be fracture-specific. Trim plate Trim the plate to the desired length using the bending/ cutting pliers and remove the burrs. Note: If the bending/cutting pliers are used on a plate with preassemble drill sleeves, the drill sleeves must first be removed from the plate. 8 Synthes LCP Compact Hand 1.5 Technique Guide
Open the catalog to page 10
Contour plate with thread 347.901 Pliers, flat-nosed, pointed, If necessary, contour the plate to suit anatomical conditions. Non-preassembled plates Use the bending pins for LCP Plates and thread the pins into the screw holes to contour the plate. (1) The plate can also be bent using two flat nosed pliers. Preassembled plates Use the non-threaded ends of the bending pins over the short threaded drill sleeves. (2) Note: If possible, bend the plate between the locking/ LCP holes. Do not deform the threaded part of the holes or over-bend the plate during bending as this may adversely affect...
Open the catalog to page 11
Position plate 399.970 Reduction Forceps with Points, ratchet lock Position the plate over the reduced fracture and, if necessary, fix provisionally with Kirschner wires or reduction forceps. (1) When using reduction forceps with points on a preassembled plate, insert one branch of the forceps in the cannulation of the short drill sleeve to secure the plate to the bone. (2) Optional instrument 398.819 Holding Forceps with Swivel Foot, for Plates 1.3 to 2.4, speed lock When using the holding forceps with swivel foot to hold the plate, remove the drill sleeves from the surrounding holes so...
Open the catalog to page 12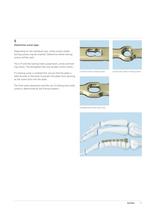
Determine screw type Depending on the individual case, cortex screws and/or locking screws may be inserted. Determine where locking screws will be used. The LCP and the locking holes accept both, cortex and lock- ng screws. The elongated hole only accepts cortex screws. If a locking screw is inserted first, ensure that the plate is held securely to the bone to prevent the plate from spinning as the screw locks into the plate. The final screw placement and the use of locking and cortex screws is determined by the fracture pattern. LCP hole (cortex or locking screw) Locking hole (cortex or...
Open the catalog to page 13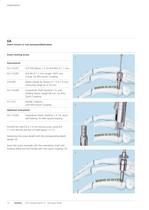
Insert screws in non-preassembled plate Insert locking screw LCP Drill Sleeve 1.5, for Drill Bits 01.1 mm 2-flute, for Mini Quick Coupling 319.003 Depth Gauge for Screws 0 1.3 to 1.5 mm, 03.114.009 Screwdriver Shaft Stardrive 1.5, with Holding Sleeve, length 66 mm, for Mini Quick Coupling with Mini Quick Coupling Optional instrument 03.1 14.002 Screwdriver Shaft, Stardrive 1.5, T4, short, self-holding, for Mini QuickCoupling Pre-drill the hole for a 1.5 mm locking screw using the 1.1 mm drill bit and the LCP drill sleeve 1.5. (1) Determine the screw length with the corresponding depth nsert...
Open the catalog to page 14All Depuy Synthes catalogs and technical brochures
-
2.0 mm LCP® Distal Ulna Plate
20 Pages
-
Building on Success
16 Pages
-
RADIUS OF CURVATURE
3 Pages
-
Introducing The Variable Angle
12 Pages
-
HEALIX Anchor™ 3.4 mm
2 Pages
-
Small Battery Drive II
4 Pages
-
HEALIX ADVANCE
4 Pages
-
3.5 mm LCP™ Medial
15 Pages
-
Titanium Sternal Fixation System
34 Pages
-
MatrixRIB®FixationSystem
86 Pages
Archived catalogs
-
2.4 mm VA LCP™
4 Pages
-
Mandible Trauma Solutions
2 Pages
-
Power line II
4 Pages
-
Concorde
28 Pages
-
LCP Intercarpal
31 Pages
-
LCS® COMPLETE™
2 Pages
-
Synthes TPLO.
8 Pages
-
SynFix-LR System
56 Pages
-
ATB Anterior Tension Band Plate
32 Pages
-
CONDUIT™
15 Pages
-
Brochure_FINAL
2 Pages
-
DePuy Synthes
81 Pages
-
Anspach
3 Pages
-
Orthopedic Foot Instruments
32 Pages
-
PINNACLE® Hip Solutions
12 Pages
-
Corail
24 Pages
-
S-ROM® NOILES™
68 Pages
-
TRI-LOCK® Product Rationale
12 Pages
-
Reclaim Surgical Technique
44 Pages
-
Speed
2 Pages
-
attune
80 Pages
-
HAMMERLOCK® 2
2 Pages
-
DePuy Glenoid Solutions
2 Pages
-
Trauma Solutions. Elbow
4 Pages
-
Polar
4 Pages
-
Alveolar Distractor.
4 Pages
-
Piezoelectric System
4 Pages
-
Air Power Line II
6 Pages
-
LCP Clavicle Hook Plate
4 Pages
-
TruMatch Pin Guides
16 Pages
-
P F N A
8 Pages
-
SKILL, DEDICATION,
16 Pages
-
Orthopaedics. Overview
20 Pages
-
DURALOC
16 Pages
-
Marathon Cemented Cup
20 Pages
-
REEF Surgical Technique
16 Pages
-
MatrixNEURO
8 Pages
-
Anspach XMax
4 Pages
-
Anspach eMax 2 Plus
4 Pages
-
Small Electric Drive
4 Pages
-
Air Pen Drive
4 Pages
-
Colibri II
4 Pages
-
Spine
25 Pages
-
Expert Hindfoot Arthrodesis Nail
48 Pages
-
LCP Distal Fibula Plates
32 Pages
-
TomoFix
60 Pages
-
Expert Tibial Nail PROtect
16 Pages
-
Expert Tibia Nail
84 Pages
-
Sacral Bars
16 Pages
-
Pelvic C-Clamp
20 Pages
-
Low Profile Pelvic System
16 Pages
-
Proximal Femoral (Hook) Plate
24 Pages
-
LCP
24 Pages
-
PFNA
112 Pages
-
HCS 1.5, 2.4, 3.0
36 Pages
-
LCP Wrist Fusion
32 Pages
-
VA-LCP Elbow
48 Pages
-
Distal Radius
44 Pages
-
Olecranon
30 Pages
-
LCP Hook Plate
28 Pages
-
DHP & Olecranon
4 Pages
-
LCP S-A
4 Pages
-
Epoca
4 Pages
-
Philos
32 Pages
-
MultiLoc
68 Pages


