- Catalogs
- Depuy Synthes
- Olecranon
Olecranon
1 /30Pages

Olecranon
1 /30Pages
Catalog excerpts
Olecranon Osteotomy Nail. For simple fractures and osteotomies of the olecranon. Technique Guide
Open the catalog to page 1
Table of Contents Introduction 2 AO Principles 4 Indications 5 Patient Positioning 6 Preparation 7 Implantation Surgical Technique Olecranon Osteotomy Nail 9 Implant Removal Implant Removal: Alternative Technique 21 Implant Specifications 22 Instruments 23 Set Lists Product Information 19 26 Image intensier control Warning This description alone does not provide sufficient background for direct use of the product. Instruction by a surgeon experienced in handling this product is highly recommended. Reprocessing, Care and Maintenance of Synthes Instruments For general guidelines, function control...
Open the catalog to page 2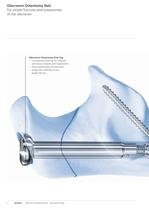
Olecranon Osteotomy Nail. For simple fractures and osteotomies of the olecranon. Olecranon Osteotomy End Cap – Countersunk end cap for reduced soft tissue irritation and reoperations – Easy reattachment of olecranon – Single size: Diameter 6 mm, length 40 mm 2 Synthes Olecranon Osteotomy Nail Technique Guide
Open the catalog to page 3
Olecranon Osteotomy Nail – Pre-osteotomy fixation ensures anatomic reduction and quick realignment – Easy instrumentation for simple fixation – Universal right and left design – Single size: Diameter 6 mm, length 63 mm Threaded Stepped Screws – Countersunk screw head for reduced soft tissue irritation and less reoperations – Targeted, angled locking to prevent nail from moving – Fully threaded stepped screws, diameter 2.7 mm Synthes 3
Open the catalog to page 4
AO Principles In 1958, the AO formulated four basic principles, which have become the guidelines for internal fixation.1, 2 Those principles, as applied to the Olecranon Osteotomy Nail, are: Anatomic reduction The Olecranon Osteotomy Nail allows anatomic alignment of the olecranon fragment. Stable fixation The oblique locking screws prevent the nail from moving within the medullary canal, stabilizing the construct. The end cap inserted through the olecranon fragment and secured to the nail stabilizes the fragment for postoperative healing. Preservation of blood supply Targeted locking of the...
Open the catalog to page 5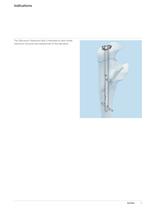
Indications The Olecranon Osteotomy Nail is indicated to treat simple olecranon fractures and osteotomies of the olecranon. Synthes 5
Open the catalog to page 6
Patient Positioning Place the patient in the lateral decubitus position to accommodate distal humerus surgery. The prone position can also be selected according to the surgeon’s preference and the severity of the patient’s injury. Rest the arm on a padded bar, allowing elbow flexion of 120°. 6 Synthes Olecranon Osteotomy Nail Technique Guide
Open the catalog to page 7
Preparation 1 Approach Beginning level with the junction of the middle and distal thirds of, and centered on, the humeral shaft, make a straight or curved incision around the olecranon to the radial side. The incision ends over the ulnar diaphysis. An ulnarbased subcutaneous flap is developed. Determine the site of the osteotomy by incising either the medial capsule, after retracting the ulnar nerve, or the lateral capsule, after elevating part of the anconeus muscle and finding the center of the trochlear notch. Split the triceps tendon longitudinally for nail insertion. Triceps Anconeus Ulnar...
Open the catalog to page 8
Preparation 2 Assemble insertion instruments Instruments Nail inserter 03.007.008 Nail Inserter 03.007.011 Alignment Tool 03.007.009 Aiming Arm 03.007.010 Pinch Screw for Aiming Arm 03.007.015 Screwdriver, hexagonal Nail Alignment tool Attach the nail Thread the proximal end of the nail into the nail inserter. Align the recess in the alignment tool with the flats at the tip of the nail and secure the assembly by tightening the nail in the nail inserter. Attach the aiming arm Insert the inserter/nail assembly through the aiming arm. Verify the construct alignment by inserting the alignment tool...
Open the catalog to page 9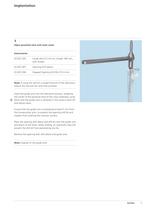
Implantation 1 Open proximal ulna and ream canal Instruments 03.007.020 Guide Wire л 2.8 mm, length 180 mm, with thread 03.007.007 Opening Drill Sleeve 03.007.006 Stepped Opening Drill Bit л 6.0 mm 5 mm Note: If using the nail for a simple fracture of the olecranon, reduce the fracture first and then proceed. Insert the guide wire into the olecranon process, targeting the center of the proximal third of the ulnar medullary canal. Verify that the guide wire is centered in the canal in both AP and lateral views. Ensure that the guide wire is positioned at least 5 mm from the humeroulnar joint,...
Open the catalog to page 10
Implantation 2 Insert nail Insert the nail into the medullary canal. Ensure that the aiming arm is oriented posterior to the forearm. Insert the nail until the hexagonal proximal end of the inserter makes contact with the olecranon process. Verify appropriate insertion depth radiographically. Place a scalpel blade (or similar) on the desired location of the osteotomy. A groove on the inserter shows the proximal end of the nail and can be seen radiographically. Ensure that the top of the nail is distal to the desired osteotomy location. 3 Insert stabilization guide wire Instrument 03.007.020 Guide...
Open the catalog to page 11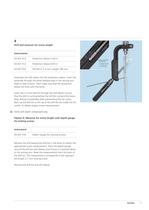
4 Drill and measure for screw length Instruments 03.007.013 Protection Sleeve 5.5/2.4 03.007.012 Protection Sleeve 8.0/5.5 03.007.024 Drill Bit л 2.4 mm, length 180 mm Measure to back end of drill bit Assemble the drill sleeve into the protection sleeve. Insert the assembly through the distal oblique hole in the aiming arm. Make a stab incision. Then make sure that the protection sleeve sits flush with the bone. Insert the 2.4 mm drill bit through the drill sleeve. Ensure that the drill is running before the drill bit contacts the bone. Stop drilling immediately after penetrating the far cortex....
Open the catalog to page 12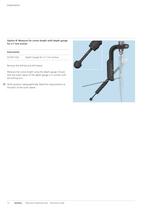
Implantation Option B: Measure for screw length with depth gauge for 2.7 mm screws Instrument 03.007.025 Depth Gauge for 2.7 mm Screws Remove the drill bit and drill sleeve. Measure the screw length using the depth gauge. Ensure that the outer sleeve of the depth gauge is in contact with the aiming arm. Verify position radiographically. Read the measurement at the back of the outer sleeve. 12 Synthes Olecranon Osteotomy Nail Technique Guide
Open the catalog to page 13All Depuy Synthes catalogs and technical brochures
 Titanium Sternal Fixation System
34 Pages
 Small Battery Drive II
4 Pages
 Introducing The Variable Angle
12 Pages

Archived catalogs
 MatrixRIB®FixationSystem
86 Pages
 HEALIX ADVANCE
4 Pages
 HEALIX Anchor™ 3.4 mm
2 Pages
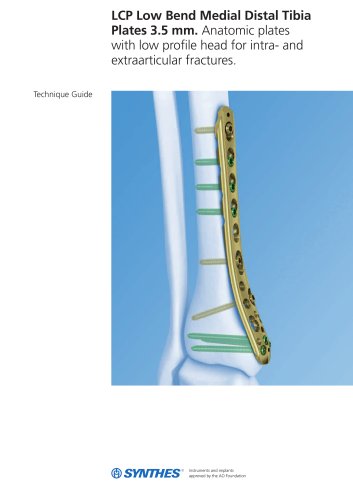
 3.5 mm LCP™ Medial
15 Pages
 RADIUS OF CURVATURE
3 Pages
 Building on Success
16 Pages
 2.0 mm LCP® Distal Ulna Plate
20 Pages
 2.4 mm VA LCP™
4 Pages
 Mandible Trauma Solutions
2 Pages
 Power line II
4 Pages
 Concorde
28 Pages
 LCP Intercarpal
31 Pages
 LCS® COMPLETE™
2 Pages
 Synthes TPLO.
8 Pages
 SynFix-LR System
56 Pages
 ATB Anterior Tension Band Plate
32 Pages
 CONDUIT™
15 Pages
 Brochure_FINAL
2 Pages
 DePuy Synthes
81 Pages
 Anspach
3 Pages
 Orthopedic Foot Instruments
32 Pages
 PINNACLE® Hip Solutions
12 Pages
 Corail
24 Pages
 S-ROM® NOILES™
68 Pages
 TRI-LOCK® Product Rationale
12 Pages
 Reclaim Surgical Technique
44 Pages
 Speed
Speed2 Pages
 attune
80 Pages
 HAMMERLOCK® 2
2 Pages
 DePuy Glenoid Solutions
2 Pages
 Trauma Solutions. Elbow
4 Pages
 Polar
Polar4 Pages
 Alveolar Distractor.
4 Pages
 Piezoelectric System
4 Pages
 Air Power Line II
6 Pages
 LCP Clavicle Hook Plate
4 Pages
 TruMatch Pin Guides
16 Pages
 P F N A
8 Pages
 SKILL, DEDICATION,
16 Pages
 Orthopaedics. Overview
20 Pages
 DURALOC
16 Pages
 Marathon Cemented Cup
20 Pages
 REEF Surgical Technique
16 Pages
 MatrixNEURO
8 Pages
 Anspach XMax
4 Pages
 Anspach eMax 2 Plus
4 Pages
 Small Electric Drive
4 Pages
 Air Pen Drive
4 Pages
 Colibri II
4 Pages
 Spine
Spine25 Pages
 Expert Hindfoot Arthrodesis Nail
48 Pages
 LCP Distal Fibula Plates
32 Pages
 TomoFix
60 Pages
 Expert Tibial Nail PROtect
16 Pages
 Expert Tibia Nail
84 Pages
 Sacral Bars
16 Pages
 Pelvic C-Clamp
20 Pages
 Low Profile Pelvic System
16 Pages
 Proximal Femoral (Hook) Plate
24 Pages
 LCP
LCP24 Pages
 PFNA
PFNA112 Pages
 HCS 1.5, 2.4, 3.0
36 Pages
 LCP Wrist Fusion
32 Pages
 LCP Compact Hand
28 Pages
 VA-LCP Elbow
48 Pages
 Distal Radius
44 Pages
 LCP Hook Plate
28 Pages
 DHP & Olecranon
4 Pages
 LCP S-A
4 Pages
 Epoca
Epoca4 Pages
 Philos
32 Pages
 MultiLoc
68 Pages


- DePuy Synthes bone plate
- Compression plate
- Metallic compression plate
- Locking compression plate
- Titanium compression plate
- Distal compression plate
- Orthopedic surgery instrument kit
- Interbody fusion cage
- Sterilization container
- Instrument sterilization container
- Arthrodesis nail
- Bone substitute
- Metallic intramedullary nail
- Femoral stem
- Anterior interbody fusion cage
- Arthrodesis plate
- Orthopedic surgery bone substitute
- Femoral intramedullary nail
- Metallic arthrodesis plate
- Knee prosthesis