
- Catalogs
- Depuy Synthes
- Reclaim Surgical Technique


Reclaim Surgical Technique

Reclaim Surgical Technique
The document provides a comprehensive guide on the surgical technique for the DePuy Synthes RECLAIM Revision Hip System, highlighting the importance of strength and modularity in hip revision surgeries.
Pre-operative planning is essential for successful surgery. The RECLAIM X-ray Templates, magnified at 20%, assist in selecting the correct implant size by evaluating length, diameter, and center of rotation, ensuring the implant addresses femoral defects and restores joint biomechanics.
- Step 1: Accessing the Femoral Canal - Achieved using the Distal Starter Reamer, with depth marks for seating depth. An extended trochanteric osteotomy may be required for better access.
- Step 2: Progressive Distal Reaming - Involves using reamers of increasing diameter to prepare the femoral canal, ensuring good cortical contact and appropriate depth.
- Step 3: Finishing Rasp - Used to remove additional bone at the distal stem's apex for proper seating.
- Step 4: Distal Stem Insertion - The Distal Stem Inserter ensures alignment with the femur's anterior bow.
- Step 5: Proximal Body Preparation - Proximal reaming over the distal stem confirms seating height and biomechanics.
- Step 6: Proximal Body Trialling - Involves inserting the Proximal Trial Shaft into the Distal Stem to assess leg length, offset, and orientation.
Surgeons should thoroughly read the material and use pre-operative radiographic templating to select the appropriate implant size, understanding the surgical technique for successful outcomes.
The Proximal Body is available in various sizes with a 135º neck angle and 12/14 Articul/eze® Mini Taper. Heights range from 20 mm with diameters of 24 mm, 28 mm, and 75 mm. Offsets are color-coded: Blue (40 mm), Green (85 mm), Yellow (95 mm), and Red (105 mm).
- Taper Engagement - Ensure the Distal Stem implant taper is clean and dry. Use the Depth Gauge and Assembly Tool for alignment and securing the Proximal Body implant.
- Locking Bolt Assembly - Installed after confirming implant placement, using a Torque Wrench to apply the correct torque.
- Optional Disassembly - The Disassembly Tool can separate the Proximal Body from the Distal Stem, but only one intra-operative separation is allowed.
- Reamer Extractor Adapter - Used for extracting a Distal Reamer.
- Slap Adapter - Connects to a Slap Hammer for implant extraction.
- Assembled Implant Inserter Adapter - Used for inserting the assembled implant construct into the femur.
- Proximal Bodies - Available in various sizes and offsets, each with specific product codes.
- Locking Bolts - Available in lengths of 75 mm, 85 mm, 95 mm, and 105 mm.
- Distal Stems - Offered in straight and angled designs, with lengths ranging from 140 mm to 290 mm and diameters from 14 mm to 31 mm.
- The RECLAIM system is designed for femoral head offsets of +12 mm or less.
- Components such as the Distal Stem or Locking Bolt Assembly cannot be reused once assembled.
- Proper cleaning and assembly techniques are critical to ensure successful implantation and avoid complications.
The document categorizes instruments into core, assembly, disassembly, and ancillary tools, including reamers, trial shafts, inserters, and torque wrenches, each with specific product codes.
Proximal Body and Distal Stem X-Ray Templates are provided for pre-surgical planning and assessment.
The document cites studies and data supporting the use of the RECLAIM system, emphasizing its effectiveness in femoral revision surgeries.
Lists contact details for DePuy Synthes offices in Ireland, England, and the USA, providing support and further information for medical professionals.
Catalog excerpts

DePuy Synthes JOINT RECONSTRUCTION COMPANIES OF Where Strength and Modularity Connect This publication is not intended for distribution in the USA. SURGICAL TECHNIQUE
Open the catalog to page 1
RECLAIM Modular Revision Hip System SURGICAL TECHNIQUE Introduction 2 STEP 1: Accessing the Femoral Canal Starter Reamer 4 STEP 2: Progressive Distal Reaming 6 Optional: Trialling Off the Distal Reamer 7 STEP 3: Finishing Rasp 8 STEP 4: Distal Stem Insertion 10 STEP 5: Proximal Body Preparation 12 STEP 6: Proximal Body Trialling 14 STEP 7: Taper Engagement 16 STEP 8: Locking Bolt Assembly 28 Optional Disassembly Step 30 Optional Instrumentation 32 ORDERING INFORMATION DePuy Synthes RECLAIM Revision Hip System
Open the catalog to page 2
Advanced Instrumentation Where Strength and Modularity Connect RECLAIM Revision Hip System Surgical Technique DePuy Synthes Joint Reconstruction
Open the catalog to page 3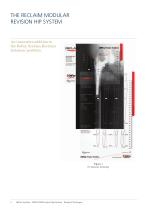
THE RECLAIM MODULAR REVISION HIP SYSTEM An innovative addition to the DePuy Synthes Revision Solutions portfolio. DePuy Synthes RECLAIM Revision Hip System Surgical Tec
Open the catalog to page 4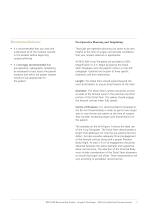
Pre-Operative Planning and Templating: • It is recommended that you read and understand all of the material covered in this booklet before beginning surgical planning. Thorough pre-operative planning can prove to be very helpful at the time of surgery and provide confidence that your implant selection is appropriate. • It is strongly recommended that pre-operative, radiographic templating be employed to best assess the patient anatomy and select the proper implant construct size appropriate for the patient. All RECLAIM X-ray Templates are provided at 20% Magnification (1.2:1). Begin by placing...
Open the catalog to page 5
ACCESSING THE FEMORAL CANAL STARTER REAMER Obtaining clear access to the femoral canal is important to ensure proper alignment of implant components. Following removal of any pre-existing hardware and debris, connect the RECLAIM Distal Starter Reamer to the Reamer T-handle or power equipment (Figure 2). In many cases, due to femoral deformity, an extended trochanteric osteotomy should be performed to facilitate more direct access down the femoral canal. The 140 mm length Distal Starter Reamer is designed to obtain clear access to the femoral canal prior to distal reaming. Colored depth marks...
Open the catalog to page 6
The Clear Out Reamer is designed to obtain clear access for the reamer extension prior to progressive distal reaming. (Figure 3) It is required that the Clear Out Reamer is seated to the same depth mark as established for the Starter Reamer. In the event deeper distal reaming is required the Clear Out Reamer must be used again to obtain additional clearance. Once final distal reaming depth or a 20 mm distal reamer has been achieved the Clear Out Reamer is no longer needed. Figure 3 Clear Out Reamer RECLAIM Revision Hip System Surgical Technique DePuy Synthes Joint Reconstru
Open the catalog to page 7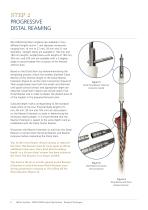
PROGRESSIVE DISTAL REAMING RECLAIM Distal Stem implants are available in four different lengths and in 1 mm diameter increments ranging from 14 mm to 27 mm, 29 mm and 31 mm diameters. Straight Stems are available in 140 mm and 190 mm lengths. Angled stems with lengths of 190 mm, 240 mm, and 290 mm are available with a 3-degree angle to accommodate the curvature of the femoral anterior bow. Based on the Distal Stem size determined during the templating process, attach the smallest diameter Distal Reamer of the shortest length to the Distal Reamer Extension (Figure 4) via the L-Slot Connection...
Open the catalog to page 8
Trialling Off the Distal Reamer (Optional) In the event that a large proximal deformity exists and traditional bony landmarks are absent, trialling off the Distal Reamer may be conducted to obtain an early indication of leg length and offset. Proximal Trials are available to replicate the biomechanics of the Proximal Body implants. Select the Proximal Trial Shaft that corresponds to the coloured depth marker selected during distal reaming, and attach it to the Distal Reamer. The Proximal Trial Shaft and Proximal Trial Neck may also be preliminarily assembled via the retaining spring inside the...
Open the catalog to page 9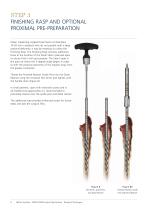
FINISHING RASP AND OPTIONAL PROXIMAL PRE-PREPARATION When implanting Angled Distal Stems of diameters 14-20 mm in patients who do not present with a large proximal deformity, it may be necessary to utilise the Finishing Rasp. The Finishing Rasp removes additional bone at the location of the Distal Stem’s planned apex to ensure that it will seat properly. The Stem’s apex is the point at which the 3-degree angle begins in order to shift the proximal geometry of the implant away from the greater trochanter. Thread the Proximal Reamer Guide Post into the Distal Reamer using the Universal Hex Driver...
Open the catalog to page 10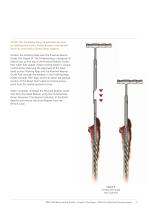
NOTE: The Finishing Rasp should only be used in combination with a Distal Reamer and should never be used with a Distal Stem implant. Position the Finishing Rasp over the Proximal Reamer Guide Post (Figure 9). The Finishing Rasp is designed to bottom-out on the top of the Proximal Reamer Guide Post when fully seated. Proper seating height is visually confirmed by observing the alignment of the black band on the Finishing Rasp and the Proximal Reamer Guide Post through the window in the Finishing Rasp. Rotate through 180° back and forth about the planned location of the Distal Stem’s apex to remove...
Open the catalog to page 11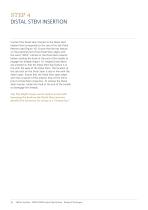
DISTAL STEM INSERTION Connect the Distal Stem Inserter to the Distal Stem implant that corresponds to the size of the last Distal Reamer used (Figure 10). Ensure that the key feature on the proximal end of the Distal Stem aligns with the word “APEX” etched on the Distal Stem Inserter before rotating the knob at the end of the handle to engage the threads (Figure 11). Angled Distal Stems are oriented so that the Distal Stem key feature is in line with the apex of the Distal Stem. The location of the size etch on the Distal Stem is also in line with the Stem’s apex. Ensure that the Distal Stem...
Open the catalog to page 12
Figure 11 Distal Stem Inserter APEX Marking Figure 10 Distal Stem Insertion RECLAIM Revision Hip System Surgical Technique DePuy Synthes Joint Reconstruction
Open the catalog to page 13All Depuy Synthes catalogs and technical brochures
 Titanium Sternal Fixation System
34 Pages
 Small Battery Drive II
4 Pages
 Introducing The Variable Angle
12 Pages


Archived catalogs
 MatrixRIB®FixationSystem
86 Pages
 HEALIX ADVANCE
4 Pages
 HEALIX Anchor™ 3.4 mm
2 Pages
 3.5 mm LCP™ Medial
15 Pages
 RADIUS OF CURVATURE
3 Pages
 Building on Success
16 Pages
 2.0 mm LCP® Distal Ulna Plate
20 Pages
 2.4 mm VA LCP™
4 Pages
 Mandible Trauma Solutions
2 Pages
 Power line II
4 Pages
 Concorde
28 Pages
 LCP Intercarpal
31 Pages
 LCS® COMPLETE™
2 Pages
 Synthes TPLO.
8 Pages
 SynFix-LR System
56 Pages
 ATB Anterior Tension Band Plate
32 Pages
 CONDUIT™
15 Pages
 Brochure_FINAL
2 Pages
 DePuy Synthes
81 Pages
 Anspach
3 Pages
 Orthopedic Foot Instruments
32 Pages
 PINNACLE® Hip Solutions
12 Pages
 Corail
24 Pages
 S-ROM® NOILES™
68 Pages
 TRI-LOCK® Product Rationale
12 Pages
 Speed
Speed2 Pages
 attune
80 Pages
 HAMMERLOCK® 2
2 Pages
 DePuy Glenoid Solutions
2 Pages
 Trauma Solutions. Elbow
4 Pages
 Polar
Polar4 Pages
 Alveolar Distractor.
4 Pages
 Piezoelectric System
4 Pages
 Air Power Line II
6 Pages
 LCP Clavicle Hook Plate
4 Pages
 TruMatch Pin Guides
16 Pages
 P F N A
8 Pages
 SKILL, DEDICATION,
16 Pages
 Orthopaedics. Overview
20 Pages
 DURALOC
16 Pages
 Marathon Cemented Cup
20 Pages
 REEF Surgical Technique
16 Pages
 MatrixNEURO
8 Pages
 Anspach XMax
4 Pages
 Anspach eMax 2 Plus
4 Pages
 Small Electric Drive
4 Pages
 Air Pen Drive
4 Pages
 Colibri II
4 Pages
 Spine
Spine25 Pages
 Expert Hindfoot Arthrodesis Nail
48 Pages
 LCP Distal Fibula Plates
32 Pages
 TomoFix
60 Pages
 Expert Tibial Nail PROtect
16 Pages
 Expert Tibia Nail
84 Pages
 Sacral Bars
16 Pages
 Pelvic C-Clamp
20 Pages
 Low Profile Pelvic System
16 Pages
 Proximal Femoral (Hook) Plate
24 Pages
 LCP
LCP24 Pages
 PFNA
PFNA112 Pages
 HCS 1.5, 2.4, 3.0
36 Pages
 LCP Wrist Fusion
32 Pages
 LCP Compact Hand
28 Pages
 VA-LCP Elbow
48 Pages
 Distal Radius
44 Pages
 Olecranon
30 Pages
 LCP Hook Plate
28 Pages
 DHP & Olecranon
4 Pages
 LCP S-A
4 Pages
 Epoca
Epoca4 Pages
 Philos
32 Pages
 MultiLoc
68 Pages




- DePuy Synthes bone plate
- Compression plate
- Metallic compression plate
- Locking compression plate
- Titanium compression plate
- Orthopedic surgery instrument kit
- Distal compression plate
- Interbody fusion cage
- Sterilization container
- Instrument sterilization container
- Arthrodesis nail
- Bone substitute
- Metallic intramedullary nail
- Femoral stem
- Anterior interbody fusion cage
- Arthrodesis plate
- Orthopedic surgery bone substitute
- Femoral intramedullary nail
- Knee prosthesis
- Metallic arthrodesis plate