


- Company
- Products
- Catalogs
- News & Trends
- Exhibitions
Neon Proximal Femoral Nail Surgical Technique

Neon Proximal Femoral Nail Surgical Technique
The Neon Proximal Femoral Nail is a surgical device designed to enhance the fixation of femoral fractures. It features Claw Technology, utilizing titanium pins for improved stability, reduced surgical time, and minimized complications. The design aims to decrease radiation exposure and blood loss by eliminating distal incisions.
The retractable titanium pins penetrate the cortical bone, providing superior axial and rotational stability. This technology reduces radiation exposure and the number of incisions, leading to fewer scars and a lower infection risk.
The nail has a proximal diameter of 15.5 mm and a distal diameter of 11 mm, with a maximum distal claw span of 38 mm. Made from a titanium alloy with anodized surface treatment, it is available in various lengths and angles for different fracture types.
Indicated for intertrochanteric, subtrochanteric, osteoporotic, and pathologic femoral fractures. Contraindications include distal third fractures, femoral neck fractures, infections, or insufficient bone quality.
The procedure involves patient positioning, incision, and medullary canal access. The nail is inserted after determining the appropriate length and reaming the femur. Claw Technology secures the nail, and a lag screw provides additional fixation.
Involves retracting claws and screws, followed by nail extraction, designed to minimize complications.
The Neon Proximal Femoral Nail, with Claw Technology, offers a reliable solution for femoral fracture fixation, enhancing stability and reducing operative time and complications.
This document outlines the Neon intramedullary nailing system's surgical technique, detailing steps and instruments for canal access, reaming, nail insertion, and lag screw placement.
Begins with guide wire insertion using a Trocar Tip Guide Wire. Instruments like the Neon Tissue Protector and Neon Entry Reamer access the canal, with guide wire positioning aided by an image intensifier.
The Neon Entry Reamer reams the proximal femur to the desired depth, monitored radiographically. The guide wire is exchanged for a Ball Tip Guide Wire and secured with a Pin Puller.
The Neon Radiographic Claw Template determines the appropriate nail length, positioned over the thigh for radiographic measurements.
The canal is reamed to at least 12 mm, 1 mm above the nail diameter, using reamer cutter heads, with the guide wire maintained by a Guide Wire Pusher.
The Guide Arm is assembled with the Guide Handle using a 7 mm Hex Driver. The nail is attached to the Guide Handle, with alignment verified using a Lag Guide Sleeve and Lag Alignment Plug.
The nail is inserted over the guide wire into the bone, with an Impactor used for light hammer blows if needed. The guide wire is removed once the nail is positioned.
The Lag Guide Pin is inserted through the Lag Guide Sleeve, with depth measured using a Lag Screw Guide Pin Ruler. The Lag Drill drills to the desired depth.
The Distal Claw Deployment Driver deploys the nail claws, with the Torque Limiting Handle ensuring proper torque to avoid excessive penetration.
The Lag Screw is connected to the Lag Driver and inserted over the Lag Guide Pin, with the Lag Driver Compression Knob setting the screw position and allowing for compression if necessary.
The document provides a comprehensive guide to the Neon surgical technique, emphasizing precise measurements and alignment for successful nail and lag screw placement.
Details on inserting and removing the Neon Proximal Femoral Nail system, including lag screws and end caps, are provided.
Includes details on various configurations and sizes for the Neon Proximal Femoral Nail, Nail End Caps, and Lag Screws. Product availability may vary by region; contact Dunitech for specifics.
Catalog excerpts
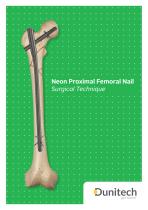
Neon Proximal Femoral Nail Surgical Technique
Open the catalog to page 1
Special thanks to Contributing Surgeons, Yalkin £AMURCU, MD, Department of Orthopedics and Traumatology Medical Faculty of Erzincan University Erzincan, Turkey Mehmet Cenk Canku§, MD, FEBOT Department of Orthopedics and Traumatology Medical Faculty of Sanko University Gaziantep, Turkey
Open the catalog to page 2
Get Better Expertise and enthusiasm can be perfectly combined into a top-notch medical engineering company! We contribute to the development of health services by providing superior technology products at competitive costs. We envision a socially conscious business environment serving the health industry and patients get better. Dunitech branded products are designed and engineered to keep our promise; Easier Operation Better Fixation
Open the catalog to page 3
TABLE OF CONTENTS Neon Proximal Femoral Nail SURGICAL TECHNIQUE NAIL REMOVAL
Open the catalog to page 4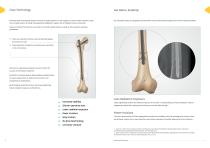
Claw Technology Dunitech leads innovational systems and aims to supply options for the surgeons to excel at their expertise. Claws Six retractable Claws are designed to penetrate the cortex and provide exceptional axial and rotational stability. are a novelty solution on distal locking systems designed to support the orthopedic trauma community. Claws are titanium pins that act as anchors to provide a stable fixation, as well as other superior operative parameters. Claws are made from titanium and mechanically deploy from within the nail. Claws penetrate through the cancellous bone and anchor...
Open the catalog to page 5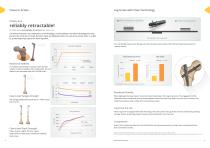
Lag Screw with Claw Technology 3x More Rotational Stability reliably retractable! All Claws were successfully retracted after every test. Conventional systems are subjected to screw breakage, screw headwear and drill bit breakage that may prevent the nail to be removed. Dunitech Claws are deployed within the nails from precise holes in a tight fit, preventing empty spaces for bone ingrowth. Virtually no cut-out Four retractable Claws anchor the lag screw into the dense cortical bone of the femoral head-neck junction for Rotational Stability superior control. Peak Compressive Forces Cumulative...
Open the catalog to page 6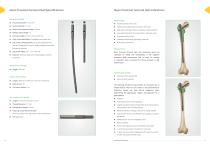
NEON KEY FIGURES • Proximal Diameter: 15.5 mm • Distal Diameter: 11 mm • Distal Claws Maximum Span: 38 mm • Medial-Lateral Angle: 4° • End Cap Length: 0 mm, 5 mm and 10 mm • Fully Cannulated Body: Compatible with guide wire • Lag Screw Locking System: Set Screw integrated into the nail. Designed for fixed or sliding configuration while preventing rotation. • Lag Screw Angle: 120°, 125° and 130° • Material: Titanium alloy with anodized type II surface treatment. NEON SHORT FIGURES • Length: 220 mm NEON LONG FIGURES • Length: 300 mm to 420 mm in 20 mm increments • Anteversion: 10° • Curvature Radius:...
Open the catalog to page 7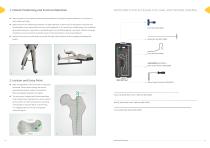
1. Patient Positioning and Fracture Reduction INSTRUMENTS FOR ACCESSING THE CANAL AND PROXIMAL REAMING ● Place the patient in the supine or lateral decubitus position according to surgeon preference on a fracture or other radiolucent table. ● Apply traction to the affected leg and place it in slight adduction to ease access to the greater trochanter and intramedullary canal. Alternatively, the torso can be abducted 10-15° towards the unaffected leg. The unaffected leg should be placed in a leg holder or extended away from the affected leg (Fig-1 and Fig-2). Position the image intensifier as to...
Open the catalog to page 9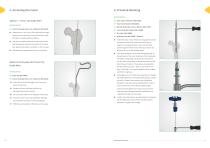
4. Proximal Reaming INSTRUMENTS: Option 1: Trocar Tip Guide Wire INSTRUMENTS: V Trocar Tip Guide Wire 3 mm x 600 mm (N01-0250) • Advance the 3 mm Trocar Tip Guide Wire through the entry point and into the proximal femur with the help of a powered driver (Fig-5). • The wire should be centered in the canal on the lateral view and intersect the center of the canal just beyond the lesser trochanter on the AP view. • Withdraw and reposition the wire as necessary. Option 2: Entry Awl and Trocar Tip Guide Wire INSTRUMENTS: V Entry Awl (N01-0040) s/ Trocar Tip Guide Wire 3 mm x 600 mm (N01-0250) • Insert...
Open the catalog to page 10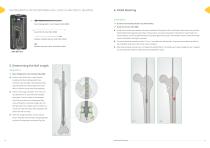
INSTRUMENTS FOR DETERMINING NAIL LENGTH AND DISTAL REAMING INSTRUMENTS: Dunitech Intramedullary Reamer Set (INST-01-002) Neon Radiographic Claw Template (N02-0080) Guide Wire Pusher (N01-0060) ● Confirm that the fracture reduction has been maintained. Starting from 8.5 mm Reamer Cutter Head, ream until the Guide Wire Pusher (N01-0060) desired depth with steady pressure (Fig-11). By each pass, increase the diameter of the Reamer Cutter Head in 0.5 mm increments. Use the Guide Wire Pusher to keep the guide wire in place. If the sheath comes out with the reamer, insert it back before starting the...
Open the catalog to page 11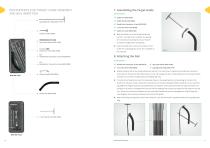
INSTRUMENTS FOR TARGET GUIDE ASSEMBLY AND NAIL INSERTION 7. Assembling the Target Guide INSTRUMENTS: Guide Arm (N02-0050) Guide Handle (N02-0060) Handle-Arm Connector Screw (N02-0200) 7 mm Hex Driver (N01-0030) Guide Arm Lock (N02-0180) ● Mate the Guide Arm to the Guide Handle and use the 7 mm Hex Driver to tighten the HandleArm Connector Screw (Fig-13). Ensure that the connection is tight before proceeding. ● Insert the Guide Arm Lock into the bottom of the Guide Arm Lock (N02-0180) Handle-Nail Connector Screw (N02-0070) Guide Arm and engage the screw. Do not tighten at this moment. 8. Attaching...
Open the catalog to page 12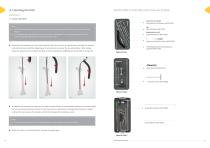
INSTRUMENTS FOR DRILLING FOR LAG SCREW INSTRUMENTS: Impactor (N01-0070) Lag Guide Pin Obturator (N02-0190) Note: 4 If the Guide Wire Sheath has not been removed, it has to be removed in before the insertion of the nail (Fig-12). 4 If a traditional ball tip guide wire was used, it must be exchanged for a smooth guide wire. The tip of traditional ball tip guide wires won’t pass through the nail. Lag Screw Guide Pin Ruler (N02-0140) ● Assemble the impactor into the Guide Handle. Pass the nail over the guide wire, through the incision and into the bone. Hold the targeting arm vertically as you enter...
Open the catalog to page 13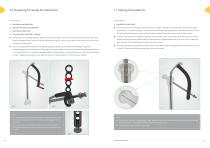
10. Preparing for Guide Pin Placement ● Set the nail in its final orientation with the help of the image intensifier in the lateral view. Arrange the image intensifier for a true lateral position. The Guide Arm should perfectly overlap the nail and femoral head, as seen in Fig-22a. If the Guide Arm is lateral to the nail and/or femoral head, reorient the nail, so they overlap. 7 mm Hex Driver (N01-0030) – Optional ● Set the nail in its final depth with the help of the image intensifier in the AP view. The projected axis of the lag screw should be slightly inferior to the axis of the femoral neck...
Open the catalog to page 14All Dunitech catalogs and technical brochures
 Corporate brochure
28 Pages


- Compression bone screw
- Metallic compression bone screw
- Arthrodesis nail
- Metallic intramedullary nail
- Proximal fixation intramedullary nail
- Femoral intramedullary nail
- Titanium intramedullary nail
- Distal fixation intramedullary nail
- Titanium compression bone screw
- Cortical compression bone screw
- Tibial intramedullary nail
- Humeral intramedullary nail
- Right intramedullary nail
- Left intramedullary nail
- Femur compression bone screw
- Tibia compression bone screw
- Mid-shaft fixation intramedullary nail