MightyMite®
1 /4Pages

MightyMite®
1 /4Pages
Catalog excerpts

MIGHTYMITE 4-BAR KNEE INSTRUCTION SHEET 2710 Amnicola Highway Chattanooga, TN 37406 423.624.0946 Fax 423.629.7936 Description MightyMite 4-Bar Knee 30mm Bolt for Pyramid Attachment 20mm Bolt for Slide Attachment 20mm Bolt for 4-Hole Attachment 20mm Bolt for Threaded Attachment Extension Spring Housing Extension Stop Spring, .210” long Extension Stop Spring, .220” long Spring Guide Extension Assist Spring Color Resistance PartNo. Orange Less 61643 Yellow 61644 Green 61645 Blue More 61646 Extension Assist Spring 61643 through 61646 Note: Assembly shown above is part number FC100510, which includes the MightyMite Knee (FC100500) and the Pyramid Attachment (FC100501).
Open the catalog to page 1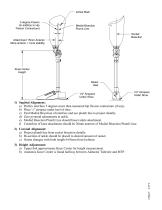
Ischial Mark 5 degree Flexion (In addition to Hip Flexion Contracture) Medial Bisection Plumb Line Socket Bisection Attachment 15mm Anterior More anterior = more stability Knee Center Height Bisect Heel 1/4" Airspace Under Shoe 1/4" Airspace Under Shoe 1) Sagittal Alignment: a) Preflex interface 5 degrees more than measured hip flexion contracture (if any). b) Place ¼” airspace under heel of shoe. c) Find Medial Bisection of interface and use plumb line to project distally. d) Zero pyramid adjustments at ankle. e) Medial Bisection Plumb Line should bisect ankle attachment. f) Centerline of knee...
Open the catalog to page 2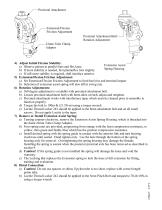
Proximal Attachment Extension/Flexion Friction Adjustment Proximal Attachment Bolt/ Rotation Adjustment 22mm Tube Clamp Adaptor 4) Adjust Initial Flexion Stability: Extension Assist a) Observe patient in parallel bars and flex knee. Spring Housing b) If more stability is needed, first plantarflex foot slightly. c) If still more stability is required, shift interface anterior. 5) Extension/Flexion Friction Adjustment: a) Set Extension/Flexion Friction Adjustment to limit heel rise and terminal impact. b) Selection of extension assist spring will also affect swing rate. 6) Rotation Adjustments:...
Open the catalog to page 3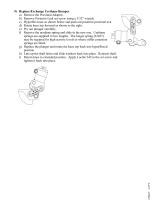
9) Replace/Exchange Urethane Bumper a) Remove the Proximal Adaptor. b) Remove Posterior Link set screw using a 3/32” wrench. c) Hyperflex knee as shown below and push out posterior proximal axle. d) Rotate knee top forward as shown to the right. e) Pry out plunger carefully. f) Remove the urethane spring and slide in the new one. Urethane springs are supplied in two lengths. The longer spring (61697) may be required for high activity levels or where stiffer extension springs are fitted. g) Replace the plunger and rotate the knee top back into hyperflexed position h) Line up the shaft holes and...
Open the catalog to page 4All Fillauer catalogs and technical brochures
 Tools, Equipment, & Materials
74 Pages
 Orthotics
74 Pages
 Lower Extremity Prosthetics
107 Pages
 Upper Extremity Prosthetics
128 Pages
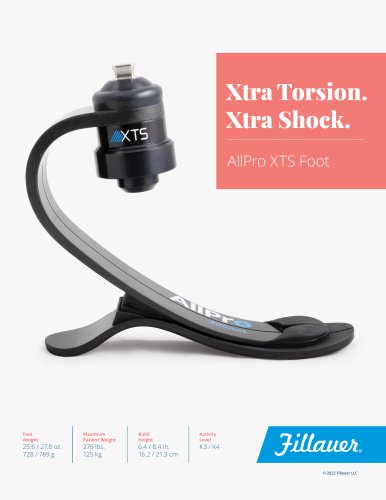 AllPro XTS Foot
4 Pages
Archived catalogs
 Absolute Suspension Sleeve
2 Pages
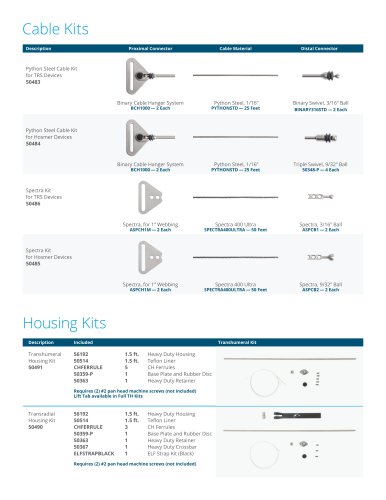 Cable Kits
4 Pages
 DuraTwist
1 Page
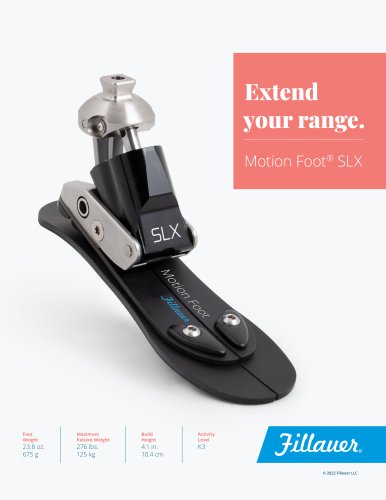 Motion Foot® SLX
4 Pages
 Fillauer Companies Catalog
572 Pages
 Raise
Raise2 Pages
 Foot-Comparison-Chart
2 Pages
 Element
2 Pages
 Wave-Comfort-Foot-System
2 Pages
 wave sport
2 Pages
 Dream-Skin
2 Pages
 Aeris-Solution
2 Pages
 DuraShock_2012
2 Pages
 Trans- Femoral rotator
2 Pages
 MightyMite_Knee
2 Pages
 AD266-ParaPod
2 Pages
 AD139-MightyMite_Knee
12 Pages
 AD280-Mac_Knee
2 Pages
 AD326-EZ-Crawl-Ad
1 Page
 tiny titans
8 Pages
 Ibex
Ibex2 Pages
 The XD Line
1 Page
 ELEMENT DS
2 Pages
 DREAM SKIN
2 Pages
 Wave Comfort 2
2 Pages
 Upper Extremity Prosthetics Index
538 Pages
 Orthotics Product Catalog
144 Pages
 Pediatric Formula™
4 Pages
 Obsidian
4 Pages
 Gloove
2 Pages
 K2 Foot
2 Pages
 ProCover
2 Pages
 Hosmer Terminal Devices
12 Pages
 TASKA
TASKA2 Pages
 DuraShock
8 Pages
 FLAG
FLAG2 Pages
 Utah Arm
4 Pages
 Hook
Hook12 Pages
 CATALOGUE 2012
56 Pages


- Orthopedic immobilization
- Orthosis
- L orthopedic immobilization
- S orthopedic immobilization
- M orthopedic immobilization
- Pediatric orthopedic immobilization
- Ankle and foot orthosis
- Lower extremity prosthesis
- Dynamic orthopedic immobilization
- Adult lower extremity prosthesis
- Custom orthopedic immobilization
- Cosmetic prosthesis
- Adult cosmetic prosthesis
- Prosthetic foot
- Walking prosthetic foot
- Adult prosthetic foot
- Upper extremity prosthesis
- Dynamic prosthetic foot
- Articulated upper extremity prosthesis
- Arm cosmetic prosthesis