
Catalog excerpts

Instruction manual NiJilptary system Fulfilling the biological requirement Swiss Dental Products
Open the catalog to page 1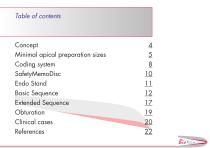
Minimal apical preparation sizes 5
Open the catalog to page 3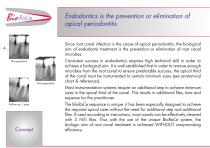
Endodontics is the prevention or elimination of apical periodontitis Since root canal infection is the cause of apical periodontitis, the biological aim of endodontic treatment is the prevention or elimination of root canal microbes. Consistent success in endodontics requires high technical skill in order to achieve a biological aim. It is well established that in order to remove enough microbes from the root canal to ensure predictable success, the apical third of the canal must be instrumented to certain minimum sizes (see anatomical chart & references). Most instrumentation systems...
Open the catalog to page 4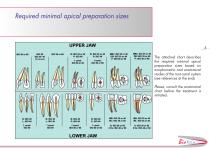
Required minimal apical preparation sizes The attached chart describes the required minimal apical preparation sizes based on studies of the root canal system Please, consult the anatomical chart before the treatment is
Open the catalog to page 5
BioRaCe basic sequence Note on the opposite figure < that when the instruments are at full working length, the tip of BR0, BR1 and BR3 don’t touch the canal walls (see contact zones). Contact zones
Open the catalog to page 6
BioRaCe instruments present the same physical characteristics of RaCe instruments such as: Alternating Cutting Edges - avoids self-threading - Sharp Cutting Edges - triangular section - Electro-Chemical Surface Polishing BioRaCe differs from the well known RaCe instruments in regard to instruments sizes, tapers and sequence. The major goal of BioRaCe is to achieve apical preparation sizes that are scientifically proven to effectively disinfect the canal (see references at the end). BioRaCe has been designed to clean the root canal efficiently and safely with few instruments. BioRaCe should...
Open the catalog to page 7
BioRoCe instruments ore identified by o specific coding system on the hondle ond by specific colored rubber stoppers* Example of marking on handles Coding system Recommended torque correspond to ISO color coding for sizes. However at the final apical sizes the colors are correct for ISO sizes (green #35 and black #40). Coding key (ck) Rubber Stopper (Assistant Colour Coding)
Open the catalog to page 8
BioRoCe Extended Set instruments hove on additional control device: SofetyMemoDisc* Coding key (ck) Rubber Stopper (Assistant Colour Coding) Severe Curvature Extra widening Extra identification groove on only (i.e. Severe Curvature) Recommended torque
Open the catalog to page 9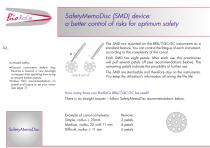
SafetyMemoDisc (SMD) device: a better control of risks for optimum safety The SMD are mounted on the BR6/7/4C/5C instruments as a standard feature. You can control the fatigue of each instrument, according to the complexity of the canal. Each SMD has eight petals. After each use, the practitioner will pull several petals off (see recommendations below). The remaining petals indicate the possibility of further use. Increased safety: • Discard instruments before they become a hazard; a new package is cheaper than spending time trying to remove broken pieces. • Follow FKG recommendations on...
Open the catalog to page 10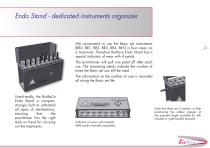
Endo Stand - dedicated instruments organizer We recommend to use the Basic set instruments (BR0, BR1, BR2, BR3, BR4, BR5) in four cases, as a maximum. Therefore BioRace Endo Stand has a special indicator of wear with 4 petals. The practitioner will pull one petal off after each use. The remaining petals indicate the number of times the Basic set can still be used. The information on the number of uses is recorded all along the Basic set life. User-friendly, the BioRaCe Endo Stand is compact, strongly built to withstand all types of sterilizations, ensuring that the practitioner has the...
Open the catalog to page 11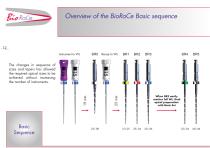
Overview of the BioRaCe Basic sequence The changes in sequence of sizes and tapers has allowed the required apical sizes to be achieved without increasing the number of instruments. When BR3 easily reaches full WL, nal apical preparation with Basic Set Basic Sequence
Open the catalog to page 12
Pre-Operative Procedures • Take parallel pre-operative radiograph(s). • Place rubber dam (rubber dam may be placed after penetrating the roof of the pulp chamber, in case of a difficult access). • Perform access. • Localize canal with an endodontic probe. • Remove coronal curvatures and establish straight line access to the canals orifices. • Use disinfectant over the pulp chamber, tooth, and 1 cm of surrounding rubber dam. • Establish working length with an Electronic Apex Locator (EAL) with SS k-files (e.g. 25 mm - #08-15).
Open the catalog to page 13
Manual Instrumentation Phase SSt files to Working Length (hereafter WL) # 08, 10, 15 • Copious irrigation with irrigant solutions. • Manual instrumentation with 0.02 taper SSt files from # 08 to #15 to full WL. • Irrigation. • If needed verify radiographically the WL with a SSt file #15. Instrumentation phase
Open the catalog to page 14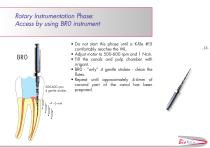
Rotary Instrumentation Phase: Access by using BR0 instrument • Do not start this phase until a K-file #15 comfortably reaches the WL. • Adjust motor to 500-600 rpm and 1 Ncm. • Fill the canals and pulp chamber with irrigant. • BR0 - “only” 4 gentle strokes - clean the utes. • Repeat until approximately 4-6mm of coronal part of the canal has been prepared.
Open the catalog to page 15
Rotary Instrumentation Phase: Reach Working Length (WL) with BR1 to BR3 Instrumentation phase • After use of BR0, repeat irrigation. • Recapitulate to full WL with a SSt file #15. • Fill the canal and pulp chamber with irrigant. • Use BR1 with 4 gentle strokes. If this instrument does not reach the WL, clean the instrument and repeat until the WL is achieved (If necessary, reconfirm the WL with an Electronic Apex Locator). • Use BR2 and BR3 as described for BR1. • DO NOT use BR3 to full WL on canals with severe apical curvatures. • Irrigate copiously between instruments.
Open the catalog to page 16
Rotary Instrumentation Phase: Final apical preparation with BR4 to BR7 • In most cases, the final apical preparation is achieved with instruments BR4 and BR5. Depending on the root canal anatomy (see anatomical chart), two additional instruments BR6 and BR7 can be used for larger canals. • The same principle as explained for BR1-3 should be used for the apical preparation. NB. Copious irrigation at all times and cleaning of the files after 4 gentle strokes is essential for safe and efficient use of these instruments.
Open the catalog to page 17All FKG Dentaire catalogs and technical brochures
-
ROOTER X3000
5 Pages
-
FGK
48 Pages
-
Catalogue 2017
64 Pages
-
XP-endo Finisher
20 Pages
-
fkg_xps
16 Pages
-
Race family
8 Pages
-
BT-Apisafe
1 Pages
-
XP-endo Finisher
16 Pages
-
Catalogue FKG
42 Pages
-
iRace Protocol card
2 Pages
-
BT-Race Protocol card
2 Pages
-
Flyer Race ISO 10 EN
4 Pages
-
Flyer ScoutRace EN
4 Pages
-
Flyer Race sterile EN
1 Pages
-
Brochure Rooter EN
8 Pages
-
Brochure iRace EN
8 Pages
-
Brochure BT-Race EN
12 Pages
-
Race
42 Pages


