- Catalogs
- G and S Smirthwaite Ltd.
- Easi-Lift Changing Bench
Easi-Lift Changing Bench
1 /24Pages

Easi-Lift Changing Bench
1 /24Pages
Catalog excerpts

User Manual Easi-Lift Changing Bench 1|Page
Open the catalog to page 1
SAFETY INSTRUCTIONS AND WARNINGS 1.0 SAFETY INSTRUCTIONS AND WARNINGS 1.1 Introduction The information in this manual is important to your safety. Please read and understand this manual in its entirety before using your Easi-Lift Changing Bench. If you require larger print or videos – these are available on the Smirthwaite website: www.smirthwaite.co.uk/product/Easi-Lift-Changing-Bench/ The information in this manual is important for the safety of anyone near the Easi-Lift Changing Bench and must be read and understood to help prevent injuries. It is also crucial to the proper operation and maintenance...
Open the catalog to page 4
SAFETY INSTRUCTIONS AND WARNINGS 1.3 Symbols Used Consult instructions before use Class II Equipment electrical equipment in which protection against electric shock does not rely on basic insulation only Safe Working Load represents the maximum load rated for safe operation Packaging indicator – This way up Packaging indicator – Keep dry Serial number Please observe local laws on recycling Degree of protection provided by enclosure. N1: Ingress of particles N2: Ingress of water Temperature range Humidity range Type ‘B’ applied part Type ‘BF’ applied part Medical Device Authorised representative...
Open the catalog to page 5
SAFETY INSTRUCTIONS AND WARNINGS personalised, case specific assessment, as there are many factors that can influence these decisions. 1.5 Intended Use For internal use only. Intended to support a recumbent patient for changing purposes Intended User The Easi-Lift has been designed for use by a child’s carer, therapist, and/or teaching staff who will maintain and clean the Changing Bench as per the recommended guidelines in section 6.0 Cleaning. The Easi-Lift is designed to be checked and adjusted by a therapist to ensure the child is positioned correctly. 1.6 Changing Bench Operating Environment...
Open the catalog to page 6
SAFETY INSTRUCTIONS AND WARNINGS 1.8 Vicinity to Other Equipment Use of this equipment stacked with other equipment should be avoided, unless the equipment is an approved accessory. Contact your local authorised dealer if assistance is required – contact details on the last page of this manual. 1.9 Incident Reporting If, during the use of this device or as a result of its use a serious incident has occurred, please report it to the manufacturer and the competent authority of the member state in which the user and/or patient is established. Additional Warnings and Safety Notices DO NOT attempt...
Open the catalog to page 7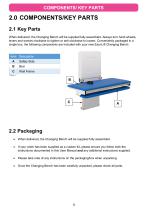
2.0 COMPONENTS/KEY PARTS 2.1 Key Parts When delivered, the Changing Bench will be supplied fully assembled. Always turn hand wheels, levers and screws clockwise to tighten or anti-clockwise to loosen. Conveniently packaged in a single box, the following components are included with your new Easi-Lift Changing Bench: Safety Side Wall Frame When delivered, the Changing Bench will be supplied fully assembled. If your order has been supplied as a custom kit, please ensure you follow both the instructions documented in this User Manual and any additional instructions supplied. Please take note of...
Open the catalog to page 8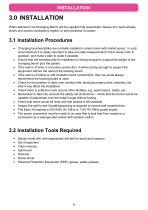
3.0 INSTALLATION When delivered, the Changing Bench will be supplied fully assembled. Always turn hand wheels, levers and screws clockwise to tighten or anti-clockwise to loosen. Changing benches/tables are normally installed in small rooms with limited space. In such circumstances it is vitally important to take accurate measurements of the whole room in question, and make a plan to scale if possible. Ensure that the intended wall for installation is strong enough to support the weight of the changing bench plus the patient. If the wall is of brick or concrete construction, it will be strong...
Open the catalog to page 9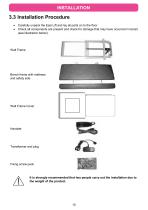
Carefully unpack the Easi Lift and lay all parts on to the floor Check all components are present and check for damage that may have occurred in transit (see illustration below): Wall Frame Bench frame with mattress and safety side Wall Frame Cover Fixing screw pack It is strongly recommended that two people carry out the installation due to the weight of the product.
Open the catalog to page 10
Store the wall frame cover and backing board (if ordered) safely until required Position the wall frame on the wall at the recommended height (300mmm) as shown opposite. Mark and drill the holes for the fixings. Where a backing board is to be used, it should be drilled to take fixing screws (minimum 8) – check the screws do not interfere with the wall frame when mounted. Fit the fixing bolts and loosely fit the frame to the wall or backing board, being careful not to trap the electrical cable Before tightening fixings, check frame is vertical in all directions, and if necessary fit packing to...
Open the catalog to page 11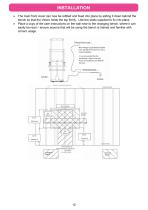
The main front cover can now be refitted and fixed into place by sliding it down behind the bench so that the Velcro holds the top firmly. Use the studs supplied to fix into place. Place a copy of the user instructions on the wall near to the changing bench, where it can easily be read – ensure anyone that will be using the bench is trained and familiar with correct usage.
Open the catalog to page 12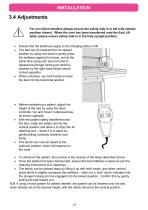
3.4 Adjustments For non-hoist transfers always ensure the safety side is in the fully stowed position (down). When the user has been transferred onto the Easi Lift table, please ensure safety side is in the fully upright position. • • Ensure that the electrical supply to the changing table is ON The bed can be lowered from its stowed position by using one hand to gently press the mattress against the frame, and at the same time using your second hand to release the plunger locking pin which is situated by the right hand hinge (shown circled opposite). When unlocked, use both hands to lower the...
Open the catalog to page 13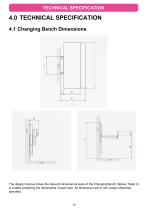
TECHNICAL SPECIFICATION 4.0 TECHNICAL SPECIFICATION 4.1 Changing Bench Dimensions The diagram above shows the relevant dimensional sizes of the Changing Bench. Below (Table 3) is a table containing the dimensions of each size. All dimensions are in mm unless otherwise specified.
Open the catalog to page 14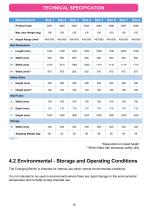
TECHNICAL SPECIFICATION Measurement Product Code *Dependant on install height **When fitted with stowaway safety rails 4.2 Environmental - Storage and Operating Conditions The Changing Bench is intended for internal use within normal environmental conditions. It is not intended to be used in environments where there are rapid changes in the environmental temperature and humidity during intended use.
Open the catalog to page 15All G and S Smirthwaite Ltd. catalogs and technical brochures
 Bath chairs IFU
28 Pages
 Buddy
Buddy12 Pages
 Tables & Desks
40 Pages

- Positioning pillow
- Rectangular table
- Stainless steel table
- Chair with armrests
- Shower chair
- Shower chair with backrest
- Washable pad
- Shower chair on casters
- Chair on castors
- Chair with high backrest
- Commode chair
- Commode shower chair
- Shower chair with footrest
- Warming blanket
- Head positioning pad
- Height-adjustable shower chair
- Commode chair with armrests
- Rectangular desk
- Wedge-shaped pillow
- Commode chair with bucket