
- Catalogs
- GE Healthcare Life Sciences
- Sample preparation for optical microscopy


- Products
- Catalogs
- News & Trends
- Exhibitions
Sample preparation for optical microscopy

Sample preparation for optical microscopy
- Coverslip Thickness: Use coverslips with a thickness of 170 µm (#1.5) to minimize spherical aberration and ensure high-resolution imaging.
- Immersion Oil: Select oils with a refractive index of 1.530 for DeltaVision OMX to correct spherical aberration.
- Sample Placement: Position samples directly on the coverslip to maintain optimal image quality.
- Bacteria: Follow specific protocols for fixation and staining, avoiding excessive pressure during mounting.
- Yeast: Use conventional fixation methods suitable for fluorescence microscopy.
- Mammalian Cells: Employ healthy cell culture techniques and appropriate substrates to maintain cell viability.
- Non-Adherent Cells: Use flow cells or gel matrices to limit cell movement during imaging.
- Tissue Samples: Optimize fixation and embedding based on the imaging modality.
- Structured Illumination Microscopy (SIM): Best for samples under 30 µm thickness; minimize background fluorescence.
- Confocal Microscopy: Suitable for thicker samples; consider clearing agents for improved resolution.
Catalog excerpts

Sample preparation for optical microscopy Intellectual Property Notice: The Biopharma business of GE Healthcare was acquired by Danaher on 31 March 2020 and now operates under the Cytiva™ brand. Certain collateral materials (such as application notes, scientific posters, and white papers) were created prior to the Danaher acquisition and contain various GE owned trademarks and font designs. In order to maintain the familiarity of those materials for long-serving customers and to preserve the integrity of those scientific documents, those GE owned trademarks and font designs remain in place, it being specifically acknowledged by Danaher and the Cytiva business that GE owns such GE trademarks and font designs. cytiva.com GE and the GE Monogram are trademarks of General Electric Company. Other trademarks listed as being owned by General Electric Company contained in materials that pre-date the Danaher acquisition and relate to products within Cytiva’s portfolio are now trademarks of Global Life Sciences Solutions USA LLC or an affiliate doing business as Cytiva. Cytiva and the Drop logo are trademarks of Global Life Sciences IP Holdco LLC or an affiliate. All other third-party trademarks are the property of their respective owners. © 2020 Cytiva All goods and services are sold subject to the terms and conditions of sale of the supplying company operating within the Cytiva business. A copy of those terms and conditions is available on request. Contact your local Cytiva representative for the most current information. For local office contact information, visit cytiva.com/contact
Open the catalog to page 1
Sample preparation for optical microscopy Multiple processing steps are required to prepare biological samples for fluorescence microscopy. Implementation of best practices at each step during sample preparation is essential to ensure high quality images are acquired. This document covers the key concepts and considerations regarding sample preparation to enable empowered choices in experimental design when preparing samples for imaging on DeltaVision™ Ultra or DeltaVision OMX. Read on for more information regarding: • • • • • General sample preparation Mammalian cell culture Non-mammalian sample...
Open the catalog to page 2
Coverslips are available in a range of thicknesses from #0.0 (~ 100 μm) to #4.0 (~ 500 μm). The correct coverslips for highresolution microscopy are #1.5. Use only coverslips, 35 mm dishes, multiwell plates, or multiwell chambered coverslips with a thickness of 170 μm. See Table 1 for a list of recommended coverslips and other imaging chambers. Do not use #1.0 coverslips (150 μm) for high-resolution imaging. For super-resolution imaging on DeltaVision OMX, choose high precision #1.5 coverslips that are more tightly toleranced (170 µm +/- 5 µm) than normal coverslips. Table 1. Recommended coverslips...
Open the catalog to page 3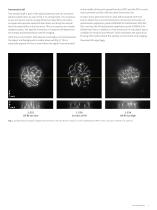
Immersion oil The sample itself is part of the optical pathway and can introduce spherical aberration as seen in Fig 1. To compensate, it is necessary to use immersion oils of varying refractive index (RI) to introduce an equal and opposite spherical aberration and bring the sample back into optimal focus and contrast. This is in essence very simple adaptive optics. The specific immersion oil required will depend on the sample and temperature used for imaging. With the correct oil RI (1.530), less blur and higher contrast between the object and background is readily observed (Fig 1). This is...
Open the catalog to page 4
Sample placement Place samples on the coverslip as shown in Figure 2. Fig 2. Place samples on the coverslip, not the slide. Why is it so important to place the sample on the coverslip? • Image quality is best closest to the coverslip. • The distance between the coverslip and sample is an important factor when determining optimal oil RI. With the sample placed on the slide, this distance will vary across the coverslip, making oil optimization much more challenging. • Placement on the coverslip enables direct imaging of the sample, rather than imaging the sample through variable amounts of mounting/imaging...
Open the catalog to page 5
For preparation of yeast samples, see the following references: • Consider using a shallow flow cell or microfluidic chamber where cells are loaded to keep them within a restricted height for imaging. 1. Atkin, A.L. Preparation of yeast cells for confocal microscopy. Methods Mol. Biol. 122, 131–139 (1999). https://www.ncbi.nlm. nih.gov/pubmed/10231788. • Consider using a gel matrix substrate to restrict cell motility during observation. 2. Pemberton, L. et al. Preparation of yeast cells for live-cell imaging and indirect immunofluorescence. Methods Mol. Biol. 1205, 79–90 (2014). doi: 10.1007/978-1-4939-1363-3_6....
Open the catalog to page 6
Fixed or live sample staining and mounting Table 3. Recommended reagents for imaging with a DeltaVision OMX SR/Flex microscope Selecting imaging reagents DeltaVision OMX SR/Flex Laser Lines Common fluorophores, fluorescent proteins, and stains GFP, mNeonGreen, EmGFP, Alexa Fluor 488, ATTO-488, CellMask™ Green, LysoTrackerTM Green, MitoTracker™ Green FM, ER-Tracker™ Green mRuby3, mApple, tdTomato, TMR, Alexa Fluor 568, MitoTracker Red, ER-Tracker Red, LysoTracker Red Cy5, Alexa Fluor 647*, TO-PRO-3, SiR, CellMask Deep Red, MitoTracker Deep Red FM, LysoTracker Deep Red Selecting bright and stable...
Open the catalog to page 7
• Consider which detergents may be best suited for permeabilizing cells. Different detergents have different modes of action. Some may create holes in the plasma and interior membranes. Some detergents will create permanent holes in the cells whilst other detergents will create openings that will reseal when the detergent is withdrawn. Test which reagents will be best suited for the sample. • Test blocking buffers to prevent non-specific binding of antibodies. • Perform antibody titrations to obtain the best staining concentration, and explore the literature for what is known to work well for...
Open the catalog to page 8All GE Healthcare Life Sciences catalogs and technical brochures
 ImageQuant TL 8.1
2 Pages
 Biacore T200
9 Pages
 Xcellerex XDUO Quad
4 Pages
 ÄKTA pilot 600
5 Pages
 Cytell™ Cell Imaging System
8 Pages


Archived catalogs
 Watman Syringe Filter Collection
26 Pages
 ÄKTA pure data file
12 Pages
 ÄKTAprocess
4 Pages
 ÄKTApurifier
12 Pages
 ÄKTAmicro
8 Pages
 ImageQuant LAS 500 data file
8 Pages
 Ultrospec 9000/9000PC
2 Pages
 Ultrospec 8000/8000PC
2 Pages
 Ultrospec 7000/7000PC
2 Pages
 WAVE Bioreactor 200 System
4 Pages
 The full imaging spectrum
32 Pages
 Typhoon Multislide Tray
2 Pages
 IN CELL ANALYZER 2200
12 Pages
 DeltaVision OMX
8 Pages
 Amersham Imager 600
8 Pages
 ImageMaster 2D Platinum
4 Pages
 SimpliNano spectrophotometer
4 Pages
 Xuri™. Believe in better futures
20 Pages
 ÄKTA avant
12 Pages


- Solvent reagent
- Molecular biology reagent
- Analysis software
- Protein reagent
- Histology reagent
- Dye reagent kit
- Cytology reagent
- Sterile needle
- Buffer solution reagent
- Control software
- Medium reagent
- PCR reagent
- Bacteria reagent
- Virus reagent
- Serum reagent
- Reagent for nucleic acids
- Automated software
- DNA extraction reagent
- Laboratory filter