way
1 /88Pages

way
1 /88Pages
Catalog excerpts

1 0 Preparation of the implant site 1 8 Tightening of the cover screw 46 Prosthetic components way Mix and way Extra 56 Prosthetic components way Slim 63 Prosthetic components way Rock e way Short 86 Warnings and sales conditions
Open the catalog to page 3
Material Stainless steel Aluminium Tungsten carbide Cobalt chrome Ethylene vinyl acetate Gold alloy Handling instruments (•) microesam Polyetheretherketone Polyamide Polyphenyisulphone Polymethylmethacrylate Polyoxymethylene Polyphenylene sulfide Restorative components H) non rotating yX rotating Abbreviations H height 0 diameter L length p. platform The measurements shown in the catalog are expressed in mm. The images shown are exclusively representative of the products. Polytetrafluoroethylene Polypropylene Polyurethane Silicone Titanium
Open the catalog to page 5
Way is an implant system designed by Geass to answer all the professionals' needs, uniting surgical and restorative simplicity and freedom: five types of implant, specific for every kind of rehabilitation, connected by the same surgical protocol. Way guarantees elevated levels of safety in all phases of the implant-restoration treatment, as each component is produced respecting the highest quality standards to ensure precision and functionality. Synthegra offers extraordinary results because it has an extremely smooth nature, able to obstacle bacterial adhesion, which at the same time acts like...
Open the catalog to page 6
The implant which acts on the key factors of the esthetic result: maintenance of bone levels, effective conditioning of the soft tissues, creation of an esthetically guided restoration. way Extra (P.44> Designed for the rehabilitation of post-extractive sites with contemporaneous placement of the implant: extra aggressive, extra stable. way Slim <P 56) The implant with 3 mm diameter, designed for reduced anatomical spaces such as the inferior incisors and the upper laterals, not treatable with traditional diameters. way Rock (P. eo> The transmucous implant for the management of the specifics...
Open the catalog to page 7
The packaging of the implants is characterized by: - blister in PETG and Tyvek® to guarantee sterility; - informative label placed on the back of the blister - sealing sticker which, as well as guaranteeing that the packaging is not damaged, has a color code for the diameter and length of the implant. Product description_ with size references Conformity of medical devices with the 93/42/CEE Directive ~ and subsequent amendments Catalog guide - ' Batch code Do not resterilize The implants are sterilized with ionizing radiation according to the protocol validated based on current regulations. All...
Open the catalog to page 8
Prosthetic components unique connection T T small large profile profile Prosthetic components Prosthetic components
Open the catalog to page 9
The modalities and instruments for the preparation of the implant site are the same for all of the way lines and only depend on the diameter of the implant and the type of bone*. Dense cortical bone which requires further widening of the site for some implant lengths. After the standard sequence, the surgical protocol requires the use of a final drill of the same diameter of the implant but shorter, to be sunk until the definitive depth. Dense/porous cortical bone, with a tight trabecular structure, or thin and porous cortical bone, with a sparse trabecular structure. Practically non-existent...
Open the catalog to page 10
surgical protocol implant length In case of compact bone, after the standard sequence, widen the hole with a final drill 3.4 of inferior length (see table), sinking it up to the final depth of the site. In case of bone D4, after the twist drill 2.1 the last step foresees to use the final drill 3.4 L. 9 mm, whatever the implant length is.
Open the catalog to page 11
surgical protocol In case of compact bone, after the standard sequence, widen the hole with a final drill 3.8 of inferior length (see table), sinking it up to the final depth of the site. For implants L. 5 and 6.5 mm, insert the implant for some threads; when the bone compression is too high, proceed with tapping with the implant itself, unscrewing it for a few turns and then screwing it again. Proceed with this movement until reaching the desired depth. In case of bone D4, after the twist drill 2.5 the last step foresees the use of the final drill 3.8 L. 8 mm, whatever the implant length is
Open the catalog to page 12
surgical protocol implant length In case of compact bone, after the standard sequence, widen the hole with a final drill 3.4 of inferior length (see table), sinking it up to the final depth of the site. In case of bone D4, after the twist drill 2.1 the last step foresees to use the final drill 3.4 L. 9 mm, whatever the implant length is.
Open the catalog to page 13
surgical protocol ► Surgical sequence 0 5.5 way Short Di bone in case of compact bone insert the implant for some threads; when the bone compression is too high, proceed with tapping with the implant itself, unscrewing for a few turns and then screwing it again. Continue with this movement until the desired depth.
Open the catalog to page 14
► Touch&go The touch&go functional solution is an innovative system which allows for the removal of the implant in a rapid and sure fashion without compromising its sterility. Its special ergonomics allows you to block the implant in place, facilitating coupling between the implant seat and the insert. Before opening the implant packaging, check on the label on its back that the diameter and length measurements of the implant are suitable to the intervention. Opening of the blister must be carried out according to the clinician's own procedure to maintain sterility. Keep touch&go in a vertical...
Open the catalog to page 15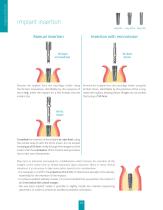
surgical protocol Implant insertion way Mix way Extra way Slim Manual insertion Insertion with micromotor ? W-Start scrrewdriver Remove the implant from the touch&go holder using the W-Start screwdriver, identifiable by the presence of the o-ring. Insert the implant for a few threads into the implant site. Remove the implant from the touch&go holder using the W-Start driver, identifiable by the presence of the o-ring. Insert the implant, keeping below 15 rpm; do not exceed the torque of 50 Ncm. Complete the insertion of the implant at crest level, using the ratchet wrench with the W-Fix insert,...
Open the catalog to page 16All GEASS S.r.l. catalogs and technical brochures
 omny classics
52 Pages
 omny Simply, everything
8 Pages
 way venezia
8 Pages
 way milano
8 Pages
 way product catalogue 2017
88 Pages
 mny catalogue 2018
60 Pages
 way short 2018
4 Pages
 way slim
4 Pages
- Implant abutment
- Titanium implant abutment
- Straight implant abutment
- Dental implant
- Titanium dental implant
- Internal implant abutment
- Angled implant abutment
- Straight dental implant
- Screw implant abutment
- Dental implant analog
- Internal dental implant
- Cylindrical dental implant
- Straight dental implant analog
- External implant abutment
- Hexagonal dental implant
- Healing abutment
- Multi-unit implant abutment
- Impression coping
- Dental screwdriver
- Internal hexagon dental implant