- Catalogs
- Groupe HumanWare
- Connect 12
Connect 12
1 /84Pages
Connect 12
1 /84Pages
Catalog excerpts
Table of Contents Chapter 1: Introduction 3 Chapter 2: Getting to know your Prodigi 4 Box Contents 4 Prodigi Connect at a Glance 5 Setting up 12 Chapter 3: Using Prodigi 15 The Button Banner 15 Magnifying 16 Capturing 19 Full Page Capture 20 Multi-Capture 21 Reading 22 Handwriting Tool 27 Configuring and using the Rapid Toggle Feature 30 Activate the Blue Light Filter 31 Using the Carousel Menu 33 Downloading Books 33 Using the Applications Access 36 Using the Quick Access 37 Using the Calculator 38 Graphic Calculator Powered by Desmos 39 Viewing Saved Documents 40 The Gallery’s Settings Menu...
Open the catalog to page 3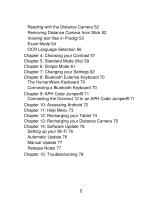
Reading with the Distance Camera 52 Removing Distance Camera from Stick 52 Viewing text files in Prodigi 53 Exam Mode 54 OCR Language Selection 56 Chapter 4: Choosing your Contrast 57 Chapter 5: Standard Mode (tile) 59 Chapter 6: Simple Mode 61 Chapter 7: Changing your Settings 62 Chapter 8: Bluetooth External Keyboard 70 The HumanWare Keyboard 70 Connecting a Bluetooth Keyboard 70 Chapter 9: APH Code Jumper® 71 Connecting the Connect 12 to an APH Code Jumper® 71 Chapter 10: Accessing Android 72 Chapter 11: Help Menu 73 Chapter 12: Recharging your Tablet 74 Chapter 13: Recharging your Distance...
Open the catalog to page 4
CHAPTER 1: INTRODUCTION Thank you for purchasing Prodigi™ Connect 12, the touchcontrolled personal vision assistant system from HumanWare, global leader in assistive technologies for people who have low vision. Prodigi is a simple, intelligent, portable, and adaptable line of products aimed at restoring and maintaining independence for people living with vision loss. Prodigi Connect is a complete magnification system that will allow you to magnify, read documents, and capture images anywhere you are. Carefully read the operating and safety instructions described in this user guide prior to using...
Open the catalog to page 5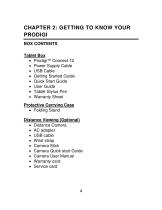
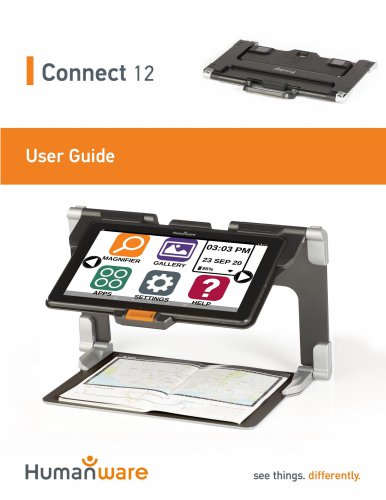
CHAPTER 2: GETTING TO KNOW YOUR PRODIGI BOX CONTENTS Tablet Box • Prodigi™ Connect 12 • Power Supply Cable • USB Cable • Getting Started Guide • Quick Start Guide • User Guide • Tablet Stylus Pen • Warranty Sheet Protective Carrying Case • Folding Stand Distance Viewing (Optional) • Distance Camera • AC adapter • USB cable • Wrist strap • Camera Stick • Camera Quick start Guide • Camera User Manual
Open the catalog to page 6
PRODIGI CONNECT AT A GLANCE Front Face 1. Front-facing camera 2. Micro-SD slot 3. USB-C port 4. Recharge port 5. High-Resolution video micro-port 6. Headphone jack 7. Speakers
Open the catalog to page 7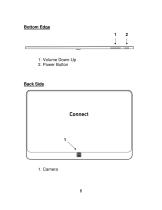
1. Volume Down-Up 2. Power Button Back Side
Open the catalog to page 8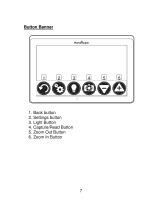
Button Banner 1. Back button 2. Settings button 3. Light Button 4. Capture/Read Button 5. Zoom Out Button 6. Zoom In Button
Open the catalog to page 9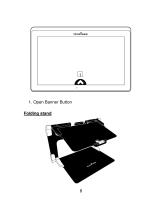
1. Open Banner Button Folding stand
Open the catalog to page 10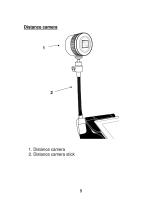
Distance camera 1. Distance camera 2. Distance camera stick
Open the catalog to page 11
Front view 1. Power button 2. Microphones
Open the catalog to page 12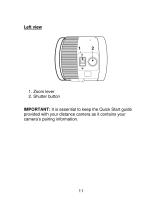
Left view 1. Zoom lever 2. Shutter button IMPORTANT: It is essential to keep the Quick Start guide provided with your distance camera as it contains your camera’s pairing information.
Open the catalog to page 13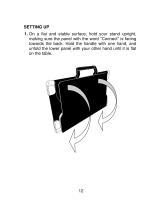
SETTING UP 1. On a flat and stable surface, hold your stand upright, making sure the panel with the word “Connect” is facing towards the back. Hold the handle with one hand, and unfold the lower panel with your other hand until it is flat on the table.
Open the catalog to page 14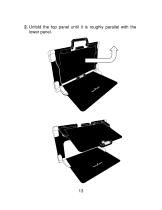
2. Unfold the top panel until it is roughly parallel with the lower panel.
Open the catalog to page 15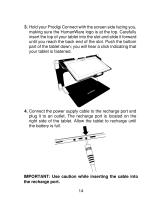
3. Hold your Prodigi Connect with the screen side facing you, making sure the HumanWare logo is at the top. Carefully insert the top of your tablet into the slot and slide it forward until you reach the back end of the slot. Push the bottom part of the tablet down; you will hear a click indicating that your tablet is fastened. 4. Connect the power supply cable to the recharge port and plug it to an outlet. The recharge port is located on the right side of the tablet. Allow the tablet to recharge until the battery is full. IMPORTANT: Use caution while inserting the cable into the recharge port....
Open the catalog to page 16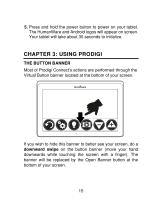
5. Press and hold the power button to power on your tablet. The HumanWare and Android logos will appear on screen. Your tablet will take about 30 seconds to initialize. CHAPTER 3: USING PRODIGI THE BUTTON BANNER Most of Prodigi Connect’s actions are performed through the Virtual Button banner located at the bottom of your screen. If you wish to hide this banner to better see your screen, do a downward swipe on the button banner (move your hand downwards while touching the screen with a finger). The banner will be replaced by the Open Banner button at the bottom of your screen.
Open the catalog to page 17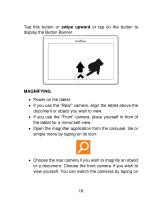
Tap this button or swipe upward or tap on the button to display the Button Banner. MAGNIFYING • Power on the tablet. • If you use the “Rear” camera, align the tablet above the document or object you wish to view. • If you use the “Front” camera, place yourself in front of the tablet for a mirror/self-view. • Open the magnifier application from the carousel, tile or simple menu by taping on its icon: • Choose the rear camera if you wish to magnify an object or a document. Choose the front camera if you wish to view yourself. You can switch the cameras b
Open the catalog to page 18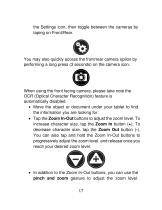
the Settings icon, then toggle between the cameras by taping on Front/Rear. You may also quickly access the front/rear camera option by performing a long press (3 seconds) on the camera icon. When using the front facing camera, please take note the OCR (Optical Character Recognition) feature is automatically disabled. • Move the object or document under your tablet to find the information you are looking for. • Tap the Zoom In-Out buttons to adjust the zoom level. To increase character size, tap the Zoom In button (+). To decrease character size, tap the Zoom Out button (-). You can also tap...
Open the catalog to page 19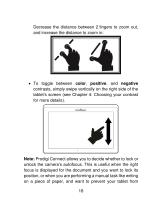
Decrease the distance between 2 fingers to zoom out, and increase the distance to zoom in: • To toggle between color, positive, and negative contrasts, simply swipe vertically on the right side of the tablet’s screen (see Chapter 4: Choosing your contrast for more details). Note: Prodigi Connect allows you to decide whether to lock or unlock the camera’s autofocus. This is useful when the right focus is displayed for the document and you want to lock its position, or when you are performing a manual task like writing on a piece of paper, and want to prevent your tablet from
Open the catalog to page 20Archived catalogs
 EasyConverter
1 Page
 Mantis q40
12 Pages
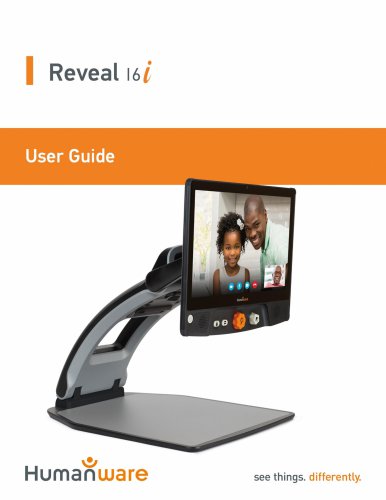 Reveal 16i
64 Pages
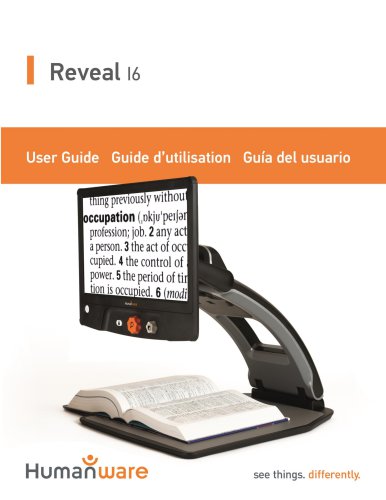 Reveal 16
64 Pages
 Brailliant
17 Pages