- Catalogs
- Groupe HumanWare
- Reveal 16
Reveal 16
1 /64Pages
Reveal 16
1 /64Pages
Catalog excerpts
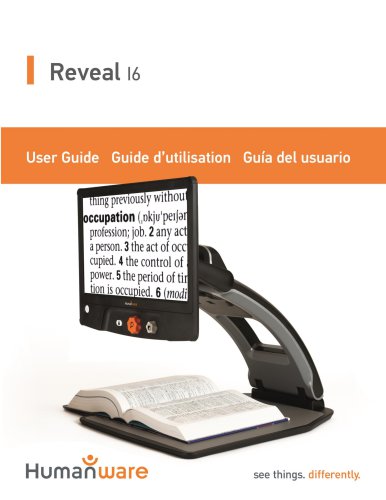
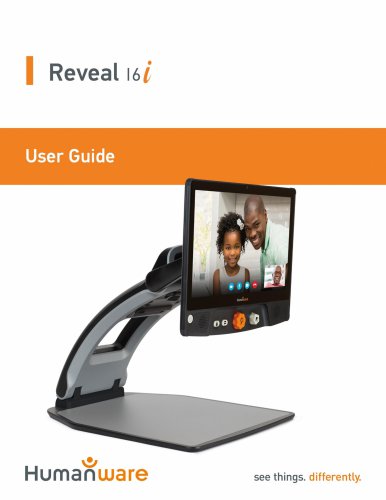
INTRODUCTION Congratulations on purchasing the Reveal 16, the complete foldable and transportable magnification system with the best image quality on the market. With its simple and intuitive interface, you will be back to doing the things you love in no time. Carefully read the operating and safety instructions described in this user guide prior to using your Reveal. If you have any questions about your system, please contact HumanWare Customer Service by consulting the contact information in the back of this user guide. Copyright 2019 by Technologies HumanWare Inc., all rights reserved. No...
Open the catalog to page 4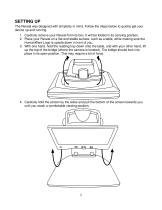
SETTING UP The Reveal was designed with simplicity in mind. Follow the steps below to quickly get your device up and running. 1. Carefully remove your Reveal from its box. It will be folded in its carrying position. 2. Place your Reveal on a flat and stable surface, such as a table, while making sure the HumanWare Logo is upside down in front of you. 3. With one hand, hold the reading tray down onto the table, and with your other hand, lift up the top of the bridge (where the camera is located). The bridge should lock into place in its open position. This may require a bit of force. 4. Carefully...
Open the catalog to page 5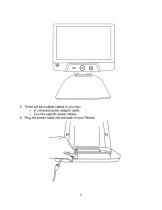
5. There will be multiple cables in your box o A universal power adapter cable o Country-specific power cables 6. Plug the power cable into the back of your Reveal.
Open the catalog to page 6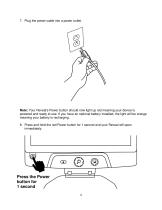
7. Plug the power cable into a power outlet. Note: Your Reveal's Power button should now light up red meaning your device is powered and ready to use. If you have an optional battery installed, the light will be orange meaning your battery is recharging. 8. Press and hold the red Power button for 1 second and your Reveal will open immediately. Press the Power button for 1 second 4
Open the catalog to page 7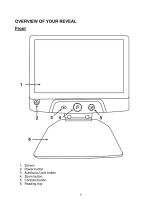
OVERVIEW OF YOUR REVEAL Front Screen Power button Autofocus Lock button Zoom button Contrast button Reading tray
Open the catalog to page 8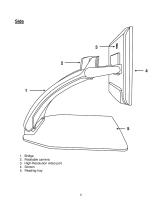
Bridge Rotatable camera High-Resolution video port Screen Reading tray
Open the catalog to page 9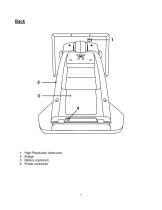
High-Resolution video port Bridge Battery (optional) Power connector
Open the catalog to page 10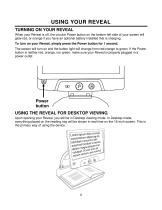
USING YOUR REVEAL TURNING ON YOUR REVEAL When your Reveal is off, the circular Power button on the bottom-left side of your screen will glow red, or orange if you have an optional battery installed that is charging. To turn on your Reveal, simply press the Power button for 1 second. The screen will turn on and the button light will change from red/orange to green. If the Power button is neither red, orange, nor green, make sure your Reveal is properly plugged in a power outlet. Power button USING THE REVEAL FOR DESKTOP VIEWING Upon opening your Reveal, you will be in Desktop viewing mode. In...
Open the catalog to page 11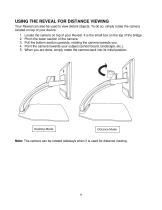
USING THE REVEAL FOR DISTANCE VIEWING Your Reveal can also be used to view distant objects. To do so, simply rotate the camera located on top of your device. 1. 2. 3. 4. 5. Locate the camera on top of your Reveal. It is the small box on the top of the bridge. Pinch the lower section of the camera. Pull the bottom section upwards, rotating the camera towards you. Point the camera towards your subject (school board, landscape, etc.). When you are done, simply rotate the camera back into its initial position. Desktop Mode Distance Mode Note: The camera can be rotated sideways when it is used for...
Open the catalog to page 12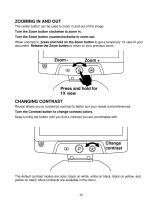
ZOOMING IN AND OUT The center button can be used to zoom in and out of the image. Turn the Zoom button clockwise to zoom in. Turn the Zoom button counterclockwise to zoom out. When zoomed in, press and hold on the Zoom button to get a temporary 1X view of your document. Release the Zoom button to return to your previous zoom. Press and hold for 1X view CHANGING CONTRAST Reveal allows you to customize contrast to better suit your needs and preferences. Turn the Contrast button to change contrast colors. Keep turning the button until you find a contrast you are comfortable with. Change contrast...
Open the catalog to page 13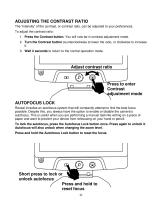
ADJUSTING THE CONTRAST RATIO The “intensity” of the contrast, or contrast ratio, can be adjusted to your preferences. To adjust the contrast ratio: 1. Press the Contrast button. You will now be in contrast adjustment mode. 2. Turn the Contrast button counterclockwise to lower the ratio, or clockwise to increase it. 3. Wait 2 seconds to return to the normal operation mode. Adjust contrast ratio Press to enter Contrast adjustment mode AUTOFOCUS LOCK Reveal includes an autofocus system that will constantly attempt to find the best focus possible. Despite this, you always have the option to enable...
Open the catalog to page 14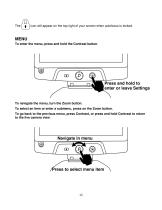
icon will appear on the top right of your screen when autofocus is locked. MENU To enter the menu, press and hold the Contrast button. Press and hold to enter or leave Settings To navigate the menu, turn the Zoom button. To select an item or enter a submenu, press on the Zoom button. To go back to the previous menu, press Contrast, or press and hold Contrast to return to the live camera view. Press to select menu item
Open the catalog to page 15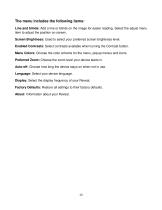
The menu includes the following items: Line and blinds: Add a line or blinds on the image for easier reading. Select the adjust menu item to adjust the position on screen. Screen Brightness: Used to select your preferred screen brightness level. Enabled Contrasts: Select contrasts available when turning the Contrast button. Menu Colors: Choose the color scheme for the menu, popup menus and icons. Preferred Zoom: Choose the zoom level your device starts in. Auto-off: Choose how long the device stays on when not in use. Language: Select your device language. Display: Select the display frequency...
Open the catalog to page 16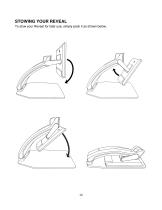
STOWING YOUR REVEAL To stow your Reveal for later use, simply pack it as shown below.
Open the catalog to page 17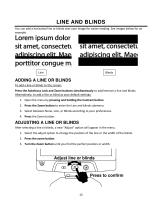
LINE AND BLINDS You can add a horizontal line or blinds over your image for easier reading. See images below for an example. ADDING A LINE OR BLINDS To add a line or blinds to the screen: Press the Autofocus Lock and Zoom buttons simultaneously to add/remove a line and blinds. Alternatively, to add a line or blind as your default settings: 1. Open the menu by pressing and holding the Contrast button. 2. Press the Zoom button to enter the Line and blinds submenu. 3. Select between None, Line, or Blinds according to your preferences. 4. Press the Zoom button. ADJUSTING A LINE OR BLINDS After selecting...
Open the catalog to page 18Archived catalogs
 EasyConverter
1 Page
 Mantis q40
12 Pages
 Reveal 16i
64 Pages
 Brailliant
17 Pages
 Connect 12
84 Pages