

iScan

iScan
This manual provides guidance for the correct and safe usage of the imaging plate scanner from Guilin Woodpecker Medical Instrument Co., Ltd.
- Features: The scanner offers ultra-high image resolution, a high-quality user interface, and a large touch HD display.
- Intended Use: It converts image information from an IP board into digital X-ray dental film for display and editing.
- Model: i-Scan
- Components: Includes the main unit, IP imaging plate, power adapter, protective bag, protection card, and image management software.
- Scope: Designed to scan latent image information to form intraoral dental digital X-ray images.
- Contraindications: Caution is advised for pregnant women and young children.
- Safety Classification: Classified as continuous operation, Class II equipment, not suitable for use with flammable anesthetic mixtures.
- Technical Parameters: Details on power input/output, imaging plate models, contrast threshold, image uniformity, laser specifications, weight, and scanning speed.
- Operation Environment: Suitable for temperatures between 5℃ and 40℃, humidity between 30% and 75%, and pressure between 70kPa and 106kPa.
- Schematic Diagram: Features include IP imaging plate inlet, tray, power switch, USB interface, power socket, and touch screen.
- Accessories Installation: Instructions for installing the power adapter, entrance cover plate, and tray.
- PC Requirements: Requires Windows OS, Intel Core 4 processor, 8GB RAM, 500GB HDD, and specific USB and display requirements.
- Software Installation: Step-by-step guide for software installation and setup.
- WIFI Connection: Instructions for connecting the device to WIFI for image acquisition.
- Preparation: Start the image management software and handle the IP imaging plate with hygiene precautions.
- Image Acquisition: Place the protective bag in the patient's mouth, select the exposure value, and ensure correct positioning.
- Reading and Erasing: Instructions for reading and erasing IP imaging plates.
- Software Operation: Detailed steps for logging in, managing patient data, acquiring and processing images, and generating reports.
Important notes on handling and using the device safely.
Guidelines for addressing common issues with the device.
Instructions for maintaining the device to ensure longevity and performance.
Recommendations for storing and transporting the device safely.
Information on environmentally friendly practices related to the device.
Details on the support and services available post-purchase.
Compliance information regarding electromagnetic interference.
Contact details for the European representative.
Explanation of symbols used in the documentation and on the device.
Official statements regarding the device and its usage.
The document outlines navigation through various software interfaces, including basic settings, clinic management, image processing, and IP settings. Users can select language, manage clinic information, process images in HD or Ultra HD, and configure IP settings.
The software supports automatic upgrades, prompting users with an upgrade option.
Highlights safety precautions, including avoiding use in environments with flammable gases and ensuring proper handling of laser products.
Addresses common faults such as connection timeouts and environmental light intensity issues.
Guidelines for cleaning and maintaining the imaging plate scanner, emphasizing non-abrasive cleaning agents.
Instructions for storing and transporting the device, including keeping it in a cool, dry place.
The device should be disposed of in designated recycling facilities for electronic medical equipment.
Outlines warranty and maintenance responsibilities, emphasizing authorized repairs.
Details on electromagnetic emissions and immunity, including compliance with standards.
Catalog excerpts
Preface Thank you for purchasing the imaging plate scanner produced by Guilin Woodpecker Medical Instrument Co., Ltd. Woodpecker is a high-tech enterprise researching, developing, producing and selling dental products. It owns a sound quality control system. To ensure that you use the equipment correctly and safely, please read the full text of the instruction manual carefully before use. 1 Product introduction Features of this device: a) Ultra-high image resolution can provide doctors with clearer diagnostic images. b) High-quality user interface makes photographing and reading easier. c) Large...
Open the catalog to page 3
1.7 Device safety classification 1.7.1 Type of operation mode: Continuous operation with intermittent loading 1.7.2 Type of protection against electric shock: Class II equipment 1.7.3 Degree of protection against electric shock: No applied part 1.7.4 Degree of protection against harmful ingress of water: Ordinary equipment (IPX0) 1.7.5 Degree of safety application in the presence of a flammable anesthetic mixture with air, oxygen, or nitrous oxide: Equipment cannot be used in the presence of a flammable anesthetic mixture with air, oxygen, or nitrous oxide. 1.8 Primary technical parameters 1.8.1...
Open the catalog to page 4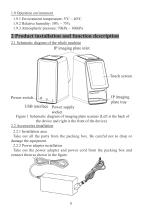
1.9 Operation environment 1.9.1 Environment temperature: 5℃ ~ 40℃ 1.9.2 Relative humidity: 30% ~ 75% 1.9.3 Atmospheric pressure: 70kPa ~ 106kPa 2 Product installation and function description 2.1 Schematic diagram of the whole machine IP imaging plate inlet Touch screen Power switch USB interface Power supply socket IP imaging plate tray Figure 1 Schematic diagram of imaging plate scanner (Left is the back of the device and right is the front of the device) 2.2 Accessories installation 2.2.1 Installation area Take out all the parts from the packing box. Be careful not to drop or damage the equipment....
Open the catalog to page 5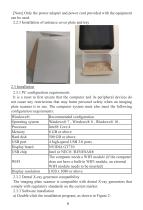
[Note] Only the power adapter and power cord provided with the equipment can be used. 2.2.3 Installation of entrance cover plate and tray 2.3 Installation 2.3.1 PC configuration requirements It is a must to first ensure that the computer and its peripheral devices do not cause any restrictions that may harm personal safety when an imaging plate scanner is in use. The computer system must also meet the following configuration requirements: Windows®: Recommended configuration Operating system Windows® 7 , Windows® 8 , Windows® 10 . Processor Intel® Core 4 Memory 8 GB or above Hard disk 500 GB or...
Open the catalog to page 6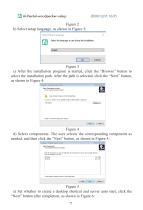
Figure 2 b) Select setup language, as shown in Figure 3: Figure 3 c) After the installation program is started, click the “Browse” button to select the installation path. After the path is selected, click the “Next” button, as shown in Figure 4: Figure 4 d) Select components. The user selects the corresponding component as needed, and then click the “Next” button, as shown in Figure 5: Figure 5 e) Set whether to create a desktop shortcut and server auto start, click the “Next” button after completion, as shown in
Open the catalog to page 7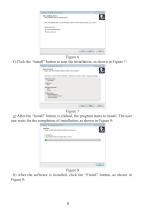
Figure 6 f) Click the “Install” button to start the installation, as shown in Figure 7: Figure 7 g) After the “Install” button is clicked, the program starts to install. The user just waits for the completion of installation, as shown in Figure 8: Figure 8 h) After the software is installed, click the “Finish” button, as shown in Fig
Open the catalog to page 8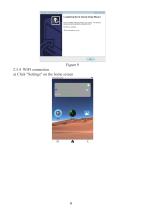
Figure 9 2.3.4 WIFI connection a) Click "Settings" on the home screen
Open the catalog to page 9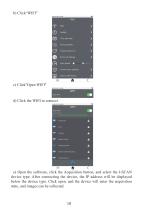
d) Click the WIFI to connect e) Open the software, click the Acquisition button, and select the I-SCAN device type. After connecting the device, the IP address will be displayed below the device type. Click open, and the device will enter the acquisition state, and images can be collected.
Open the catalog to page 10
3 Operation instructions 3.1 Preparation before X-ray photographing 3.1.1 Start the image management software on the image workstation and create a new patient file or open an existing patient file. 3.1.2 Take out the IP imaging plate of the required size from the storage box. Note: Natural X-rays and/or X-rays scattered by the X-ray generator may cause the imaging phosphor to be exposed before normal use. Warning: There is a risk of cross infection. Make sure that you always pay attention to take necessary hygiene precautions when handling the IP imaging plate, protection card and the disposable...
Open the catalog to page 11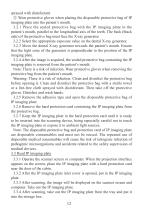
sprayed with disinfectant. ② Wear protective gloves when placing the disposable protective bag of IP imaging plate into the patient’s mouth. 3.2.1 Place the sealed protective bag with the IP imaging plate in the patient’s mouth, parallel to the longitudinal axis of the teeth. The back (black side) of the protective bag must face the X-ray generator. 3.2.2 Select the appropriate exposure value on the dental X-ray generator. 3.2.3 Move the dental X-ray generator towards the patient’s mouth. Ensure that the light cone of the generator is perpendicular to the position of the IP imaging plate. 3.2.4...
Open the catalog to page 12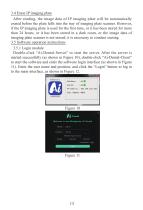
3.4 Erase IP imaging plate After reading, the image data of IP imaging plate will be automatically erased before the plate falls into the tray of imaging plate scanner. However, if the IP imaging plate is used for the first time, or it has been stored for more than 24 hours, or it has been stored in a dark room, or the image data of imaging plate scanner is not erased, it is necessary to conduct erasing. 3.5 Software operation instructions 3.5.1 Login module Double-click “Ai-Dental-Server” to start the server. After the server is started successfully (as shown in Figure 10), double-click “Ai-Dental-Client”...
Open the catalog to page 13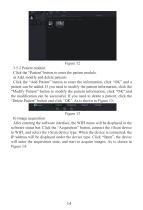
Figure 12 3.5.2 Patient module Click the “Patient” button to enter the patient module. a) Add, modify and delete patients Click the “Add Patient” button to enter the information, click “OK” and a patient can be added. If you need to modify the patient information, click the “Modify Patient” button to modify the patient information, click “OK” and the modification can be successful. If you need to delete a patient, click the “Delete Patient” button and click “OK”. As is shown in Figure 13: Figure 13 b) Image acquisition After entering the software interface, the WIFI name will be displayed in...
Open the catalog to page 14All Guilin Woodpecker Medical Instrument Co., Ltd. catalogs and technical brochures
 CATALOGUE
56 Pages
 UDS-B
UDS-B19 Pages
 UDS-A
UDS-A26 Pages
 dental instrument catalogue
8 Pages

- Dental material
- Diode laser
- Tabletop laser
- Flat panel detector
- Drill
- Micromotor
- Class 4 laser
- Dental scaler
- Surgical laser
- Turbine
- Electric micromotor
- Air turbine
- Dental turbine
- Curing light
- Dental micromotor
- Orthodontic material
- Dental office curing light
- Dental handpiece
- Ultrasonic dental scaler
- Powder dental material