Basis-Design-and-Planning-Guide

Basis-Design-and-Planning-Guide
The Basis® Headwall System is a versatile headwall solution for hospital patient rooms, designed to support essential clinical functions from ICU to Med-Surg. It offers a clean, linear look and simplifies installation.
- Offers extensive design and styling options, including high-pressure laminates and wood caps.
- Organizes clinical functions ergonomically to reduce staff movement.
- Pre-plumbed and pre-wired for easy installation.
- Supports gas, power, data, and communication needs.
The system can be configured based on service and device loading, with three installation options: On-Wall, In-Wall, and Double-Sided. Each has specific spacing and alignment requirements.
- Available in various laminate finishes and wood caps for On-Wall configurations.
- Customizable styles based on volume and compliance with building codes.
- On-Wall: Secure to hanger brackets and make electrical connections.
- In-Wall: Construct openings and secure to studs before drywall.
- Double-Sided: Similar to In-Wall with additional accessory rail trim.
Supports a range of accessories on horizontal or vertical rails, considering gas and electrical outlet placement.
Complies with ANSI/UL standards for surface burning characteristics and other building material requirements.
The Basis® Headwall System offers functional and aesthetic benefits, with a modular design and ease of installation, making it suitable for modern healthcare facilities.
- ASME: B16.22 for copper fittings.
- ASTM: B819 for copper tubes.
- CGA: G-4.1 and V-5 for gas systems.
- NFPA: 70 and 99 for electrical and healthcare facilities.
- NEMA: Compliance for electrical manufacturers.
- UL: 94 and 1047 for flammability and power systems.
- UL listed by Underwriters Laboratory Inc.
- Copper vacuum tubes meet ASTM B819.
- Sockets are UL-listed, NEMA style, hospital grade.
- Gas systems comply with NFPA 99.
- Gas outlets conform to CGA V-5.
- Meets UL fire performance requirements and complies with NFPA 70 and 99.
- Hill-Rom reserves the right to change design, specifications, and models without notice. Warranty is provided as per the express written warranty on sale or rental.
- Website: www.hill-rom.com
- USA: 800-445-3730
- Canada: 800-267-2337
Catalog excerpts

Basis® Headwall Healing Environment Design and Planning Guide patients and their caregivers:
Open the catalog to page 1
Table of Contents ++ At a Glance / 2 ++ Configuring the Basis Headwall / 3 ++ Basis Headwall System Architecture / 4 ++ Basis Horizontal Units / 5 ++ Basis Vertical Units / 6 ++ Single and Double Configurations / 7 ++ On-Wall Ceiling Interface / 8 ++ Basis On-Wall Installation Guide / 9 ++ Basis In-Wall Installation Guide / 10 ++ Double-Sided Unit Wall Interface / 11 ++ Nurse Call Placement Options / 12 ++ Equipping the Basis Headwall / 13 ++ Design Options – Laminates and Reveals / 16 ++ Design Options – Horizontal On-Wall Wood Caps / 17 ++ Hill-Rom’s Online Toolbox / 18 ++ Codes and Standard...
Open the catalog to page 2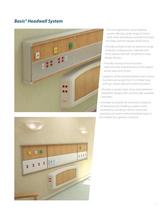
Basis® Headwall System • he next generation value headwall T system offering a wide range of clinical utility while providing an architectural style for today and the hospital of the future. • rovides architects with an extensive range P of design configurations, materials and finish options that will compliment many design themes. • rovides nursing clinical functions P ergonomically organized around the patient saving steps and motion. • upports all the essential patient room clinical S functions and acuity from ICU to Med-Surg with gas, power, data and communications. • Provides a simple, clean,...
Open the catalog to page 3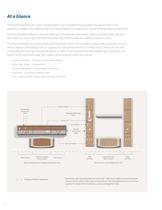
At a Glance The Basis® headwall is the value hospital patient room headwall that provides hospital architects and designers a platform that offers design and styling options to create a less clinical-looking hospital experience. The Basis headwall offers an extensive selection of finishes and decorative options including high pressure laminates and wood caps (On-Wall horizontal only). Panel reveals are available in black or silver. The Basis headwall is a versatile panel and framework system. This provides nursing with a complete array of service options and loading that can support any care...
Open the catalog to page 4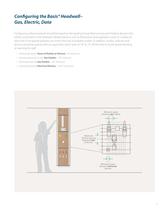
Configuring the Basis® Headwall– Gas, Electric, Data Configuring a Basis headwall should be based on the loading of specified services and medical devices that will be connected to the headwall. Medical devices such as flowmeters and regulators come in a variety of sizes that if not spaced properly can restrict the use of available outlets. In addition, outlets, switches and devices should be placed with an ergonomic reach zone of 18" to 72" off the floor to avoid severe bending or reaching for staff. • Vertical spacing for Rows of Outlets or Devices – 6" minimum • Vertical spacing for in-line...
Open the catalog to page 5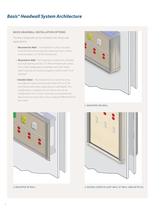
Basis® Headwall System Architecture Basis headwall installation options The Basis headwall can be installed with three wall applications: 1. Mounted On-Wall – the headwall is surface mounted to the finished wall serving that respective room. Surface mounted depth is 5" off the finished wall. 2. Mounted In-Wall – the headwall is installed into a framed stud wall opening and sits .75" off the finished wall surface. The In-Wall configuration is available with 3.625" frame depth only, but can function properly in both a 3.625" or 6" stud wall. 3. Double-Sided – the headwall has two sides that serve...
Open the catalog to page 6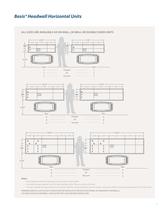
Basis® Headwall Horizontal Units All sizes are available as On-Wall, In-Wall or Double-Sided Units 60.00" 18.00" Notes: • Electrical/Data outlets have separate service panels from gas outlets. • Gas outlets occupy separate rows from electrical/data outlets. They cannot be combined. • The Basis headwall can support all electrical capacity needs for normal, emergency and low voltage. Consult your Hill-Rom architectural specialist for more information. WARNING: MEDICAL GAS OUTLETS SHOULD NOT BE INSTALLED IN CENTER ACCESS PANEL IN HORIZONTAL HEADWALLS. CAUTION: GASES ON HEADWALL SHOULD NOT BE PLACED...
Open the catalog to page 7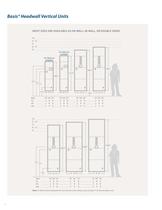
Basis® Headwall Vertical Units MOST SIZES ARE AVAILABLE AS ON-WALL, IN-WALL, OR DOUBLE-SIDED Note: In-Wall vertical headwalls do not extend to the ceiling. Leave at least 6" of drywall above unit.
Open the catalog to page 8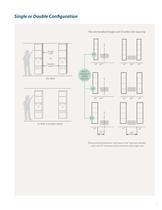
Single or Double Configuration Recommended Single and Double Unit Spacing Single Unit Basis® Headwall Width Options *Recommended Bariatric bed space is 66" between double units and 33" between bed centerline and single unit.
Open the catalog to page 9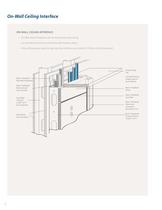
On-Wall Ceiling Interface On-Wall Ceiling Interface • On-Wall vertical headwall units terminate at the drop ceiling. • Gas and electrical services extend through the drop ceiling. • Drop ceiling requires pass through opening (reference your projects “Hill-Rom As Built Drawings”). Drop Ceiling Tile Basis® Headwall Wall Mount Bracket Finished Ceiling Height (spec’d by architect) Basis® Headwall Electrical and Gas Conduits Basis® Headwall Panel Stud Wall Channel (3.625" or 6" by contractor) Sheet Rock (by contractor) Basis® Headwall Gap Filler Basis® Headwall Aluminum Accessory Extrusion/ Trim Basis®...
Open the catalog to page 10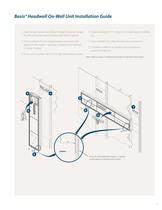
Basis® Headwall On-Wall Unit Installation Guide 1. Install Hanger brackets per Hill-Rom As-Built Drawings. Hanger brackets should be bolted to backer plate behind drywall. 4. Install manifolds. On 16" vertical units, install hoses to manifold first. 2. Hang headwall unit onto hanger brackets ensuring proper alignment with rough-in openings. If required, bolt headwall to hanger brackets. 5. Braze manifold risers. Make final electrical connections. 6. Complete installation by installing service panel and surrounding gap trim. 3. Secure unit to bottom brackets through wall into backer plate. Note:...
Open the catalog to page 11
Basis® Headwall In-Wall Unit Installation Guide 1. Construct headwall openings according to the Hill-Rom As-Built Drawings. Cut out pass through opening in top header for gas pipe and electrical conduit clearance. 4. Install manifolds. On 16" vertical units, install hoses to manifold first. 2. Insert headwall unit into opening ensuring proper alignment with studs. 6. Complete installation by installing service panel and surrounding gap trim. 5. Braze manifold risers. Make final electrical connections. Note: Basis In-Wall units must be installed BEFORE DRYWALL! 3. Secure unit to studs at mounting...
Open the catalog to page 12All Hill-Rom catalogs and technical brochures
 Excel Care® Bariatric Bed
8 Pages
 Catoni Collection - Select
2 Pages

Archived catalogs
 Free Stand Rail System
10 Pages
 Hill-Rom® Bariatric Solutions
12 Pages
 FreeSpan Straight Rail
2 Pages
 Stretcher Portfolio Brochure
7 Pages
 Centrella® Smart+ Bed
11 Pages
 Sabina® II Mobile Lift
12 Pages
 Compella™ Bariatric Bed
9 Pages
 The Vest™ Model 205
8 Pages
 Liko® M220/M230
2 Pages
 MetaNeb ® System
2 Pages
 TotalCare® Bariatric Plus
8 Pages
 Slingbar Mini 220
2 Pages
 Progressa® bed system
9 Pages
 VersaCare® Med Surg Bed
8 Pages
 Liko ™ M220 and M230
2 Pages
 AccuMax Quantum™
8 Pages
 bariatric_family_brochure
12 Pages
 advanta_2_brochure
8 Pages
 careassist_brochure
5 Pages
 progressa bed
9 Pages
 NaviCare® Nurse Call
4 Pages
 Basis® Headwall System
4 Pages
 Liko® Patient Handling Solutions
24 Pages
 Advanta TM 2 Bed
8 Pages
 CareAssist ® ES Bed
8 Pages
 Hill-Rom ® 100 Low Bed
8 Pages
 TotalCare-Bed-Family-Brochure
12 Pages
 P500-Therapy-Mattress
2 Pages
 Gallery TM Wall
2 Pages
 Integris® Light Solutions
4 Pages
 Latitude® Arm System
2 Pages
 Medical Headboard
2 Pages
 Prima® Xtend® Ceiling Arm
2 Pages
 Clinitron® Rite Hite®
2 Pages
 Liko-M220-M230-Mobile-Lift
4 Pages
 Golvo_Lift
4 Pages
 Golvo_Lift 8000
2 Pages
 Affinity ® 4 Birthing Bed
8 Pages
 Excel Care® ES Bariatric Bed
2 Pages
 Clinitron® II
4 Pages
 Envision® E700
8 Pages
 V-Cue® Dynamic Air Therapy®
6 Pages
 VersaCare A.I.R.™ Surface
12 Pages
 Electric Stretcher
2 Pages
 OB/GYN Stretcher
2 Pages
 Barton® I-400 and I-700
2 Pages
 Latitude™ Arm System
4 Pages
 Hill-Rom Visitors Chairs
8 Pages
 VersaCare® TC Bed
8 Pages
 Tri-Flex™ II Bariatric Bed
2 Pages
 TotalCare
8 Pages
 Sabina® II
2 Pages
 Bariatric_Family_Brochure
12 Pages


- Health & Life hospital bed
- Health & Life tilting bed
- Surgical table
- Health & Life stretcher trolley
- Trendelenburg bed
- Health & Life hospital bed mattress
- Health & Life transport stretcher trolley
- Adjustable height operating table
- Reverse Trendelenburg bed
- Medical bed
- Electric operating table
- Foam mattress
- Health & Life height-adjustable stretcher trolley
- Nebuliser
- Monitor support arm
- Health & Life anti-decubitus mattress
- Health & Life patient lift
- Stretcher trolley with adjustable backrest
- 2-section stretcher trolley
- Bedside table with compartments