

Free Stand Rail System

Free Stand Rail System
Catalog excerpts

FreeStand Instruction Guide English 7EN131101 Rev.3 2015-11-02 Product Description FreeStand is a freestanding lift system that is intended for use where there is need for lifting in a specific location, e.g., near a bed or in a hygiene room, etc. Freestanding systems are a good alternative if you need the features of a fixed-installation overhead lift system but do not wish to install permanent fixtures in the walls or ceiling, or if the need for lifting is only temporary. With its simple and safe structural design, the FreeStand lift system is ideal for home-care and other care settings. Since FreeStand requires no wall or ceiling fixtures, it enables great flexibility of placement in the room. The width of the FreeStand rail system depends on the choice of lift rail length. The lift rail (H100) is available in 7 different lengths: from 2.0 m (79 inch.) up to 3.2 m (126 inch.). For a complete lift system, FreeStand is combined with lift rail H100, a lift unit, parking set and other accessories. With the FreeStand lift system, Liko’s stationary lifts Multirall or Likorall are used. FreeStand complies with EN ISO 10535 according to the requirements of directives for medical- technical products, MDD 93/42/EEC. In this document, the person being transferred is referred to as the patient and the person helping them is referred to as the caregiver. Caution triangles are used to warn of situations that demand extra care and attention. IMPORTANT! Read the instructions for both the patient lift and the lifting accessories before use. Lifting and transferring a patient always involves a degree of risk. A complete understanding of the contents of instructions is essential, and only trained personnel should use the equipment. When in doubt, contact Liko.
Open the catalog to page 1
NOTE! This instruction guide contains important information about the use of the product. All personnel who use this product must be thoroughly familiar with the contents of this instruction guide. Remember to keep the instructions where they are easily accessible for users of the product. Safety Instructions Before using the product, make certain that: • FreeStand and the lift unit are assembled according to the instructions. • Lifting devices are properly connected to the lift. • You have read and understood the instruction guides for FreeStand, the lift unit and lifting accessories. • Personnel...
Open the catalog to page 2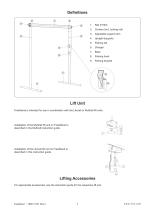
Upright Supports Parking set Charger Parking hook Corners (incl. locking rail) Parking bracket Lift Unit FreeStand is intended for use in combination with the Likorall or Multirall lift units. Installation of the Multirall lift unit on FreeStand is described in the Multirall instruction guide. Installation of the Likorall lift unit on FreeStand is described in this instruction guide. Lifting Accessories For appropriate accessories, see the instruction guide for the respective lift unit.
Open the catalog to page 3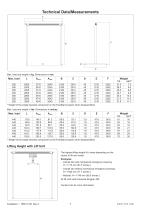
Max. load and weight in kg. Dimensions in mm. * Weight of the single heaviest component on the FreeStand system when disassembled. Max. load and weight in lbs. Dimensions in inches. Lifting Height with Lift Unit The highest lifting height (H) varies depending on the choice of lift unit model. Examples: - Likorall 242 with mechanical emergency lowering: H = 1715 mm (67.5 inches.) - Likorall 242 without mechanical emergency lowering: H = 1820 mm (71.7 inches.) - Multirall: H = 1740 mm (68.5 inches.) All lift units with Universal Slingbar 450. Contact Liko for more information.
Open the catalog to page 4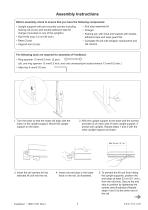
Assembly Instructions Before assembly, check to ensure that you have the following components: • End stop assembly kit • Charger • Parking set, with hook and bracket with double- adhesive tape and wear-guard foil • Complete lift unit with slingbar, handcontrol and rail carriers • Upright supports with pre-mounted corners including l ocking rail (2 pcs) and double-adhesive tape for charger (mounted on one of the uprights) • Rail H100 (max 3.2 m/126 inch.) • Base (2 pcs) • Support arm (2 pcs) The following tools are required for assembly of FreeStand: • Ring spanner 13 mm/0.5 inch. (2 pcs) (alt....
Open the catalog to page 5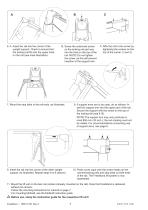
6. A. Insert the rail into the corner of the upright support. Check to ensure that the locking rail fits into the upper track on the rail (see inset illustration). B. crew the outermost screw S on the locking rail part way into the hole on the top of the rail. NOTE! Do not tighten the screw, as this will prevent insertion of the support arm. 7. ount the stop bolts in the rail ends, as illustrated. M C. ffix the rail to the corner by A tightening the screws on the top of the corner (1 and 2). 8. f support arms are to be used, do as follows: InI sert the support arm into the upper part of the rail....
Open the catalog to page 6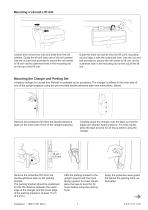
Mounting a Likorall Lift Unit Loosen and remove the nuts and bolts from the rail carriers. Guide the lift unit onto one of the rail carriers. Use the nut and bolt provided to secure the rail carrier to lift unit via the outermost hole in the mounting rail on the top of the lift unit. Guide the other rail carrier onto the lift unit’s mounting rail and align it with the outermost hole. Use the nut and bolt provided to secure the rail carrier to lift unit via the outermost hole in the mounting rail on the top of the lift unit. Mounting the Charger and Parking Set A battery charger for Likorall and...
Open the catalog to page 7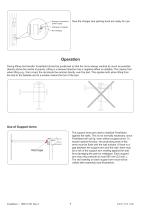
Now the charger and parking hook are ready for use. • Charger connected to power supply • Charging in progress • Not charging Operation During lifting and transfer, FreeStand should be positioned so that the rail is always centred as much as possible directly above the centre of gravity. Lifting in a skewed direction has a negative effect on stability. This means that when lifting e.g., from a bed, the rail should be centred directly over the bed. This applies both when lifting from the bed to the bedside and to a location below the foot of the bed. Use of Support Arms The support arms are used...
Open the catalog to page 8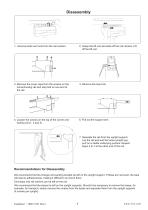
1. Unscrew bolts and nuts from the rail carriers. 2. Grasp the lift unit and slide off the rail carriers. Lift off the lift unit. 3. emove the cover caps from the screws on the R corner/locking rail and stop bolt on one end of the rail. 4. Remove the stop bolt. 5. oosen the screws on the top of the corner and L locking rail (1, 2 and 3). 7. eparate the rail from the upright support. S Lay the rail end and the loose upright support on a stable underlying surface. Repeat steps 3 to 7 at the other end of the rail. Recommendations for Disassembly We recommend that the charger and parking bracket...
Open the catalog to page 9All Hill-Rom catalogs and technical brochures
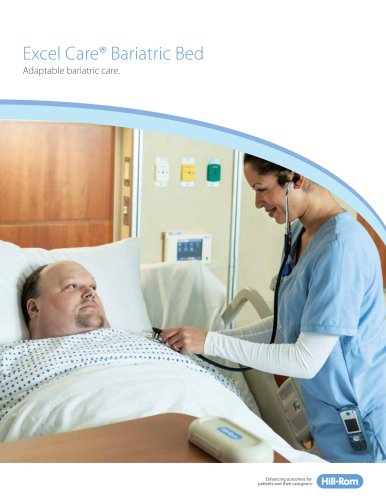 Excel Care® Bariatric Bed
8 Pages
 Catoni Collection - Select
2 Pages

Archived catalogs
 Hill-Rom® Bariatric Solutions
12 Pages
 FreeSpan Straight Rail
2 Pages
 Stretcher Portfolio Brochure
7 Pages
 Centrella® Smart+ Bed
11 Pages
 Sabina® II Mobile Lift
12 Pages
 Compella™ Bariatric Bed
9 Pages
 The Vest™ Model 205
8 Pages
 Liko® M220/M230
2 Pages
 MetaNeb ® System
2 Pages
 TotalCare® Bariatric Plus
8 Pages
 Slingbar Mini 220
2 Pages
 Progressa® bed system
9 Pages
 VersaCare® Med Surg Bed
8 Pages
 Liko ™ M220 and M230
2 Pages
 AccuMax Quantum™
8 Pages
 bariatric_family_brochure
12 Pages
 advanta_2_brochure
8 Pages
 careassist_brochure
5 Pages
 progressa bed
9 Pages
 NaviCare® Nurse Call
4 Pages
 Basis® Headwall System
4 Pages
 Liko® Patient Handling Solutions
24 Pages
 Advanta TM 2 Bed
8 Pages
 CareAssist ® ES Bed
8 Pages
 Hill-Rom ® 100 Low Bed
8 Pages
 TotalCare-Bed-Family-Brochure
12 Pages
 P500-Therapy-Mattress
2 Pages
 Basis-Design-and-Planning-Guide
22 Pages
 Gallery TM Wall
2 Pages
 Integris® Light Solutions
4 Pages
 Latitude® Arm System
2 Pages
 Medical Headboard
2 Pages
 Prima® Xtend® Ceiling Arm
2 Pages
 Clinitron® Rite Hite®
2 Pages
 Liko-M220-M230-Mobile-Lift
4 Pages
 Golvo_Lift
4 Pages
 Golvo_Lift 8000
2 Pages
 Affinity ® 4 Birthing Bed
8 Pages
 Excel Care® ES Bariatric Bed
2 Pages
 Clinitron® II
4 Pages
 Envision® E700
8 Pages
 V-Cue® Dynamic Air Therapy®
6 Pages
 VersaCare A.I.R.™ Surface
12 Pages
 Electric Stretcher
2 Pages
 OB/GYN Stretcher
2 Pages
 Barton® I-400 and I-700
2 Pages
 Latitude™ Arm System
4 Pages
 Hill-Rom Visitors Chairs
8 Pages
 VersaCare® TC Bed
8 Pages
 Tri-Flex™ II Bariatric Bed
2 Pages
 TotalCare
8 Pages
 Sabina® II
2 Pages
 Bariatric_Family_Brochure
12 Pages


- Hill-Rom hospital bed
- Hill-Rom tilting bed
- Hill-Rom stretcher trolley
- Surgical table
- Trendelenburg bed
- Hill-Rom hospital bed mattress
- Hill-Rom transport stretcher trolley
- Reverse Trendelenburg bed
- Adjustable height operating table
- Medical bed
- Monitor support arm
- Electric operating table
- Foam mattress
- Nebuliser
- Hill-Rom height-adjustable stretcher trolley
- Hill-Rom anti-decubitus mattress
- Hill-Rom electric patient lift
- Stretcher trolley with adjustable backrest
- Bedside table with compartments